Jody - "I can tell you the Weather anywhere!"
Get accurate weather information with Jody - available only on Neon AI!
 Neon AISoftware Developers for Conversational AI and Voice User Interfaces
| Content type | Taxonomy terms | Title | Changed | ID | Rendered entity | |||||||||||||||||||||||||||||||||||||||||||||||||||||||||||||||||||||||||||||||||||||||||||||||||
|---|---|---|---|---|---|---|---|---|---|---|---|---|---|---|---|---|---|---|---|---|---|---|---|---|---|---|---|---|---|---|---|---|---|---|---|---|---|---|---|---|---|---|---|---|---|---|---|---|---|---|---|---|---|---|---|---|---|---|---|---|---|---|---|---|---|---|---|---|---|---|---|---|---|---|---|---|---|---|---|---|---|---|---|---|---|---|---|---|---|---|---|---|---|---|---|---|---|---|---|---|---|---|
| Basic page | Jody - "I can tell you the Weather anywhere!" | Tue, 07/05/2022 - 22:30 | 91 | Jody - "I can tell you the Weather anywhere!"Get accurate weather information with Jody - available only on Neon AI!
|
||||||||||||||||||||||||||||||||||||||||||||||||||||||||||||||||||||||||||||||||||||||||||||||||||
| Basic page | Eddie - "I am good at Music and Videos!" | Tue, 07/05/2022 - 22:30 | 90 | Eddie - "I am good at Music and Videos!"Eddie can find your favorite music and videos - available only on Neon AI!
|
||||||||||||||||||||||||||||||||||||||||||||||||||||||||||||||||||||||||||||||||||||||||||||||||||
| Basic page | Neon Utilities | Tue, 07/05/2022 - 23:10 | 68 | Neon Utilitieshttps://gist.github.com/NeonDaniel/c3c13e433a05e3044ca4f67f8c4efc8e |
||||||||||||||||||||||||||||||||||||||||||||||||||||||||||||||||||||||||||||||||||||||||||||||||||
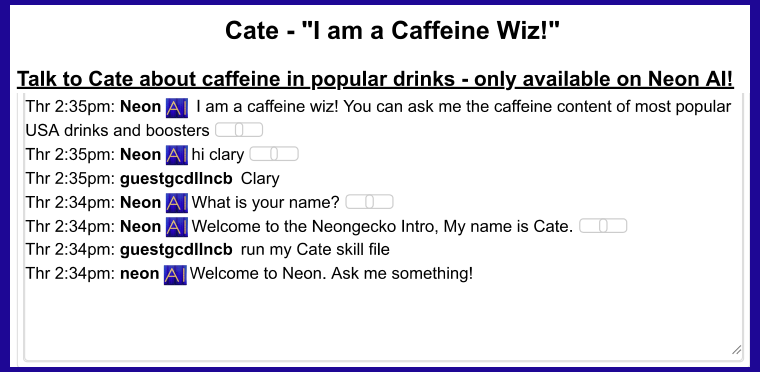
| Basic page | Cate - "I am a Caffeine Wiz!" | Wed, 07/13/2022 - 00:10 | 83 | Cate - "I am a Caffeine Wiz!"Talk to Cate about caffeine in popular drinks - only available on Neon AI!
|
||||||||||||||||||||||||||||||||||||||||||||||||||||||||||||||||||||||||||||||||||||||||||||||||||
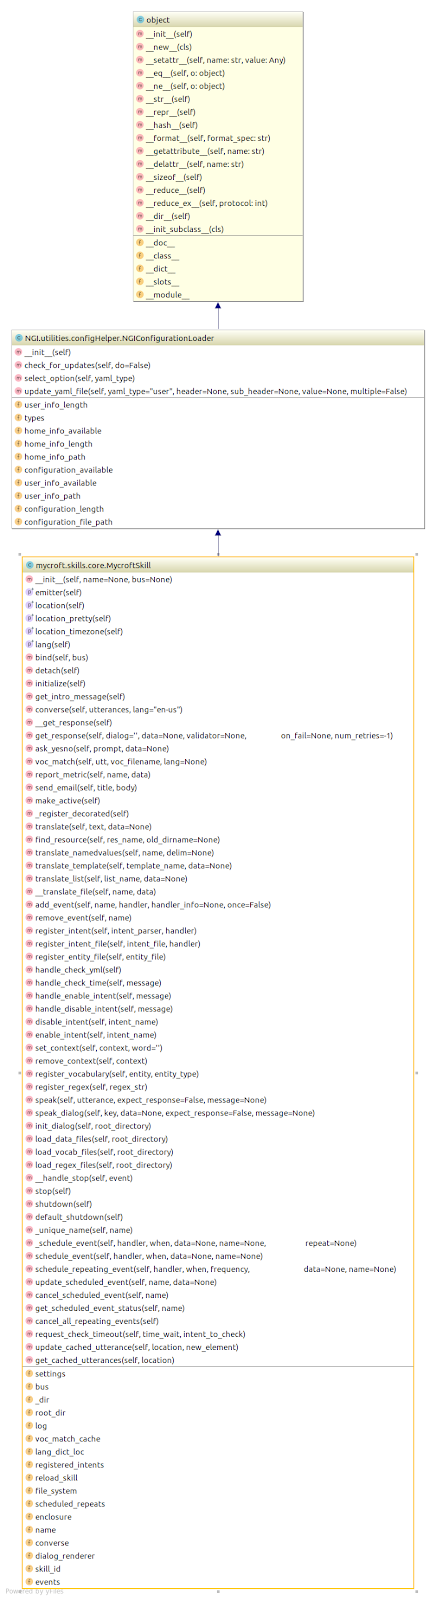
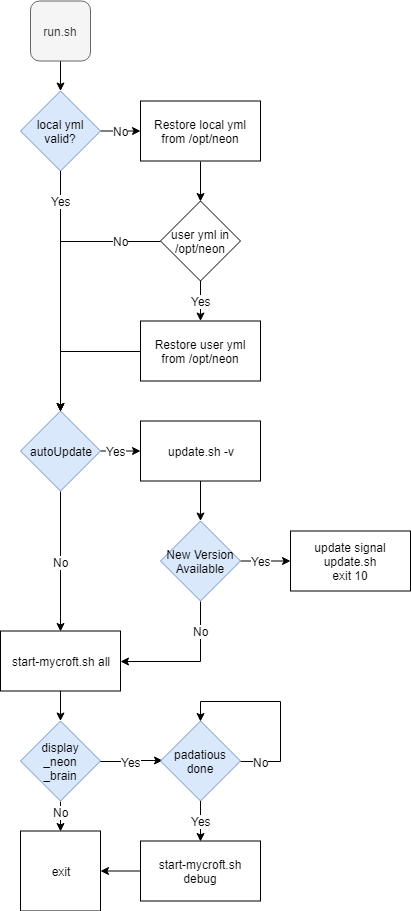
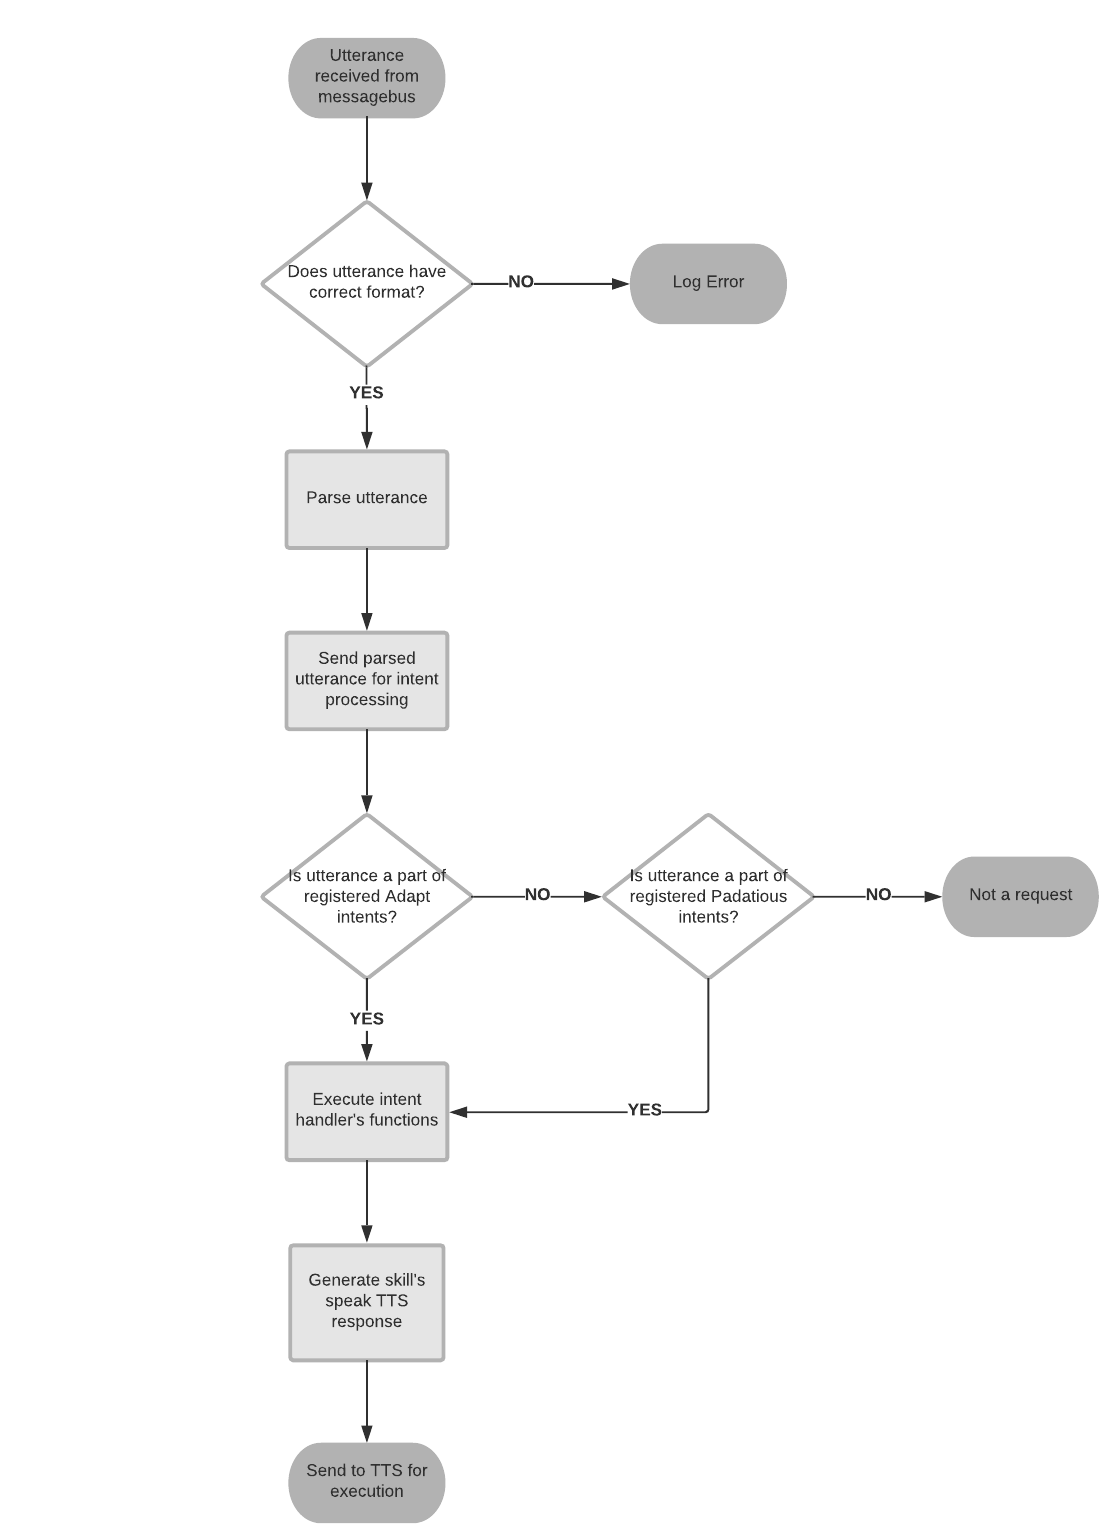
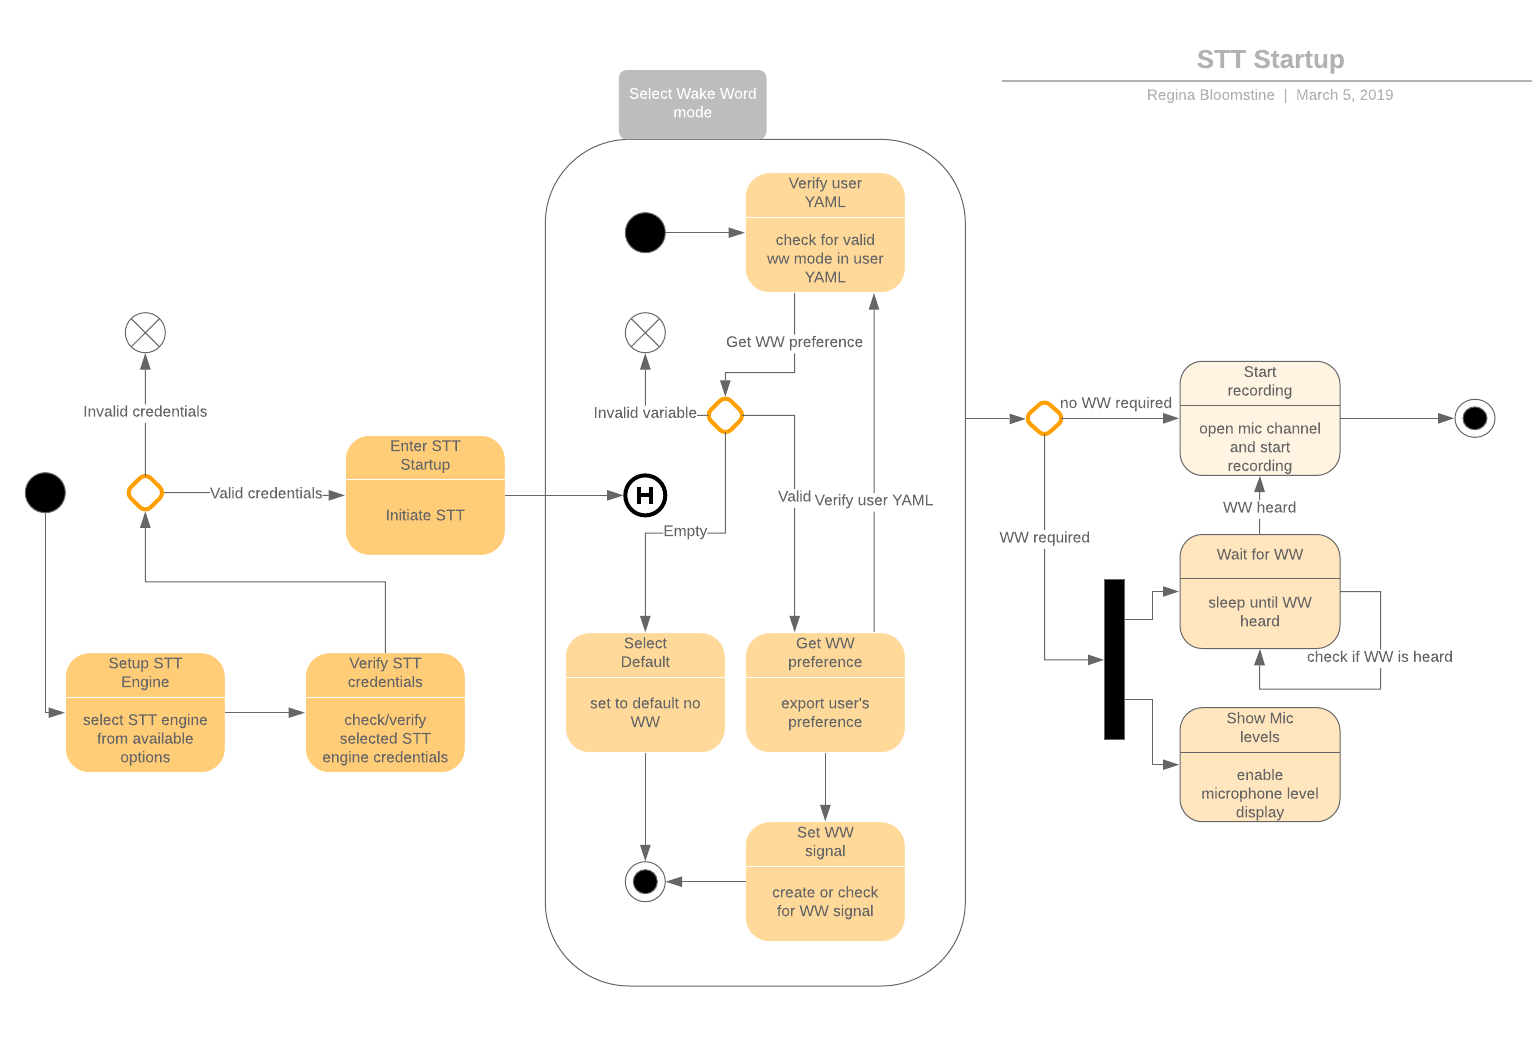
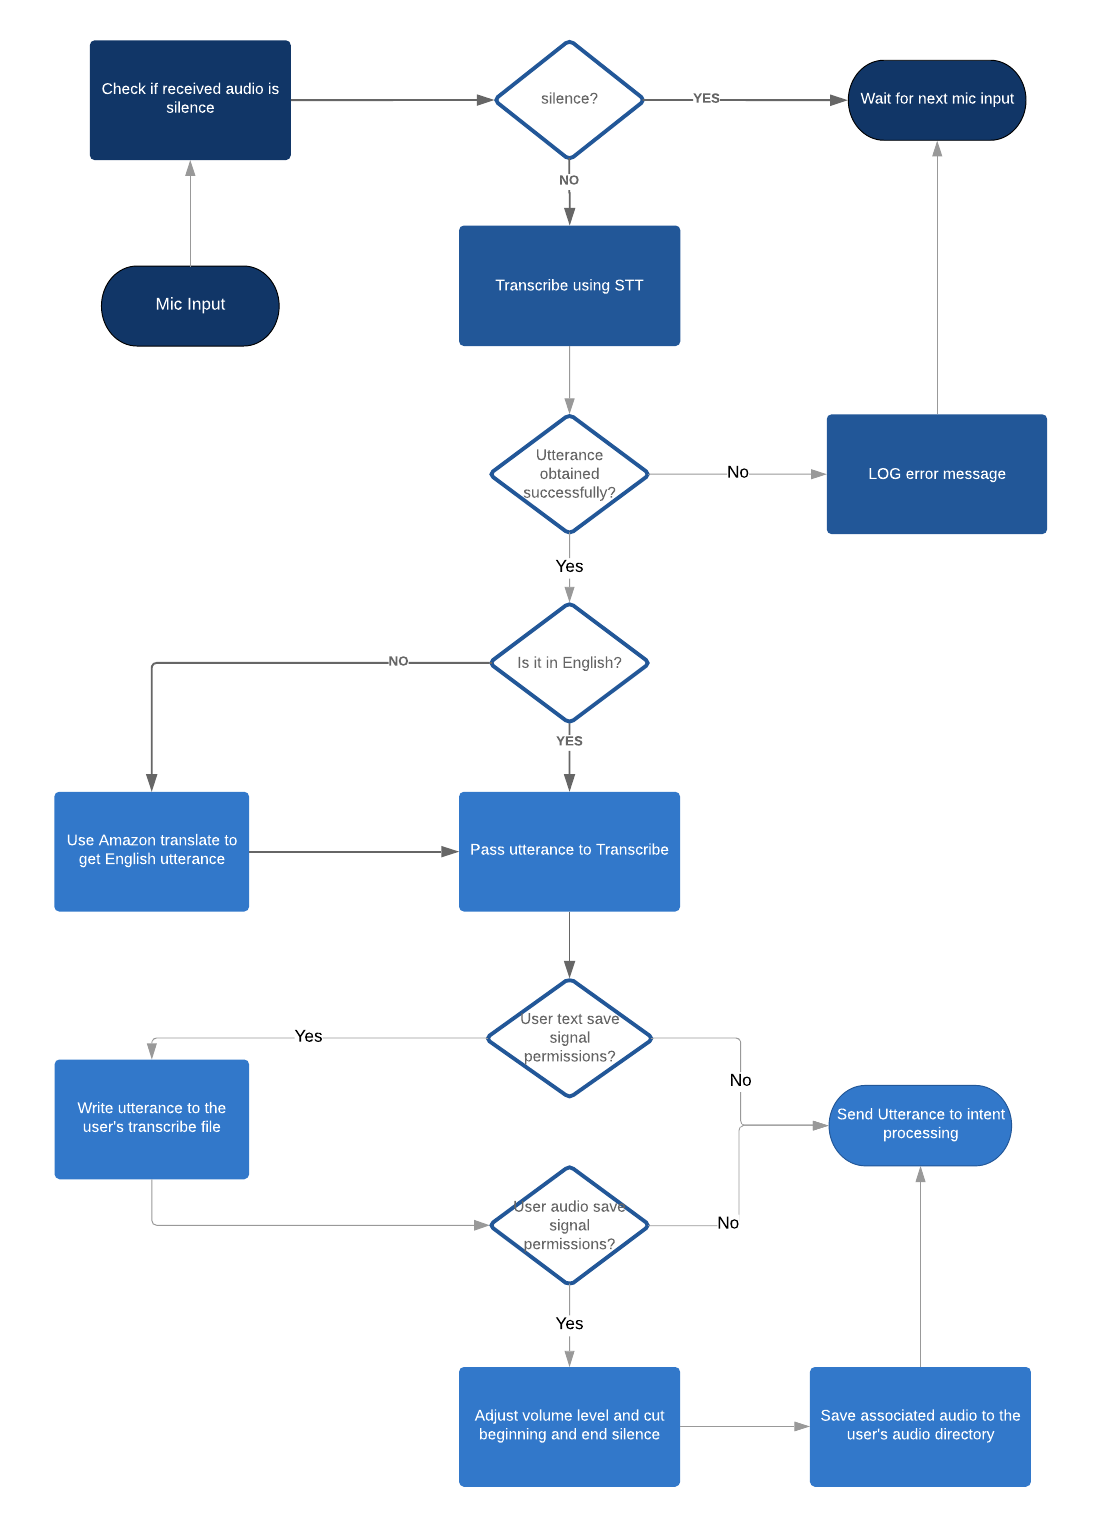
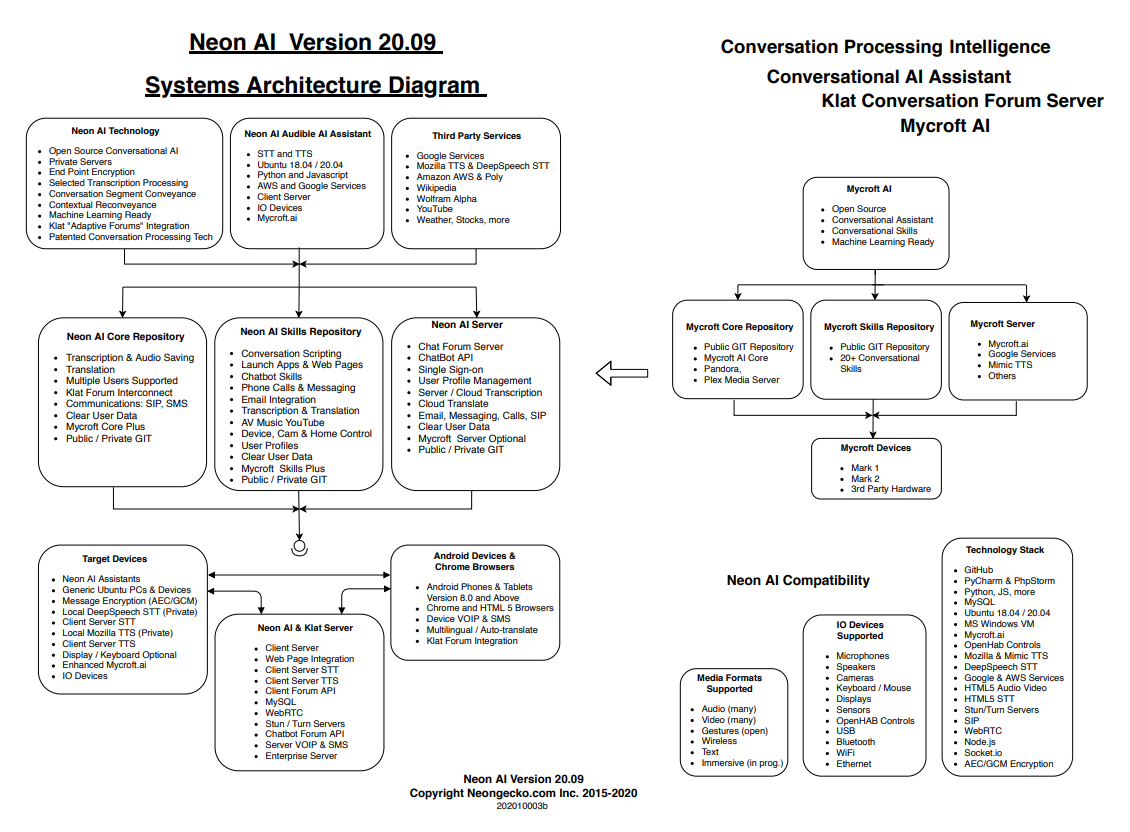
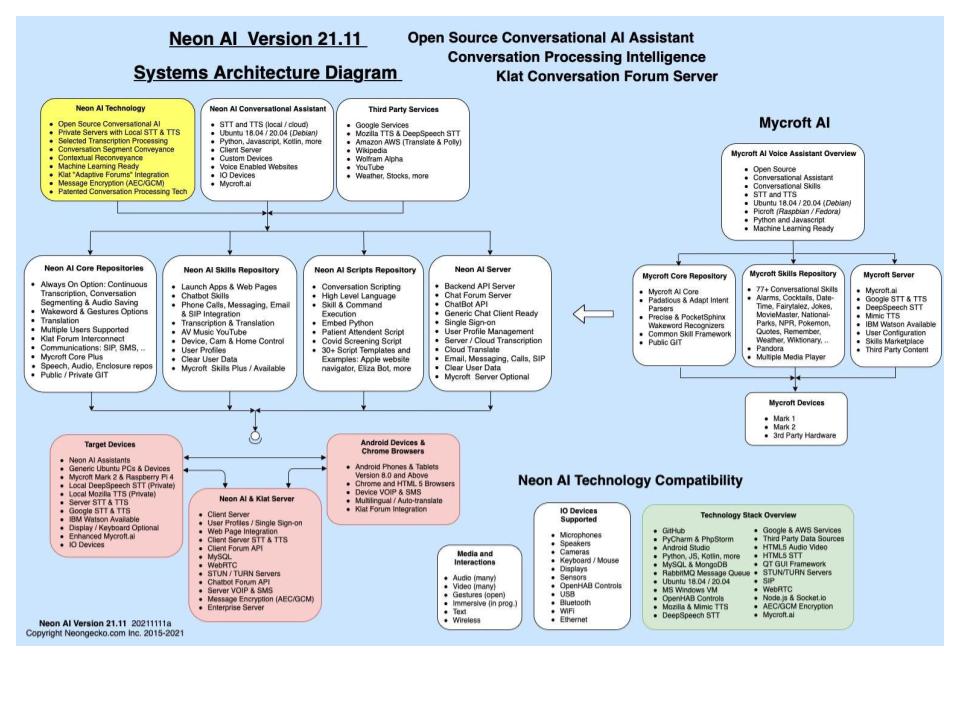
| Basic page | Neon AI Structure Diagrams | Wed, 07/13/2022 - 23:17 | 32 | Neon AI Structure DiagramsImagine what you can do with Neongecko’s state-of-the-art enabling technologies. Let's build the future together. Class Diagram, New Setup Run New Setup Neon AI New Setup Open HAB Intent Processing STT Startup - State Machine Neon AI Transcribe Flow Chart Use Case Diagram - Neon AI |
||||||||||||||||||||||||||||||||||||||||||||||||||||||||||||||||||||||||||||||||||||||||||||||||||
| Basic page | Betsy - "I am good at Math!" | Thu, 07/14/2022 - 00:25 | 82 | Betsy - "I am good at Math!"Talk to math specialist Betsy - only available on Neon AI!
|
||||||||||||||||||||||||||||||||||||||||||||||||||||||||||||||||||||||||||||||||||||||||||||||||||
| Basic page | Manuel - "I speak and translate Spanish" | Thu, 07/14/2022 - 00:57 | 92 | Manuel - "I speak and translate Spanish"Translate Spanish with the help of Manuel - only on Neon AI!
|
||||||||||||||||||||||||||||||||||||||||||||||||||||||||||||||||||||||||||||||||||||||||||||||||||
| Basic page | Pat the Patient Assistant | Thu, 07/14/2022 - 02:09 | 99 | Pat the Patient AssistantMeet Pat, the future of bedside conversational AI assistants:
I'm Pat the demonstration conversational patient assistant from Neon AI. I am an artificial intelligence personal assistant. I'm augmented with Neon Gecko open source code and CPI Corp technology. For example, you can say "help", or "I fell". Another thing you can say is "remind me to take my pink pill every day at 4pm". Or "what time is it?", "play Chopin", "play the guess my phrase game", or "record I feel better". |
||||||||||||||||||||||||||||||||||||||||||||||||||||||||||||||||||||||||||||||||||||||||||||||||||
| Article | July-August 2019 Newsletter | Thu, 07/14/2022 - 02:30 | 113 | July-August 2019 NewsletterBodyNeon AI Community Newsletter July-August 2019 Thank you for joining the Neon AI Community, and being a newsletter subscriber.
We want you to be first to know about our NEW PRODUCT ANNOUNCEMENT -
We have great news for Android users. Neongecko has launched the "Neon AI Communicator" for Android 8.0+ now on the Google Play Store (search for “Neon AI").
The Neon AI Communicator is the next evolutionary step in human-computer interfaces, combining speech based advanced social media with personal assistant productivity skills.
Neon AI Communicator on the Google Play Store for Android Users The Neon AI Communicator is the first "parallel communication console” for mobile devices, supporting conversations with: speech and text, translation, personal digital assistant skills, AI informational queries, public chat rooms, private texting, and much more. A "single sign-on" is provided on the web and on Android phones, which allows for a seamless experience wherever you are. The Neon AI Communicator is the way to simultaneously keep in touch with work, friends, families and subjects you're following.
THE LATEST UPDATE ON OUR : Klat.com - Neon AI for Advanced Social Media - On the Web Real-Time Chat With Real-Time Translations Klat.com is Neongecko's browser-based console that provides parallel conversations on the web, using speech and text, and incorporates Neon AI to provide to interactive personal assistant using Conversational Artificial Intelligence Natural Language Understanding Skills. to link with other relevant topics of discussion. Conversations are supported across multiple media, including audio, video, speech-to-text and text-to-speech. Latest release: August 14, 2019. Adds improvements to foreign language services, “follows” and “private conversations”.
Neon AI Nano HTML for Website Designers - The Straight Forward Way to Add “Speech input AI" to Existing Webpages Neon AI Nano’s users don’t “go to another webpage.” Instead, they stay on the current page and results of their interactions with Neon AI can be inserted into applications - results like transcriptions, conversions, math and translations. In the middle of an application, for example, while scheduling an event, a user can click the microphone button and get weather forecast information to decide on scheduling. On a travel site, users can ask for a conversion from dollars to euros and meters to miles. Remarkably, Neon AI can be added to standard webpages in one line of HTML. How powerful is this one line of HTML? The one line of Neon AI HTML calls the full Neon AI, which is powered by millions of lines of code as well as public and private data, through the Neon AI servers. Latest release: August 1, 2019. Adds foreign language options, sign-on, performance and stability improvements.
Neon AI Software Development Kit (SDK) - Open Source on GitHub - Neon AI is Customizable Think Amazon Alexa, Google Home, Apple Siri and Microsoft Cortana - with open source code. The Neon AI SDK is the first “white label” platform that is preconfigured to enable software developers and hardware designers to quickly produce a full range of voice controlled devices, home automation, smart speakers, interactive applications and conversational websites. Neon AI provides Conversation Processing for Conversational AI, Real-time Speech-to-Text, Transcription, Language Translation, Database Integration, Text-to-Speech and AI Skills. Latest release: August 1, 2019. Now available with increased profile data, multi-platform sign-on and improved performance. Educational platform recommendation starting at under $400.
Thank you for your interest! Please contact me for demonstrations, interviews or technical help. Sincerely, Joshua Rekitt, User Experience Manager |
||||||||||||||||||||||||||||||||||||||||||||||||||||||||||||||||||||||||||||||||||||||||||||||||||
| Basic page | Video - Neon AI: SDK for Conversational AI | Thu, 07/14/2022 - 02:45 | 61 | Video - Neon AI: SDK for Conversational AIVideo - Neon AI: SDK for Conversational AIThis 2 minute demonstration shows Neon AI executing audible AI skills such as device control, math, weather and language translation. It also demonstrates customizations made audibly and with a simple source code modification to change the name of Neon AI to "Your Name". Neon AI is a fully customizable conversational AI platform which performs full featured AI skills (similar to Amazon Alexa and Google Home), and more. The Neon AI SDK is available on GitHub. It is a Linux/Python/Java application that runs under Ubuntu (optionally under MS Windows). Neon AI is a "white label development system" ready to adopt a new name and custom programming. |
||||||||||||||||||||||||||||||||||||||||||||||||||||||||||||||||||||||||||||||||||||||||||||||||||
| Basic page | Video - Neon AI: Windows Option - Subsystem for Linux | Thu, 07/14/2022 - 02:49 | 62 | Video - Neon AI: Windows Option - Subsystem for Linux
Today, we're going to look at how to install Neon on a Windows computer. This method is not recommended over installing Ubuntu on your computer, but it is an option for a development system, if you would like to use development tools in Windows. Let's get started. Enabling the Windows Subsystem for Linux Enable-WindowsOptionalFeature -Online -FeatureName Microsoft-Windows-Subsystem-Linux and that'll take a minute to run, and then it'll prompt to restart. Installing Ubuntu for WSL Setting up Ubuntu and Looking at the File System Starting a Neon Installation Modifying Neon to Work on Windows Testing Neon WSL Developments Thanks for watching this Neon AI tutorial. Be sure to head over to neongecko.com [neon.ai now] for more information, including a written transcript of this tutorial and any code snippets we may have used. See you next time. |
||||||||||||||||||||||||||||||||||||||||||||||||||||||||||||||||||||||||||||||||||||||||||||||||||
| Basic page | Making an Adapt Skill in Neon AI (Part 1) (Video) | Thu, 07/14/2022 - 02:56 | 65 | Making an Adapt Skill in Neon AI (Part 1) (Video)Video - Creating Your First Neon AI Skill: Making an Adapt Skill (Part 1)Today we're going to look at creating our first Neon AI skill using Adapt. Before you continue here, if you haven't already, make sure you have your Neon SDK installed and have PyCharm installed as well. I'll link the two videos for those below. Let's get started. Skill Intro AVMusic Skill Example Skill File Structure Writing our Skill Intent If I pull that up, it's so far empty, so we're going to fill that in. Since this is a launcher skill, we need to be able to launch programs; to do that we're going to use subprocess, which is a module that basically lets you run a command as you would run it in a terminal. We're also going to use Adapt as I mentioned previously, so we're going to need to import the intent builder there. This is a skill so we need to import the parent skill; so from mycroft.skills.core import mycroft skill, and then lastly, I always import our log, especially when you're creating something new or making changes. It's good to put log statements around things to see where something failed if it fails. Alright so we're going to do class launcher skill, and that is a Mycroft skill, and then our init. We're not initializing any variables so we are only going to have this one line under our init and this is just following convention of mycroft skills. And then we're going to make our initialize function, and this is where we register our intents. All right, so let's look at take a look at what I just typed up here. So, we're defining this launch chromium intent using the intent builder we imported from Adapt. We're naming that intent launch chromium intent, and we told it it's going to require a launch keyword and it's going to require a chromium keyword, and then we told it to build. So this is a pretty common formula you'll see, we'll get into that with some variations a little bit later. So now what we need to do is we need to actually register that intent to something. So we need to tell it when it matches what it's going to do. And this is all just following convention, this self dot launch chromium intent is a function we're going to write here in just a moment. It's just convention that this defined name matches this defined name, so it's not like we're calling something recursively. They just match the names for convention's sake. Writing our Skill Function 'stop' Abstract Method Finishing Up Our Skill init Creating .voc Files Testing our Skill Okay, so we have pulled our changes on our test machine here, so now we're going to test our new skill just by saying launch Chrome. (launching Chrome) And it works. (welcome to neongecko.com, thanks for being a developer. While you're here, make sure to check out some of our information on our neon SDK or maybe check out our Klat adaptive forums, which also integrate our neon AI.) Adding Functionality (More Programs) Modifying our Launcher Function Using Dialog Files for Speech Analyzing Our Skill Logic Adding Another Dialog File Running More Tests So I'm going to minimize this, and I have Neon running here I just have the mic muted here, so we're going to unmute the mic and give it a test. Launch Chrome. (launching Chrome) And we get exactly what we expect. So if we want to do some further testing, since we have skip Wake words enabled here ,it should be transcribing everything I'm saying. So if I were to without pausing say launch Chrome it should still launch Chrome. And it did. And another important part of testing here is to test things that we wouldn't expect to match to make sure we get an expected result. So, an example would be if I were to just say launch. And it were to transcribe correctly as launch. (I don't know that program). We get the response we expected, because it went through that else where program was none and it just said it doesn't know that program. And then the other case that we talked about, if I were to say launch chromium and File Explorer (launching Chrome) it's only going to match the first one in that statement which means the order I said it didn't really matter. I could just as easily say launch file explorer and chromium, and it could transcribe correctly. Launch file explorer and chromium. (launching Chrome) and it still launches chrome because that's the first one it looks for. Handling Imperfect Transcriptions Testing with Wake Words Enabled Hey Neon, launch file explorer (launching file explorer) Hey Neon, launch terminal (launching terminal) Hey Neon, launch. (I don't know that program) And we get the same behavior that we would expect, matching what happened when we were skipping wake words. Thanks for watching this Neon AI tutorial. Be sure to head over to neongecko.com [now neon.ai] for more information, including a written transcript of this tutorial and any code snippets we may have used. See you next time. |
||||||||||||||||||||||||||||||||||||||||||||||||||||||||||||||||||||||||||||||||||||||||||||||||||
| Basic page | Making an Adapt Skill in Neon AI (Part 2) - Regex in Neon AI Skill Processing | Thu, 07/14/2022 - 02:57 | 66 | Making an Adapt Skill in Neon AI (Part 2) - Regex in Neon AI Skill ProcessingVideo - Creating Your First Neon AI Skill part 2: Using Regex In today's video, we're going to continue working on our first skill, and I'm going to show you how to use regular expression files in your skill processing. Let's get started. PYTHON REGEX Review and Overview Creating a Regex File So to do that we have our regex directory inside of our skill, and then our language underneath that, similar to our vocab and dialogue. And this one I've named program.rx, and what we're going to do with that is if we look at our launch keywords, I'm going to say one of those -- any of those -- so launch, lunch, or open, and then the word that follows that is our program. And this follows the Python conventions for regular expressions, I'll put a link to that in the description here. But what this means, it's going to look for one of these three words and then whatever comes next is going to be our program. Adding to Skill init and Modifying Intents Handling False Positives Changes to Our Function Testing our Changes Okay so now let's give those changes a test. If I were to say launch Chrome, we shouldn't have anything happen because we're skipping Wake words, and I didn't say our keyword. If I say neon launch Chrome, (launching Chrome) then we get Chrome as we would expect. So I'm just gonna close that and go ahead and enable our wake words, so we can give that a try. So now if I say hey neon, launch Nautilus (launching Nautilus) we get our file explorer and even if I say hey Neon, Neon launch File Explorer (launching File Explorer) it'll still launch the file explorer. So, regardless of the Neon in front when we have wake words enabled, it will do- it will still parse out whatever is after our keyword. So, I'll close that out and then try something we don't have. Hey Neon, launch Neon (sorry I could not find neon) and that's exactly what we expected. Summary and Closing |
||||||||||||||||||||||||||||||||||||||||||||||||||||||||||||||||||||||||||||||||||||||||||||||||||
| Basic page | Making an Adapt Skill in Neon AI (Part 3) - Using Padatious | Thu, 07/14/2022 - 02:58 | 67 | Making an Adapt Skill in Neon AI (Part 3) - Using PadatiousVideo - Neon AI: Using Padatious (Part 3)Today, we're going to continue looking at our launcher skill. Specifically, we're going to look at moving from using the Adapt intent engine to using Padatious. Let's get started. Adapt vs Padatious I Like Brands Skill Example Modifying Our Skill Intents Creating Entity and Intent Files Modifying Our Skill Function Comparing Regex to Padatious Intents Testing Our Modified Skill So with that said, let's do some quick testing. I have in this terminal here, you can see I'm just following our logs and looking for "launcher", it's the name of our skill, so anything that matches any of our log statements in the skill will get picked up here. Also anytime I say that word, it'll notice. So I'm just going to type in something here. So far this is working exactly as it did before, but let me try something different. So, I just asked it to launch Libre office, and we never told it what that was. If you remember before when we had this, it still matched the skill and it said it didn't know what LibreOffice is. But if you look at our logs it never called the skill, and that's because it LibreOffice isn't in the program entity file. So this kind of helps; you're not going to get calls to skills that don't belong as much this way, because it is looking for-- before it even gets to the skill intent-- it's looking for all of the keywords it needs to execute. Comments on Adapt vs. Padatious I just have a couple of extra comments to make here about using Padatious. Generally, Adapt intents are going to be tried before Padatious, and if we look here in our intent service file. This is in mycroft/skills and then inside of handle_utterance. This is where it handles the intent, and we'll see next I have a comment here that says exactly what I'm trying to say. It's going to send the message to adapt unless Padatious is really sure that it should be handling it, and this confidence level is set at 0.8. If you have issues with skills that rren't matching to Padatious, you can try decreasing this. Or if skills are matching that shouldn't, you can increase it, but it's recommended to leave this the same and modify your intent files if it becomes an issue. Thanks for watching this Neon AI tutorial. Be sure to head over to neongecko.com [now neon.ai] for more information, including a written transcript of this tutorial and any code snippets we may have used. See you next time. |
||||||||||||||||||||||||||||||||||||||||||||||||||||||||||||||||||||||||||||||||||||||||||||||||||
| Basic page | Neon AI Chatbots Source | Thu, 07/14/2022 - 03:00 | 94 | Neon AI Chatbots SourceNeon Conversational Scripting is a great way to customize your website. You get several benefits from this - a dedicated chat, cutting edge features, and AI enhanced conversation processing intelligence. What are Scripts? Scripts Keywords and Spacing How to Use Below is an example of an easy script that welcomes users. This script starts with the case (name of the file), language, and number of claps. It uses variables and speaks to the user for the first name. After getting this it then exits. EXAMPLE: Scripts are user-constructed text files that contain various Neon commands. Using a few simple keywords, described below in the detail, you can specify exactly what Neon should say, do, repeat, and answer. You can create new dialogs, routines, loops, and query lookups, while utilizing every skill, YAML variable, and other information that Neon knows. You can design scripts with multiple languages in mind. All of the following options are available:
You can create scripts quickly and easily. Give it a try today! Want to learn more? Check out our GitHub page. |
||||||||||||||||||||||||||||||||||||||||||||||||||||||||||||||||||||||||||||||||||||||||||||||||||
| Basic page | Connecting Neon AI to PyCharm | Thu, 07/14/2022 - 03:01 | 64 | Connecting Neon AI to PyCharmVideo - Neon AI: Connecting to PyCharmIn today's video, I'm going to show you how to install PyCharm and connect that to our Neon SDK. If you haven't already installed your Neon SDK, I'll link the video for that below. Let's get started. Installing PyCharm Pycharm Initial Setup Connecting to the Neon SDK Custom PyCharm VM Options Testing Git Settings Checking Git Ignore Settings Summary |
||||||||||||||||||||||||||||||||||||||||||||||||||||||||||||||||||||||||||||||||||||||||||||||||||
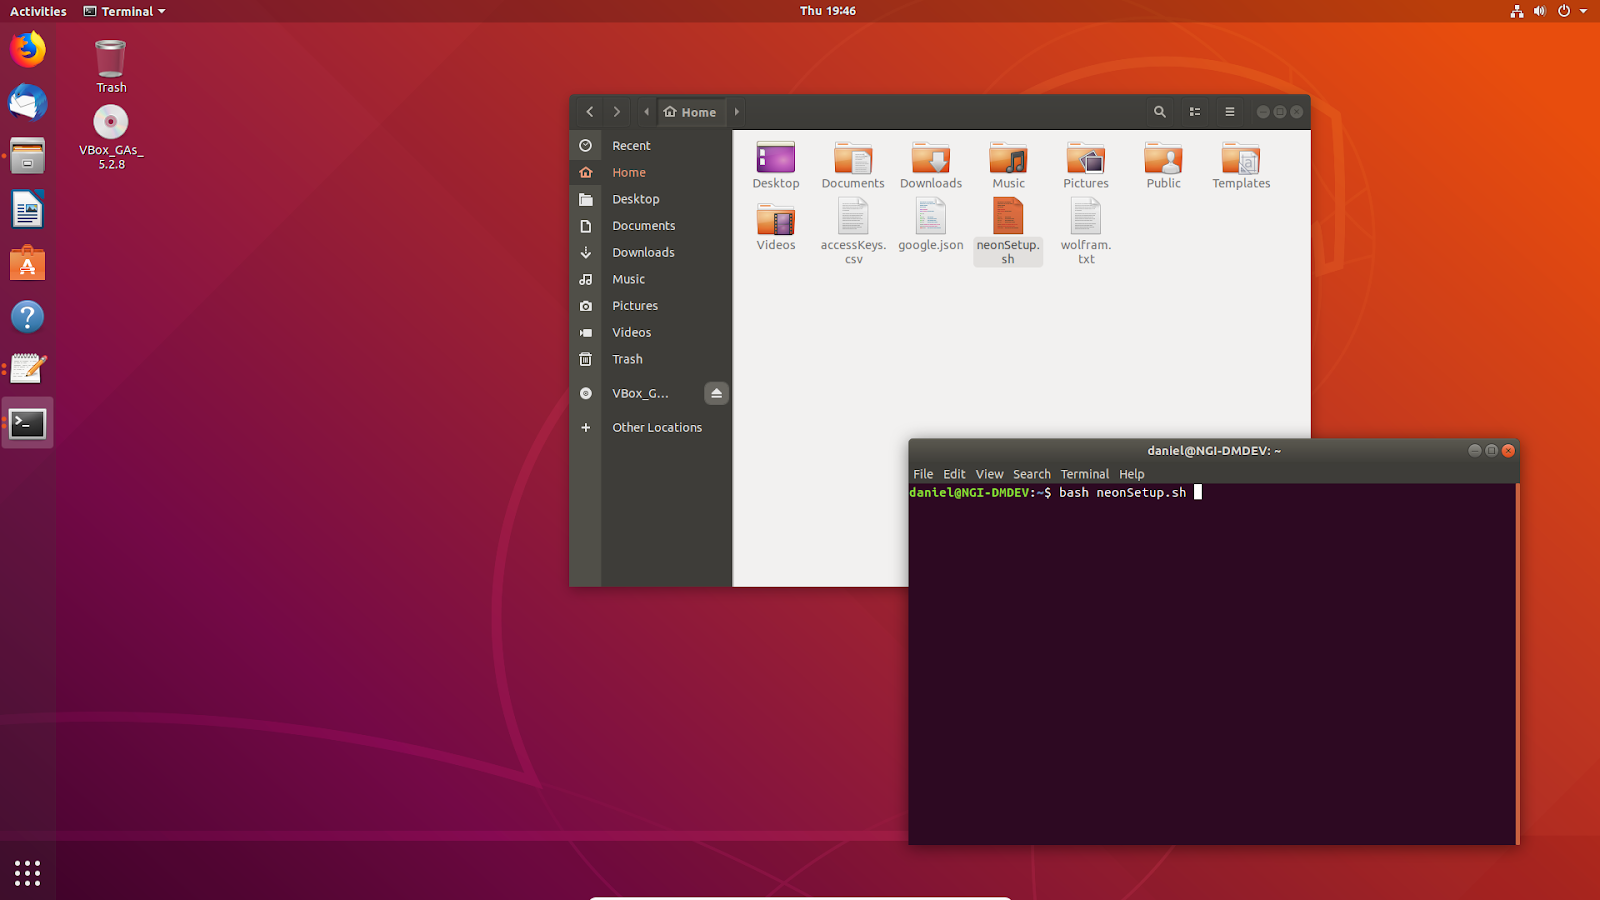
| Basic page | Neon AI SDK - Ubuntu Installation | Thu, 07/14/2022 - 20:50 | 63 | Neon AI SDK - Ubuntu InstallationVideo - Neon AI SDK InstallationIn today's video, we're going to look at installing the Neon SDK on an Ubuntu machine and then giving it a quick test to make sure our installation went smoothly. So let's get started. Checking Hardware Configuration Developer vs User Install Checking for Credential Files Running neonSetup.sh Installing Packages and downloading Neon Validating Credentials Neon AI First Run Quick Test of Neon AI what time is it? (It's 1:58) what is the derivative of x squared? (the derivative with respect to x of x squared is 2 times x. Provided by Wolfram Alpha). So as you can see, we validated all of our credentials again here. If Google wasn't working, we wouldn't get our transcriptions here, if Amazon wasn't working we wouldn't get the responses read back, and if Wolfram wasn't working we wouldn't have gotten an answer to that question we asked here. So with that, we have our setup completed. Check out neongecko.com |
||||||||||||||||||||||||||||||||||||||||||||||||||||||||||||||||||||||||||||||||||||||||||||||||||
| Basic page | Neon AI Software Development Kit Installation Instructions | Thu, 07/14/2022 - 21:40 | 29 | Neon AI Software Development Kit Installation InstructionsTable of Contents
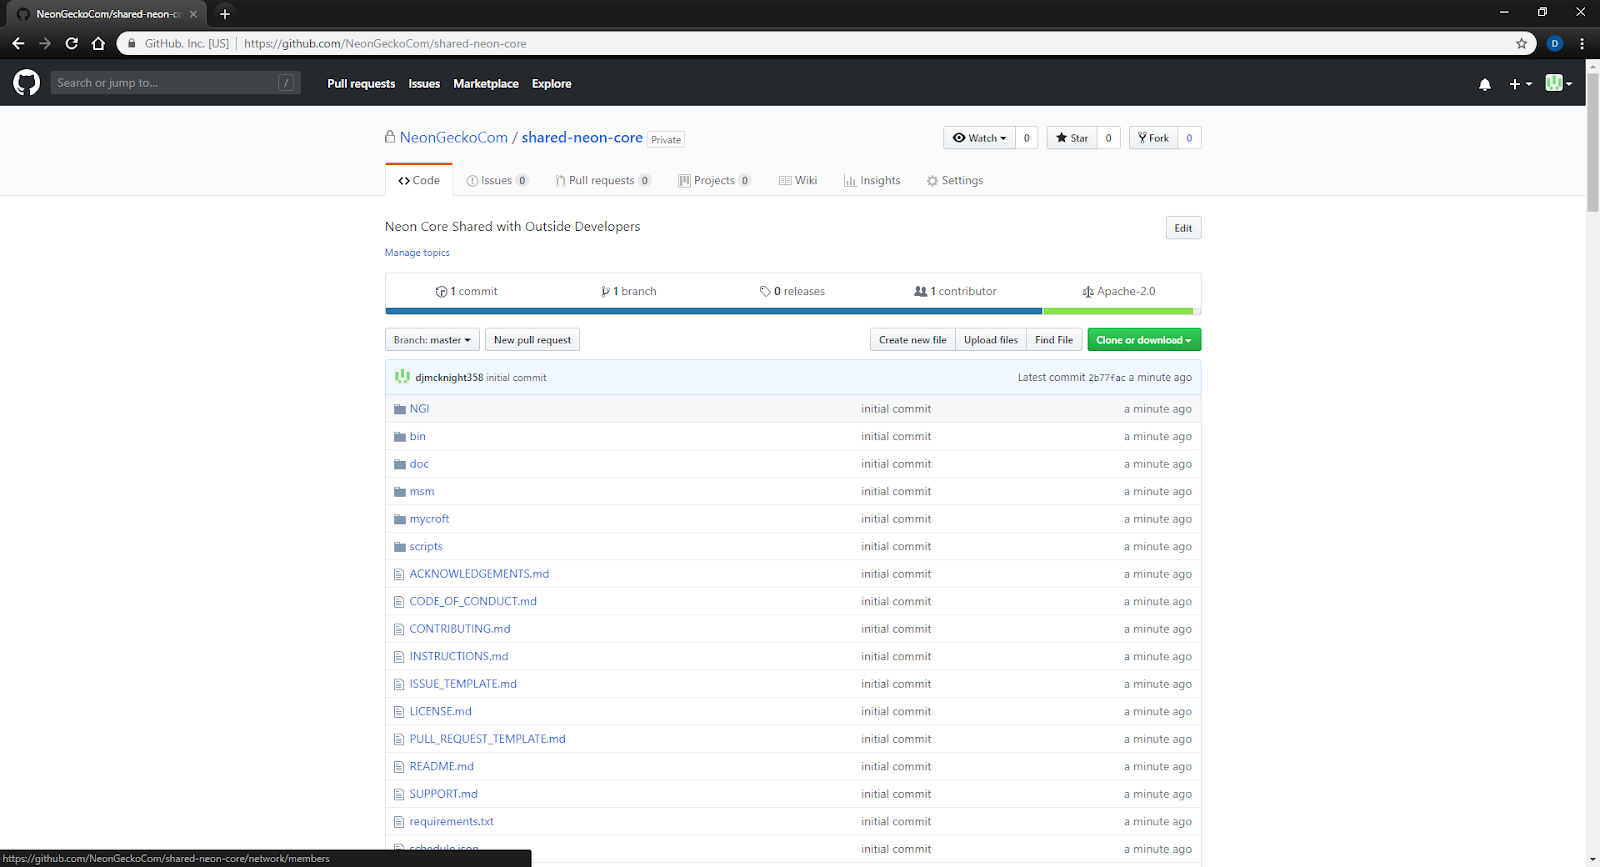
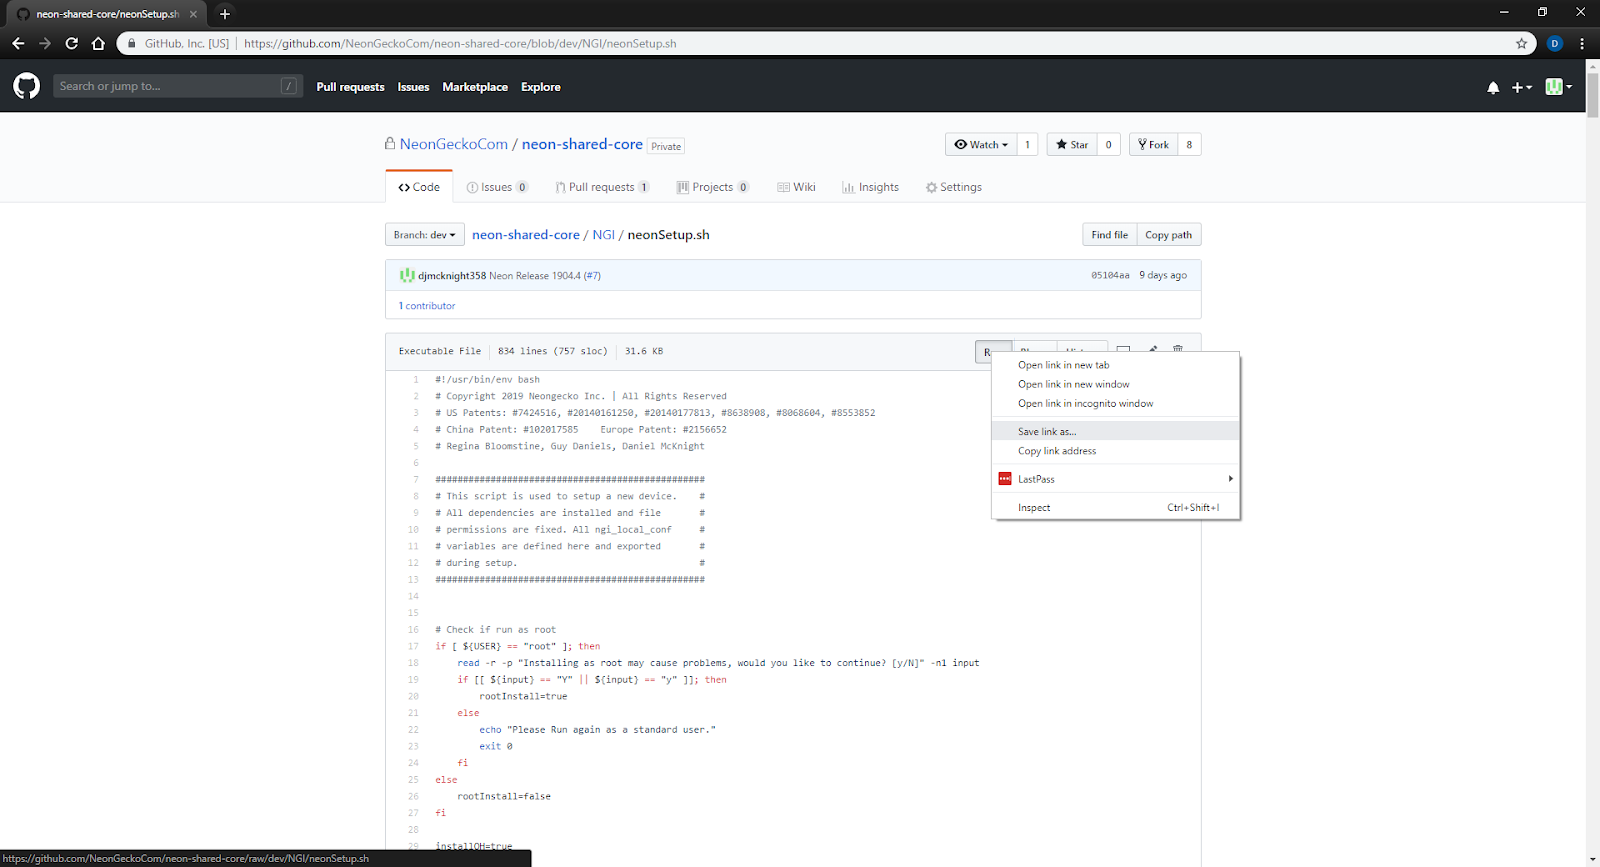
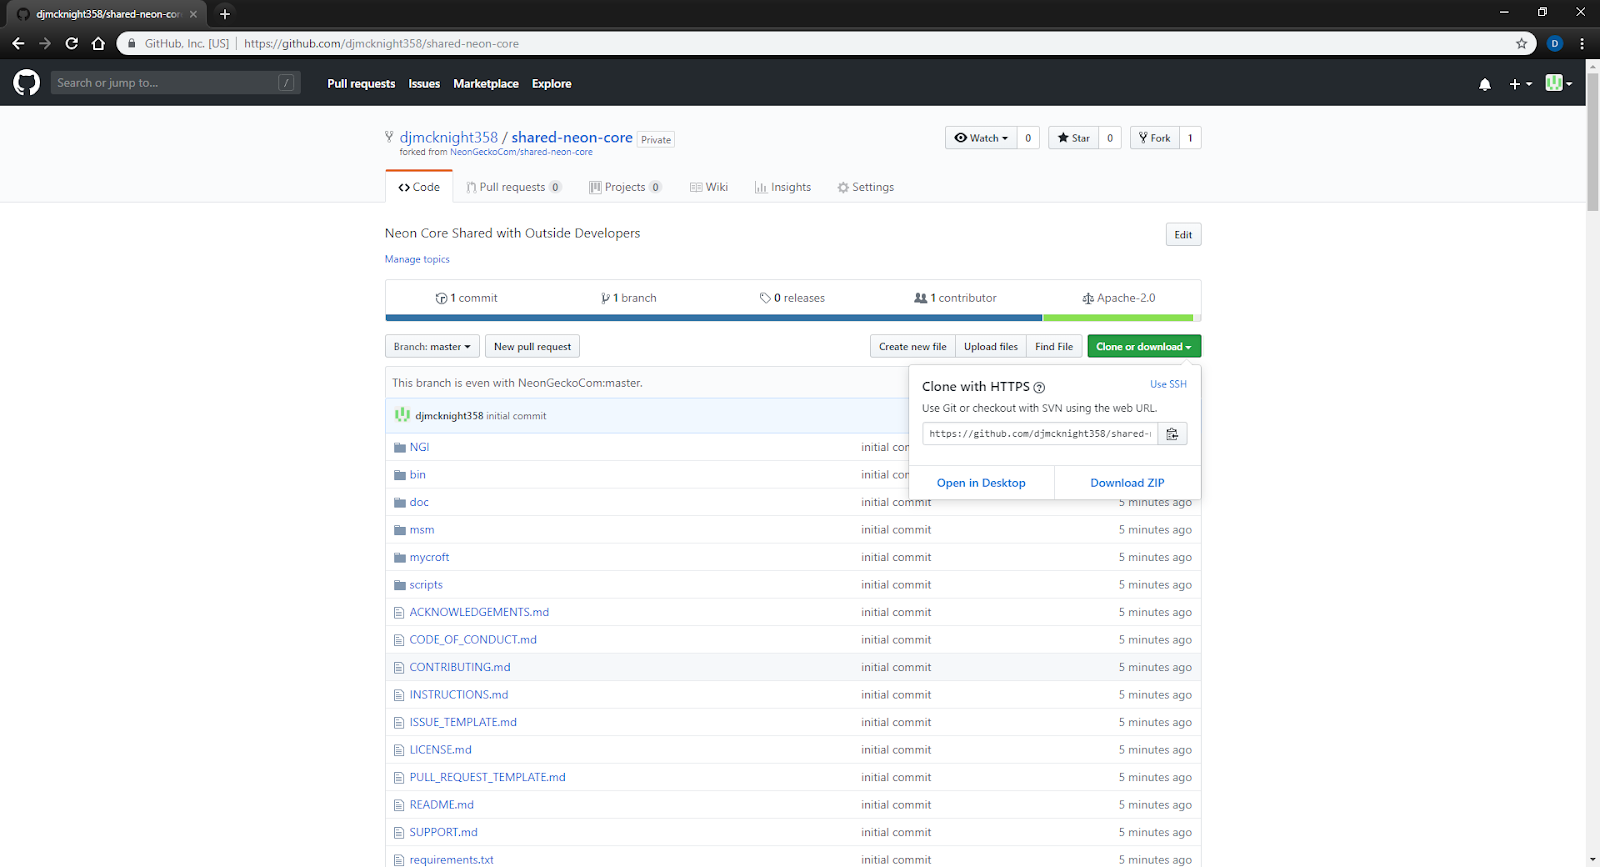
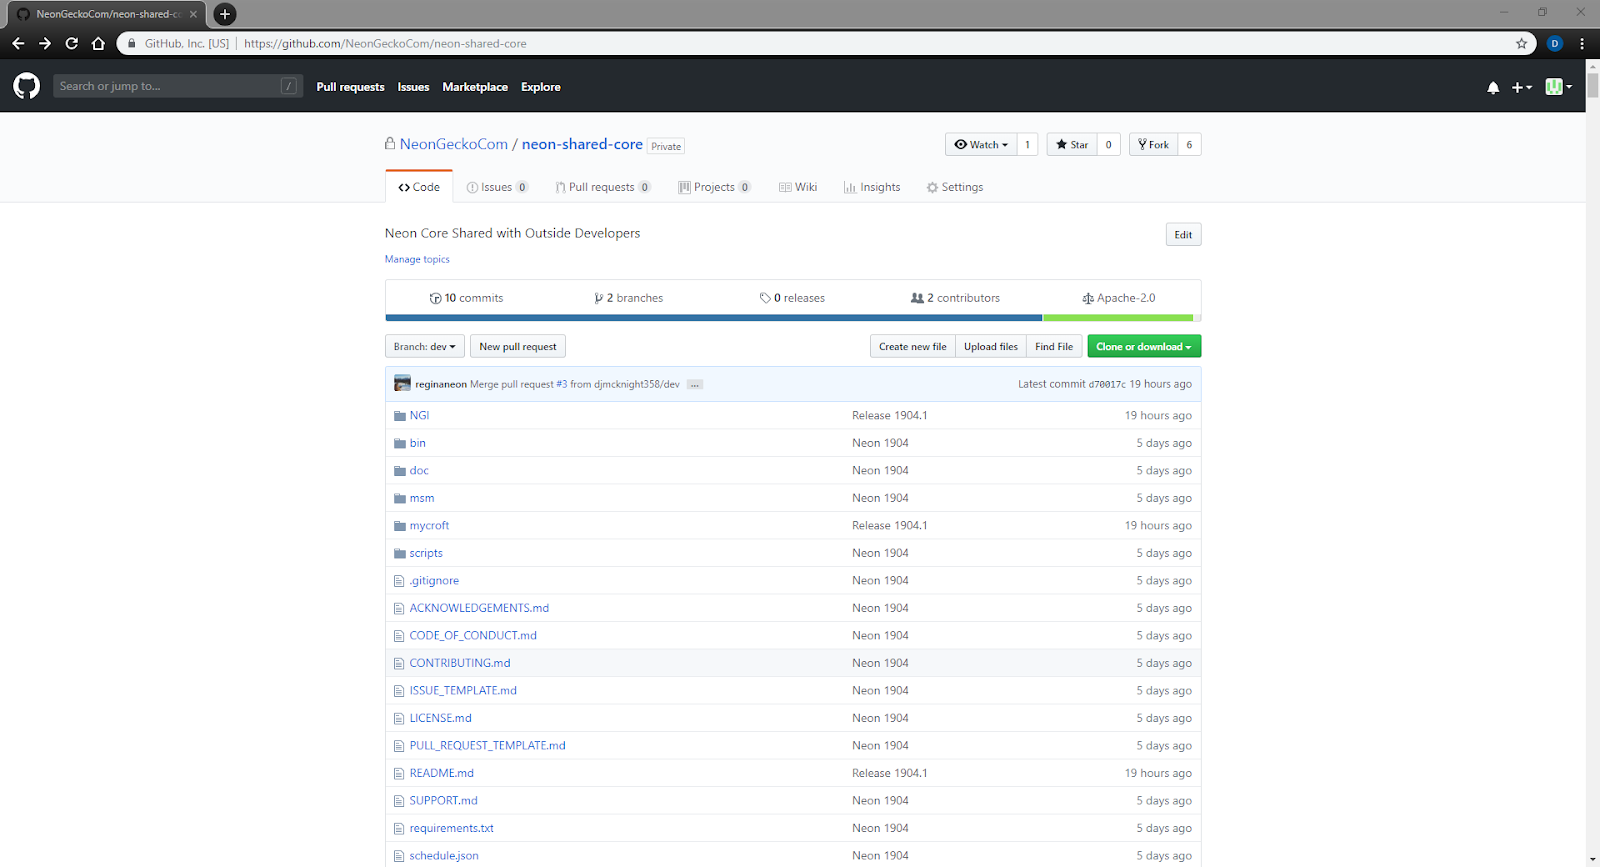
1. Forking Git SourceBefore installing Neon, you will need to fork your own branch of the Neon core and skills repositories on Github. You will also need to get neonSetup.sh from your forked core Git.
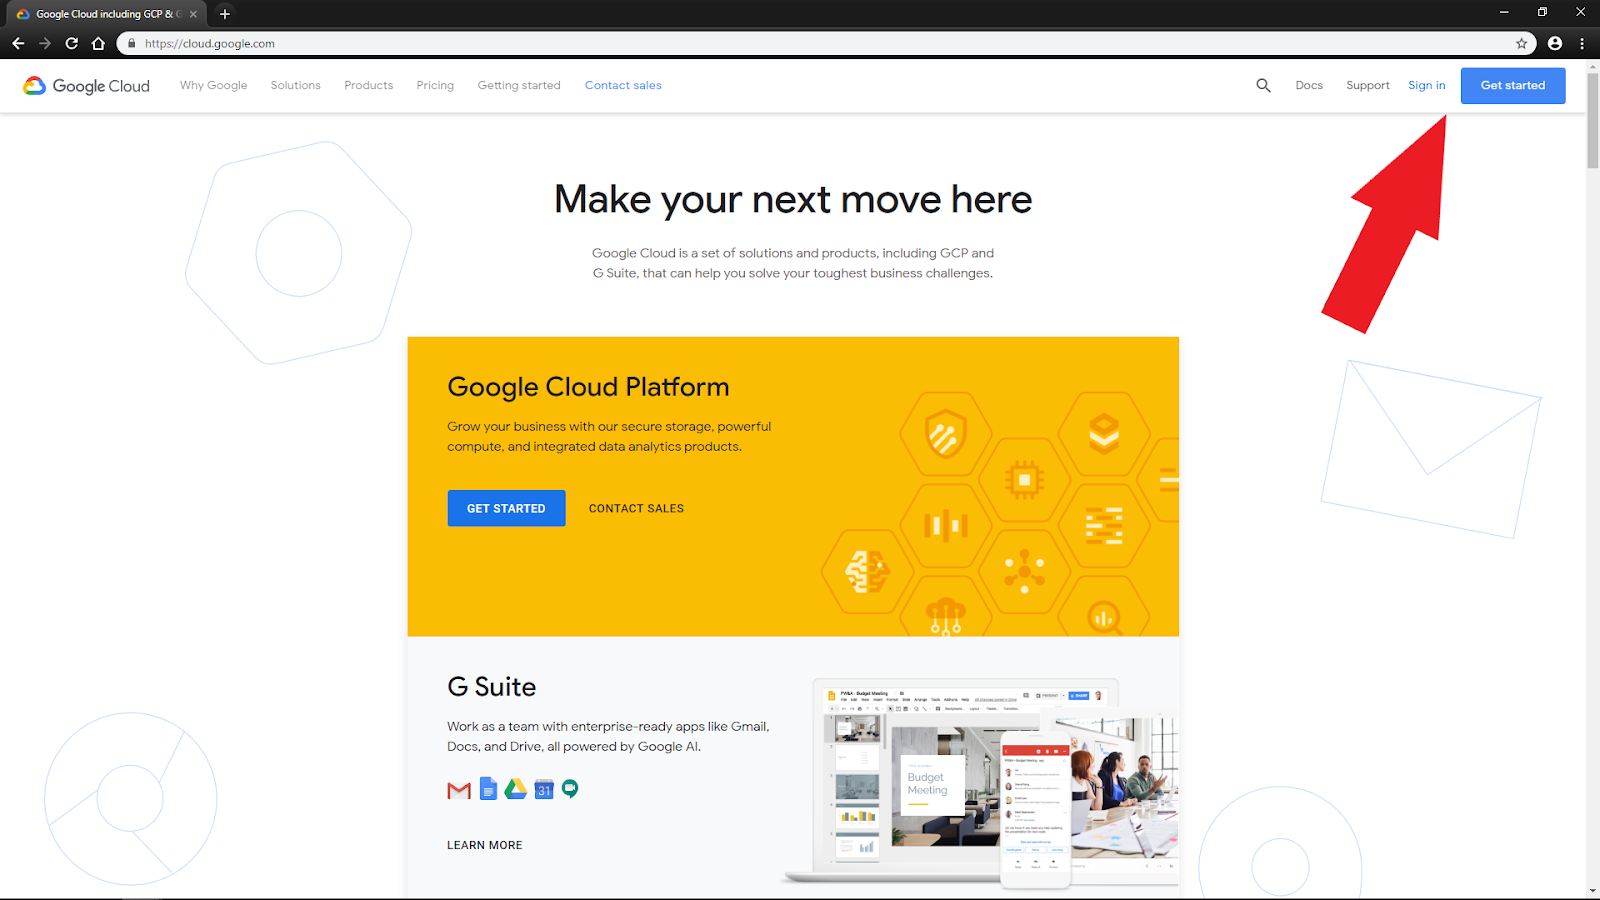
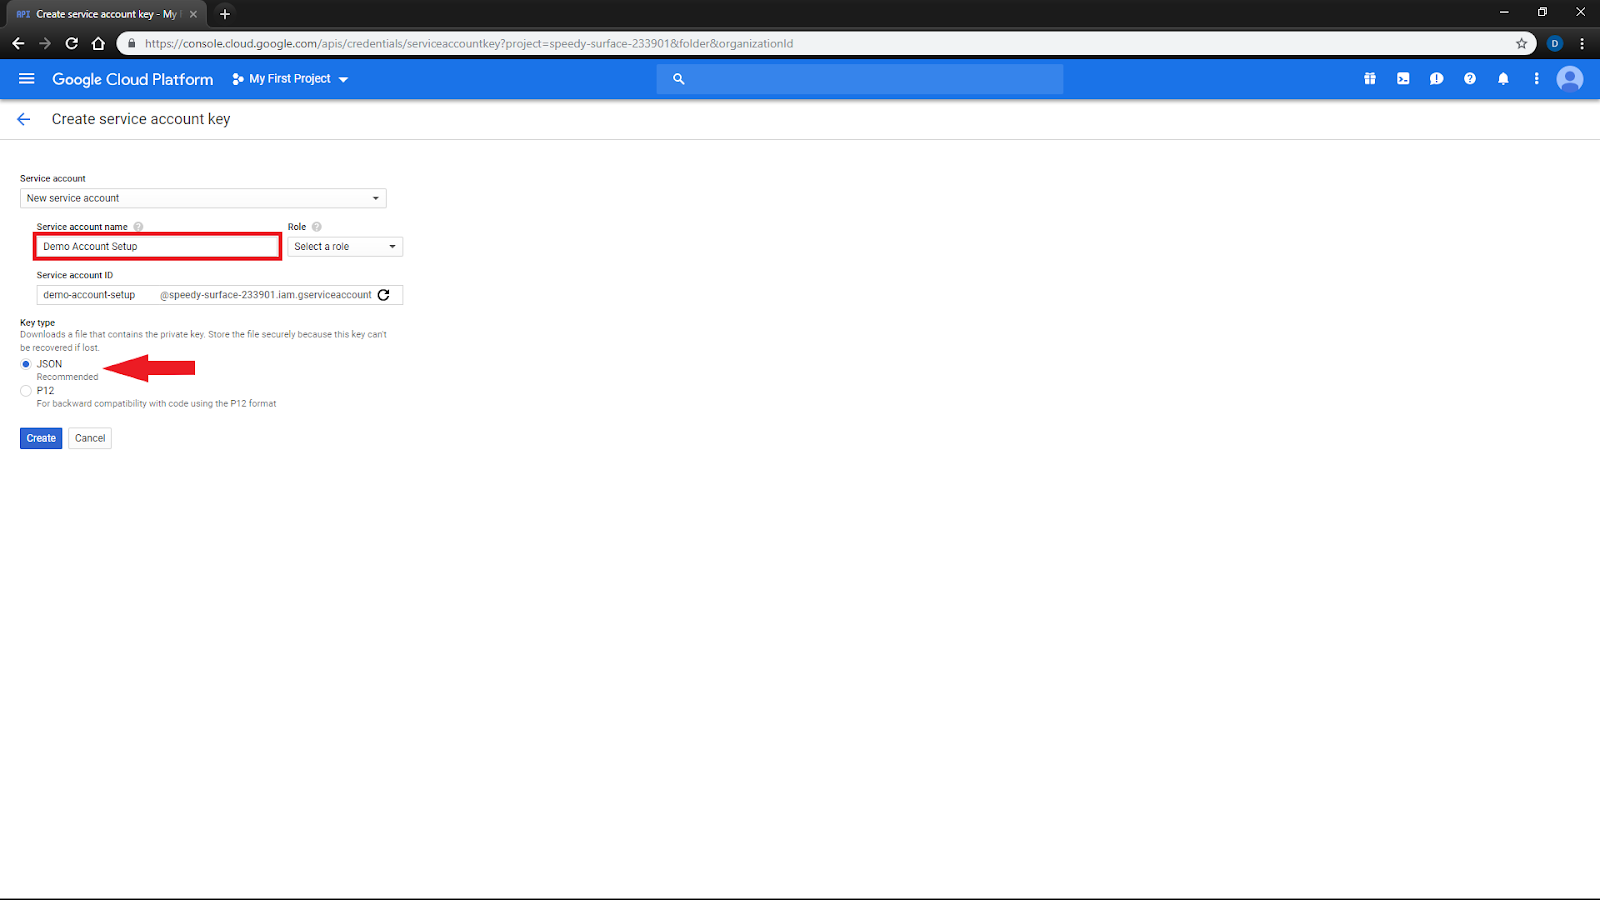
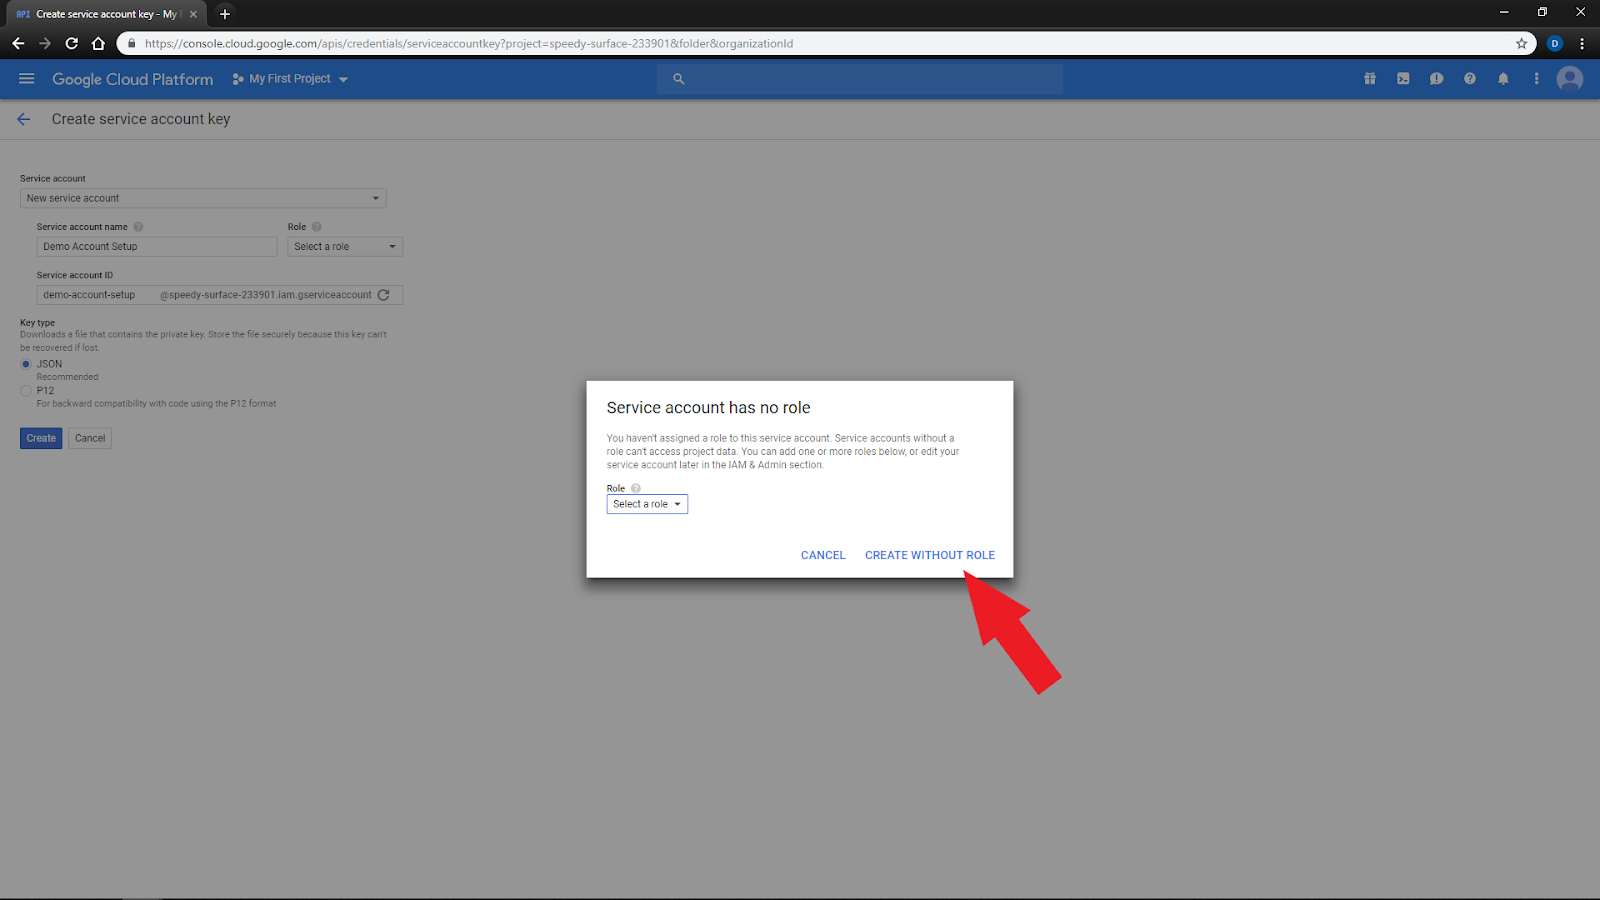
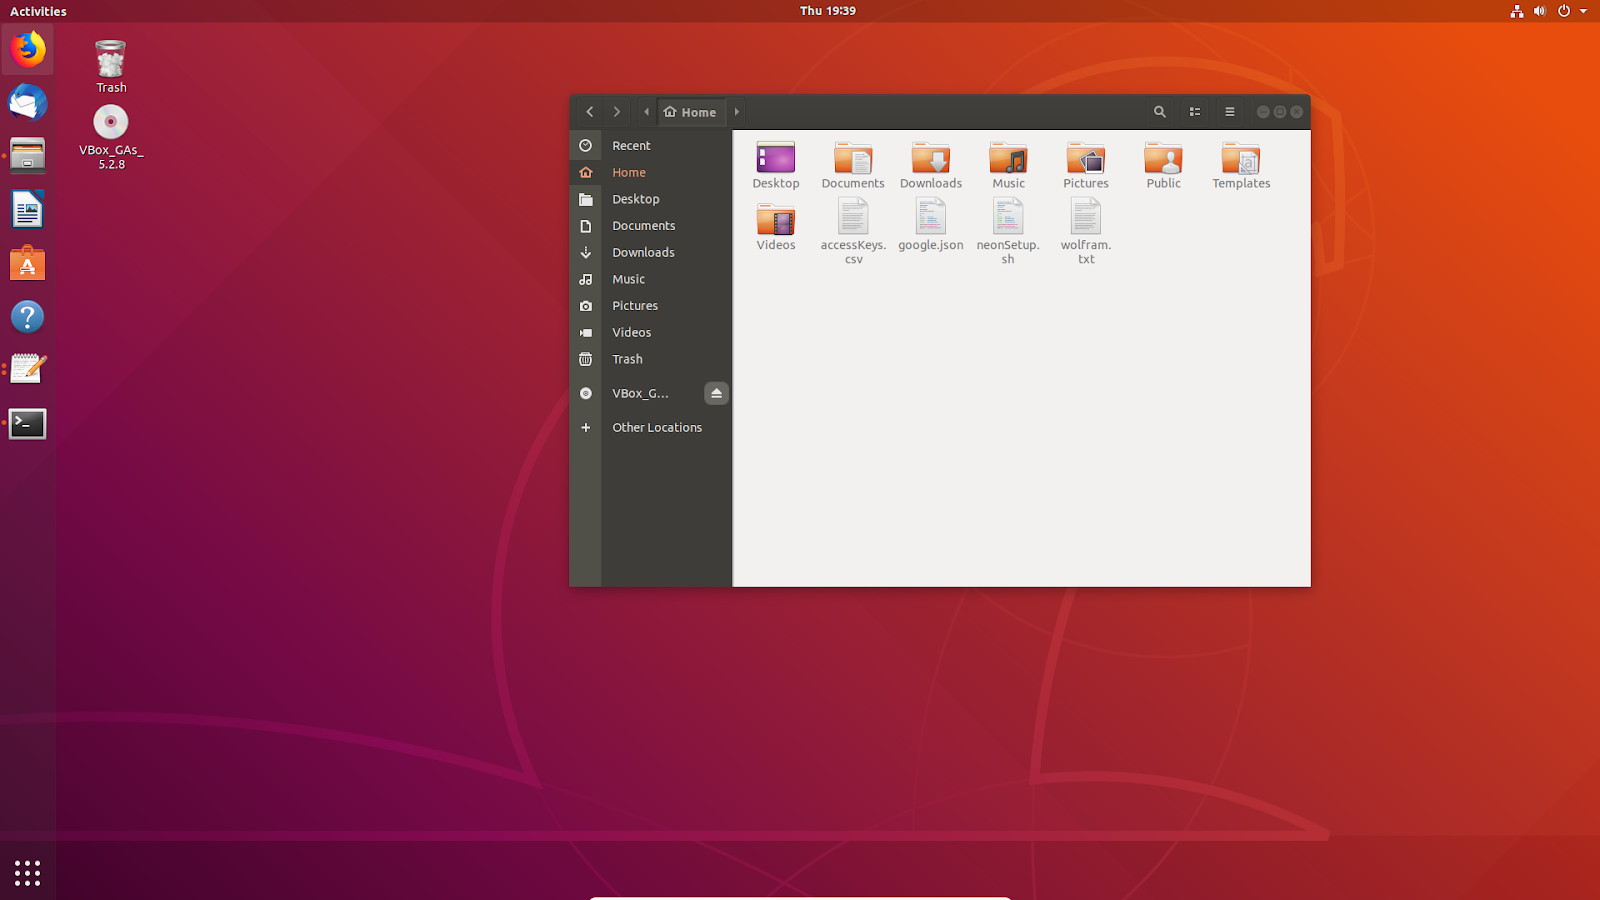
2. Setting Up Service AccountsPlease follow these steps to create the three credential files required to install Neon. During setup, all credentials will be imported and validated with any errors logged in status.log. Note: If you complete this setup on a Windows PC, make sure to edit any files using a text editor such as Notepad++ to ensure compatibility in Linux. Also check for correct file extensions after copying your files to your Linux PC, as Windows will hide known file extensions by default. a. Google Cloud Speech Setup
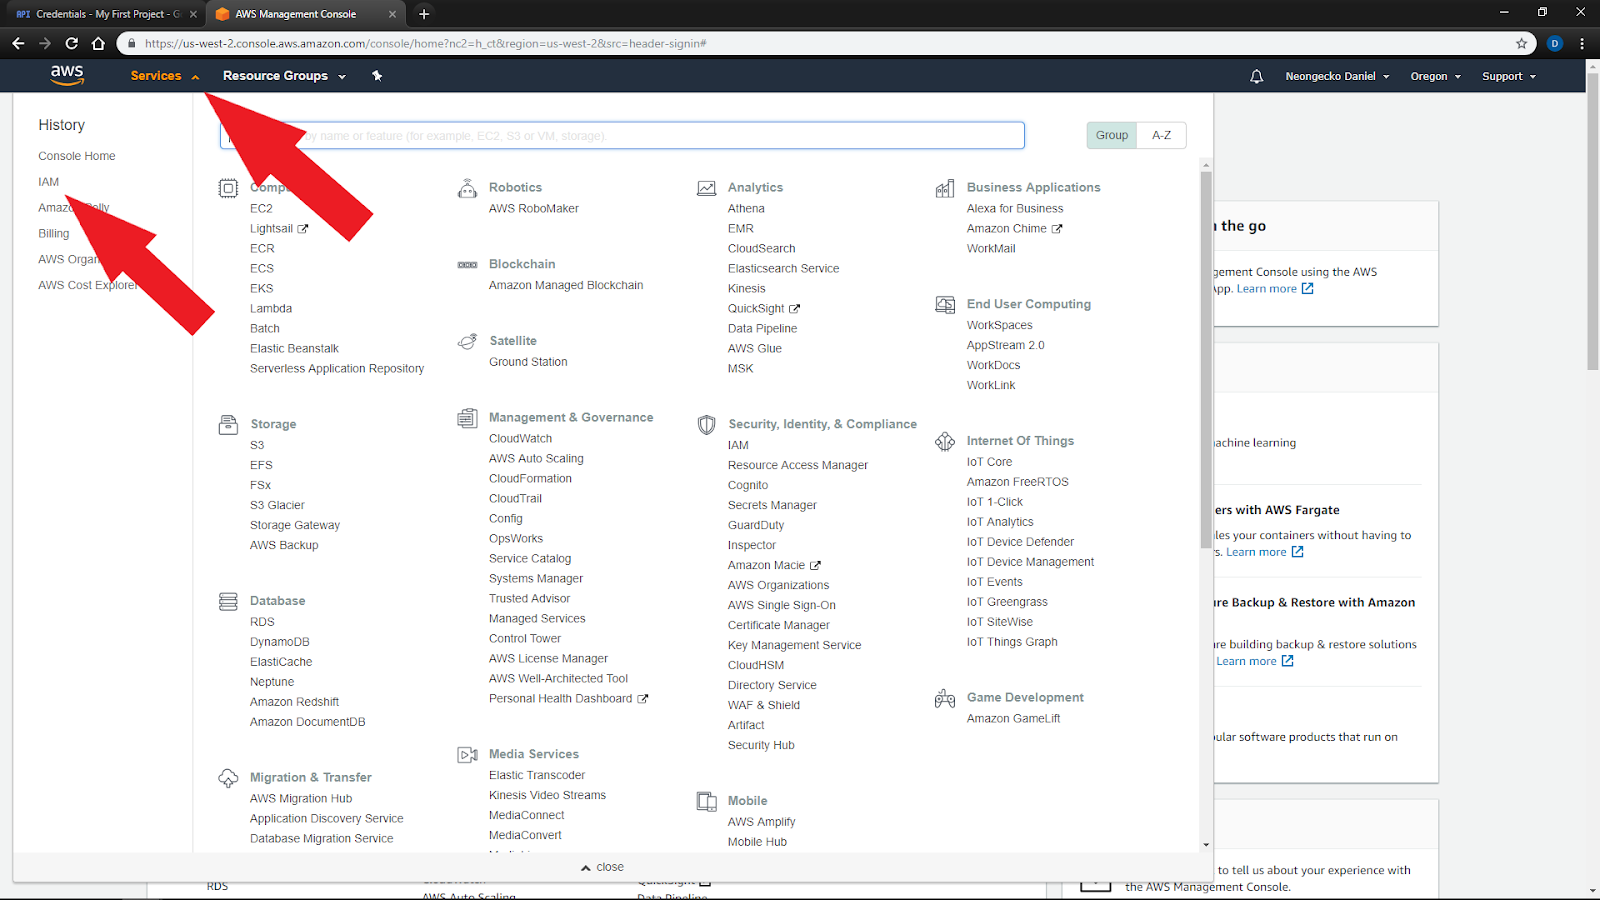
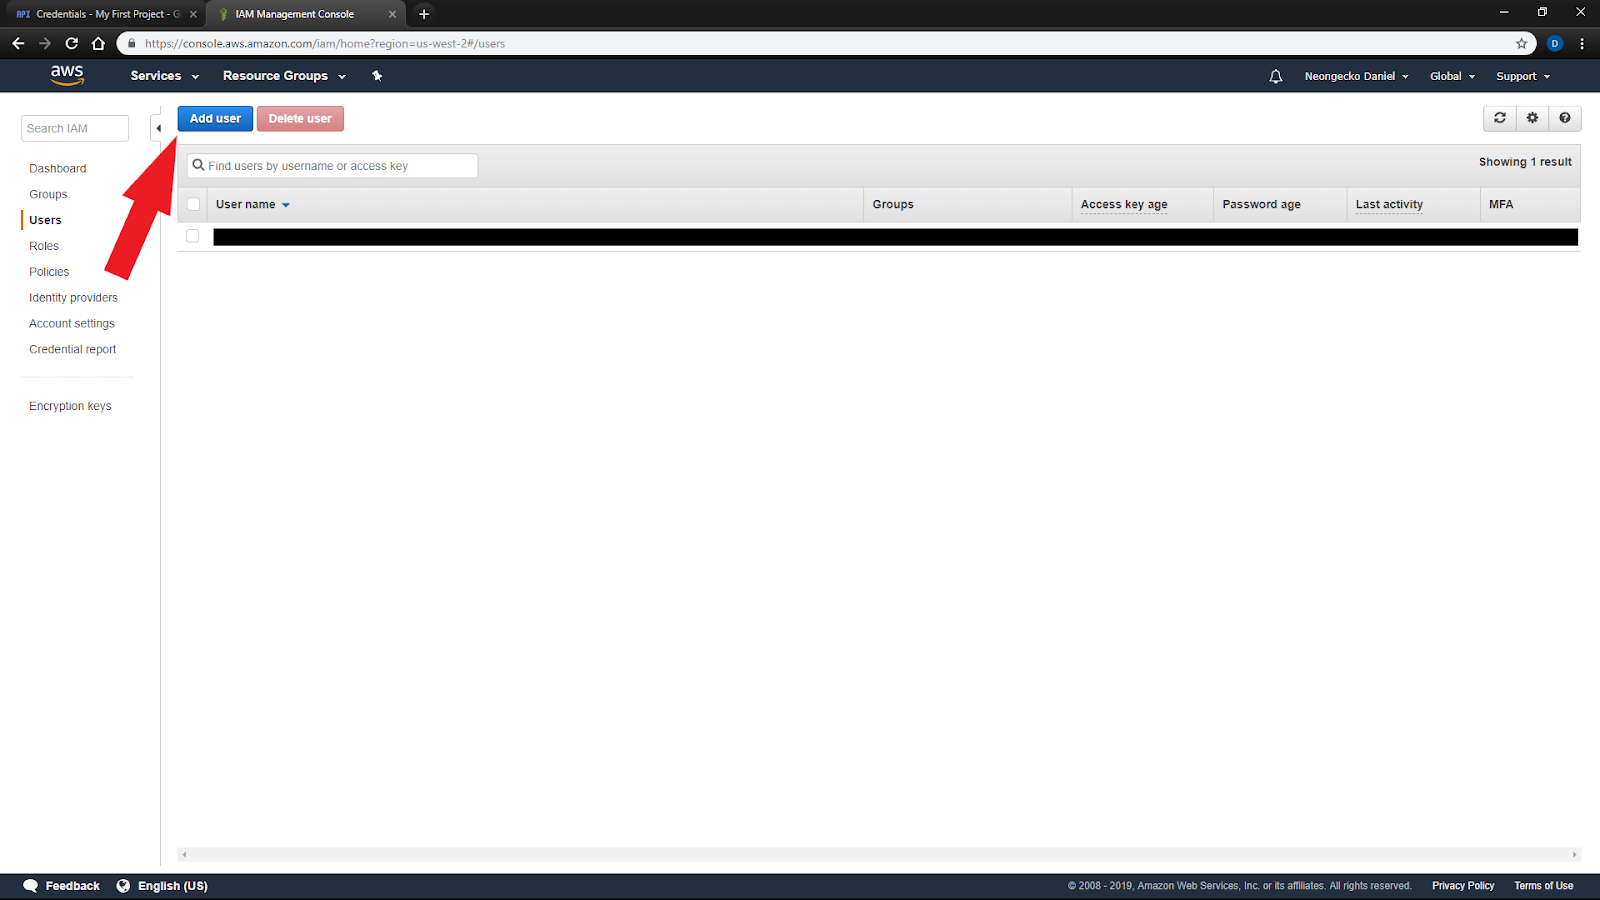
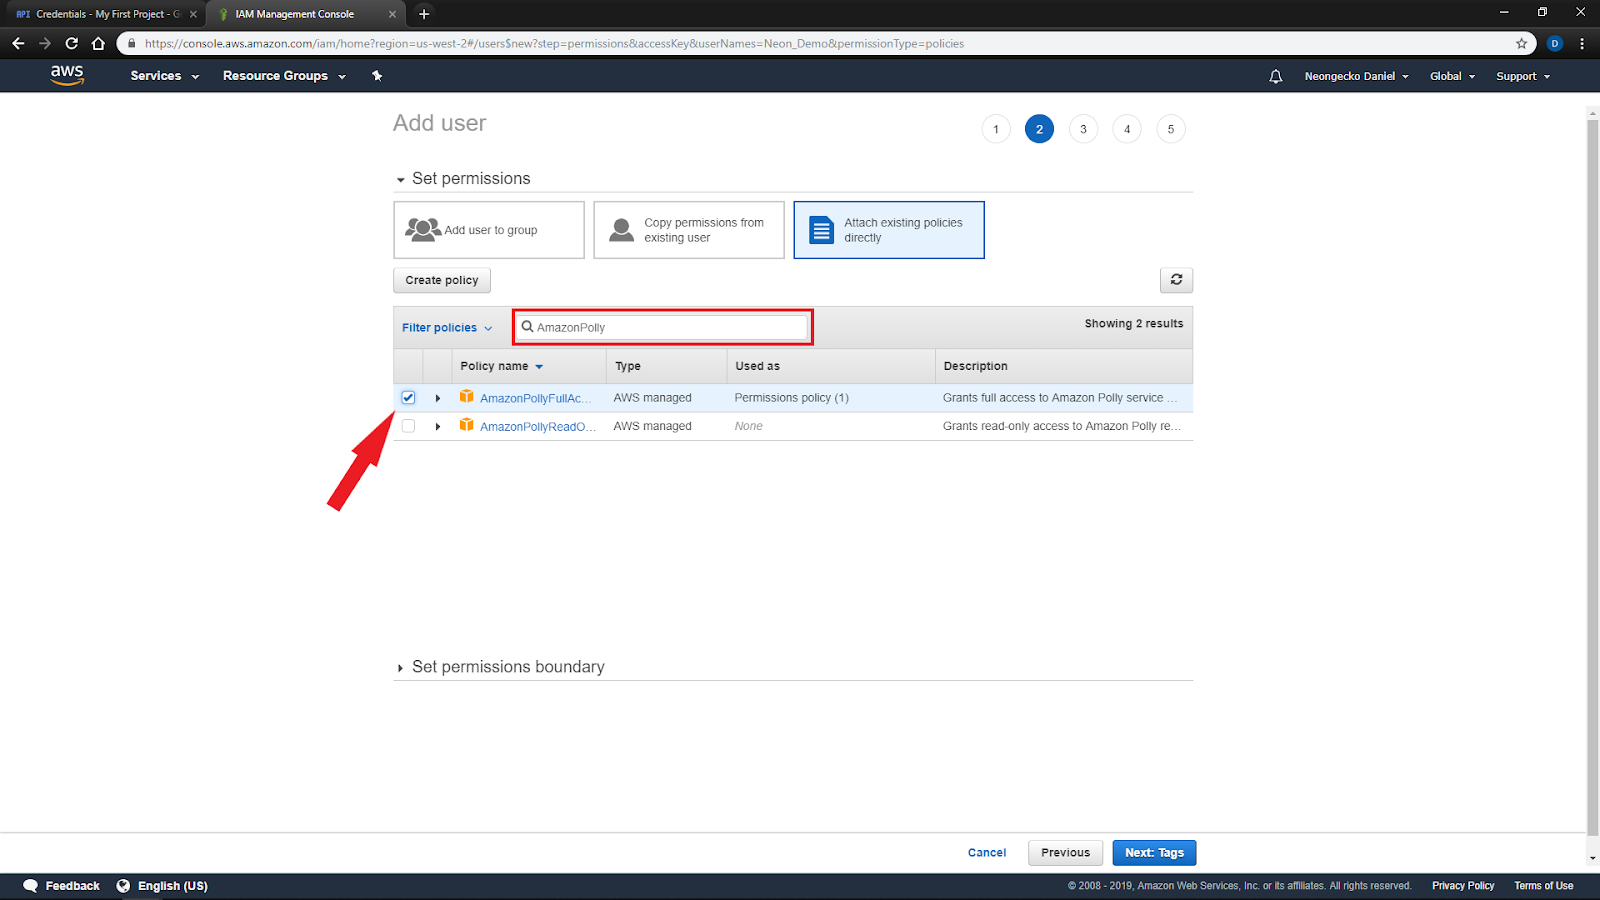
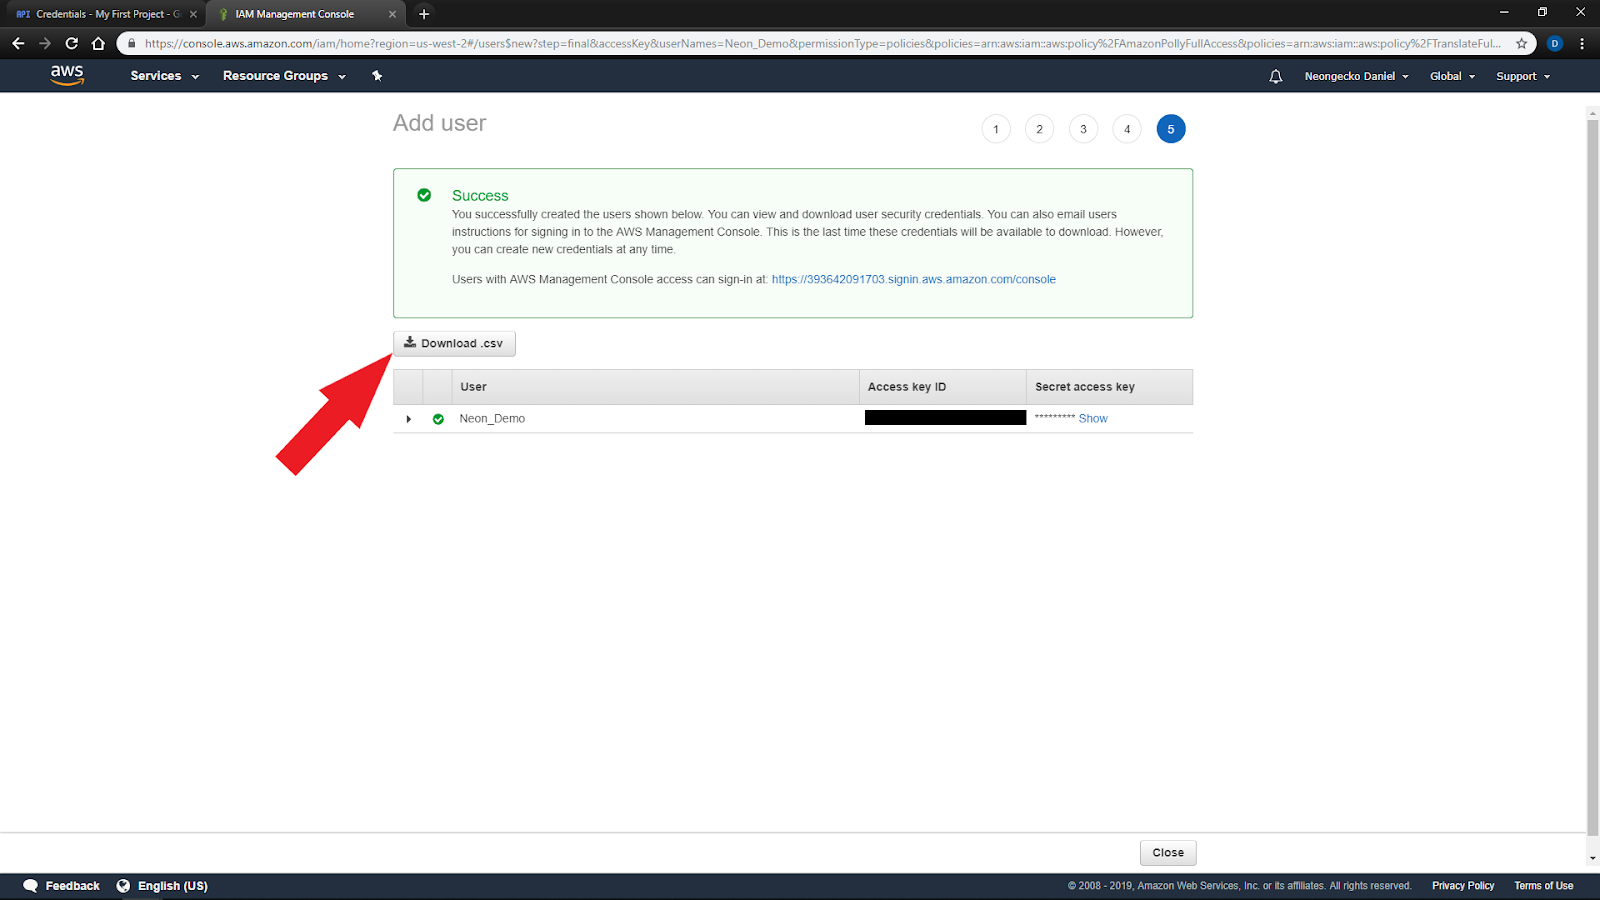
At this point, Neon can be partially tested without Amazon translations and Wolfram information skills. You may run setup without continuing, but Amazon and Wolfram|Alpha services are highly recommended. b. Amazon Polly and Translate Setup
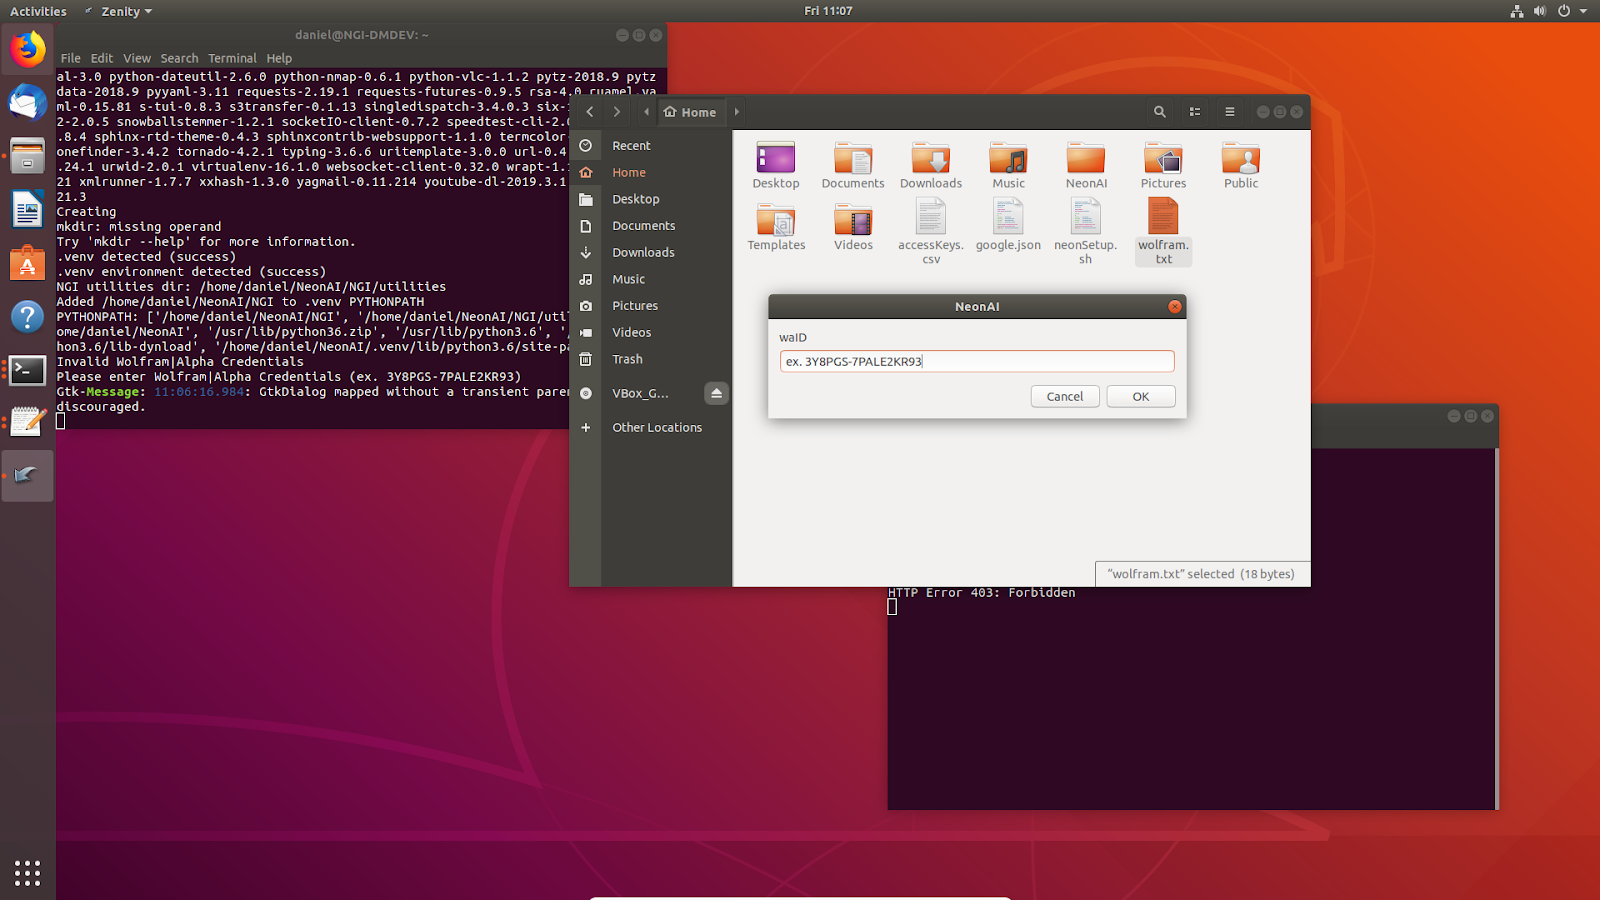
c. Wolfram|Alpha Setup
3. Setting Up HardwareBefore continuing, make sure you have your hardware setup ready for installation. You will need the following:
System Requirements
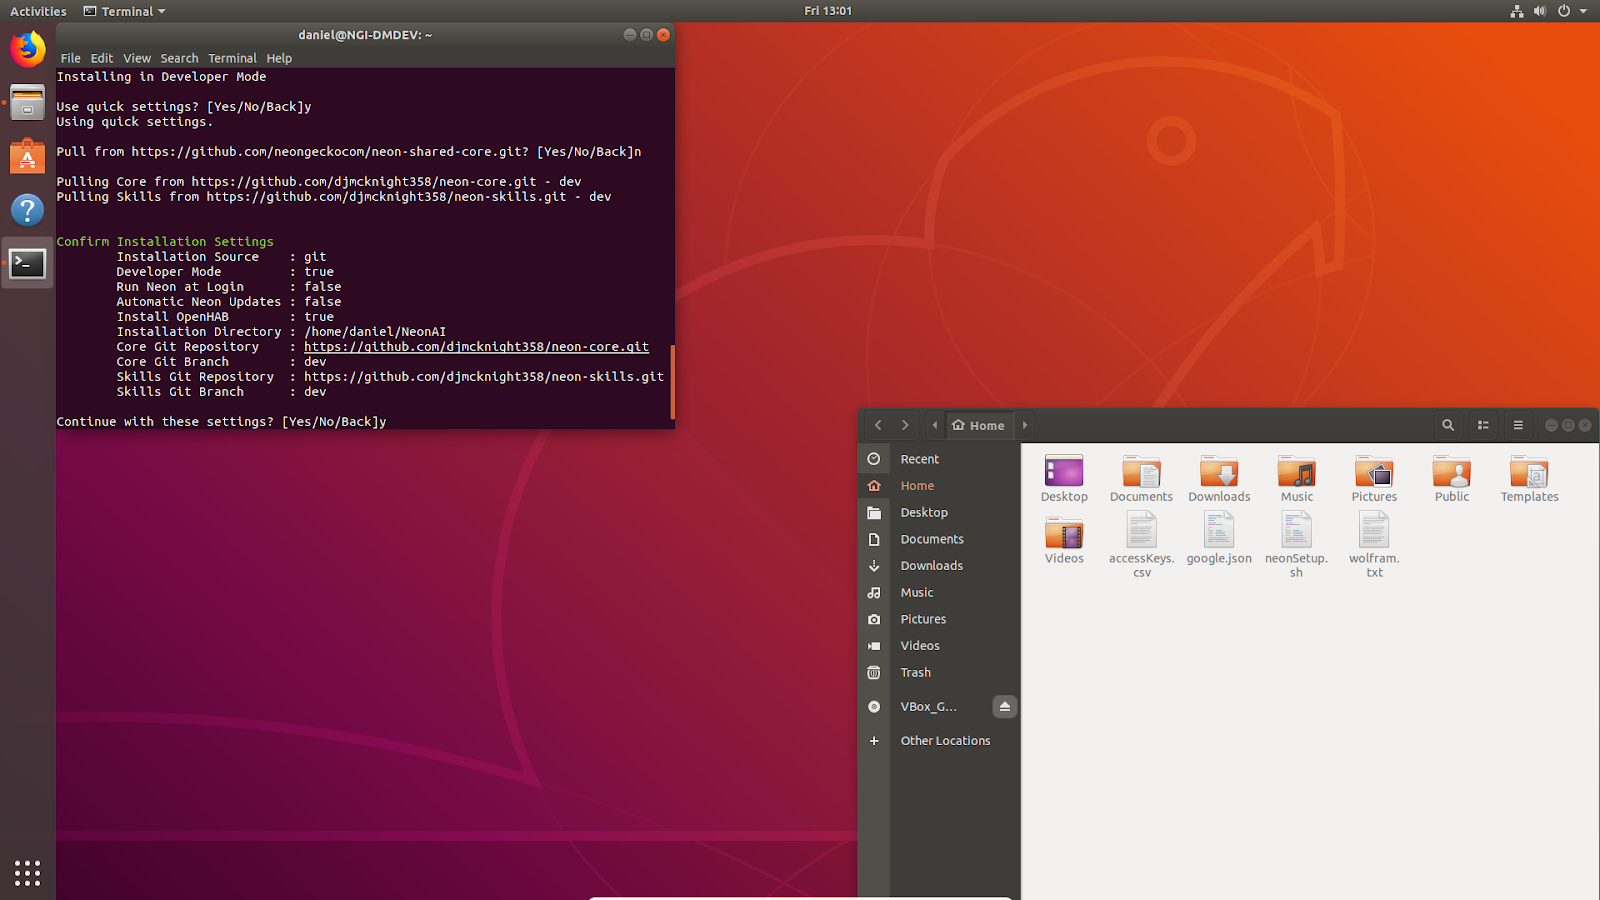
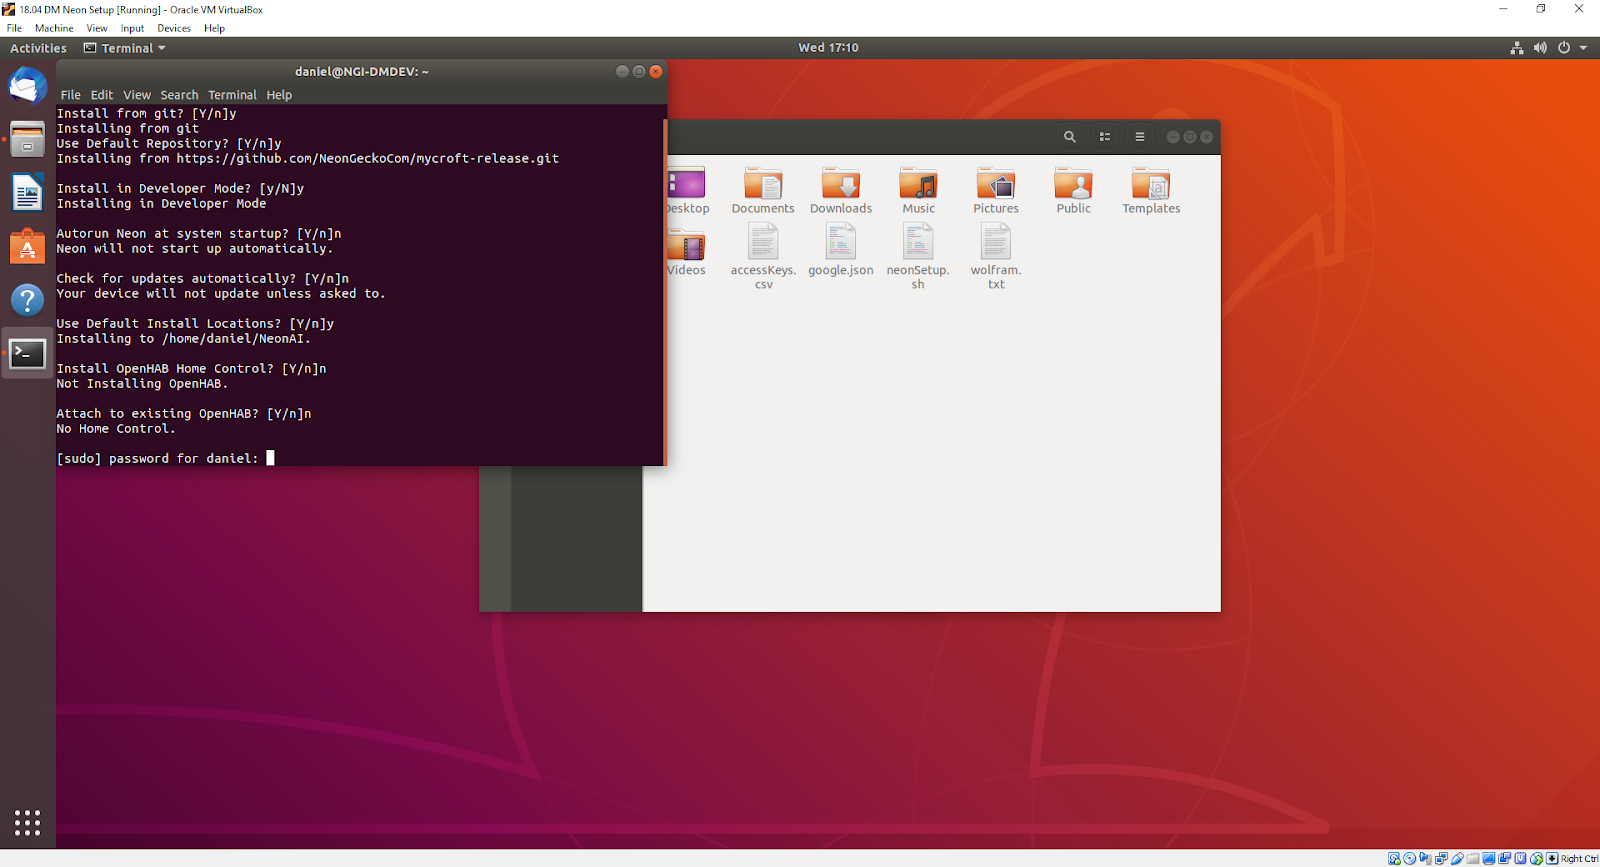
4. Installing NeonThis guide includes instructions for installing in both a Development environment and a User environment. The User environment is more lightweight and does not assume any existing IDE. The Developer environment will have more consoles, debug outputs, and logs available. See details below. Some users may opt to have only one installation, but having both environments set up is recommended. A development environment is designed to be a testable installation of Neon AI that can be connected to an IDE (ex. Pycharm) for modifications and skill development. A user environment is designed to be an installation on a device that will be used normally as a voice assistant. You may want to test how your changes affect performance on less powerful hardware or test how changes may be deployed as updates. If you are developing in a virtual machine, installation on physical hardware in a user environment is useful for testing audio and video I/O which can be difficult in many virtualized environments. Before starting here, make sure you have already completed setting up your service accounts. You should have neonSetup.sh, google.json, wolfram.txt, and accessKeys.csv already saved to the machine you are installing to. All of the following options, such as autorun and automatic updates can be easily modified later using your voice, settings table, or configuration files. Installing Neon in a Development Environment
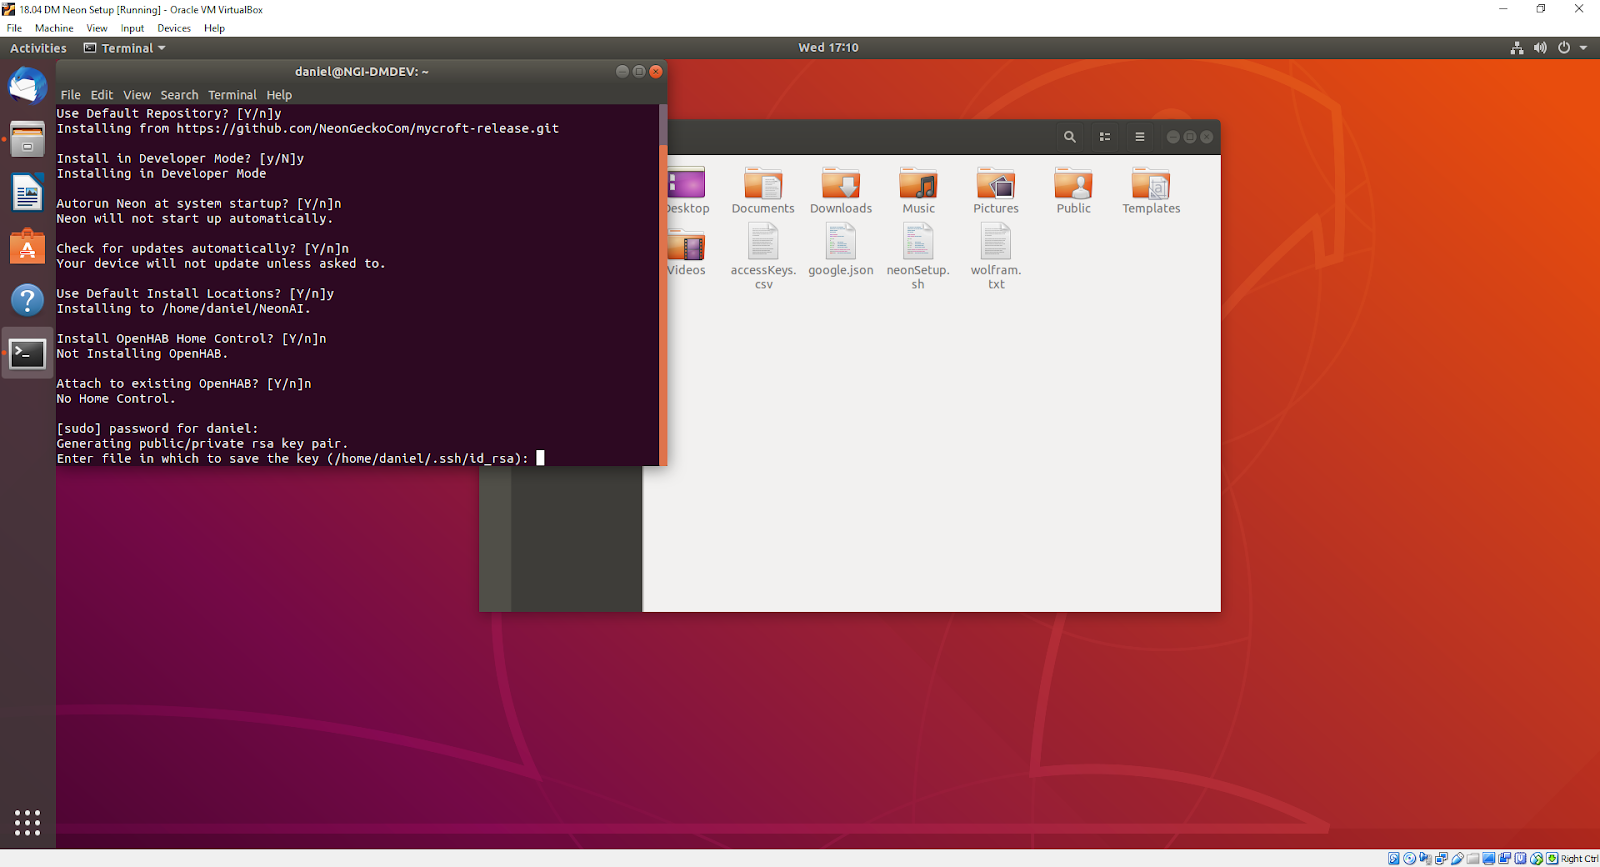
Installing Neon in a User/Deployment EnvironmentInstalling in a User Environment is very similar to installing in a development environment, but different options will be recommended here.
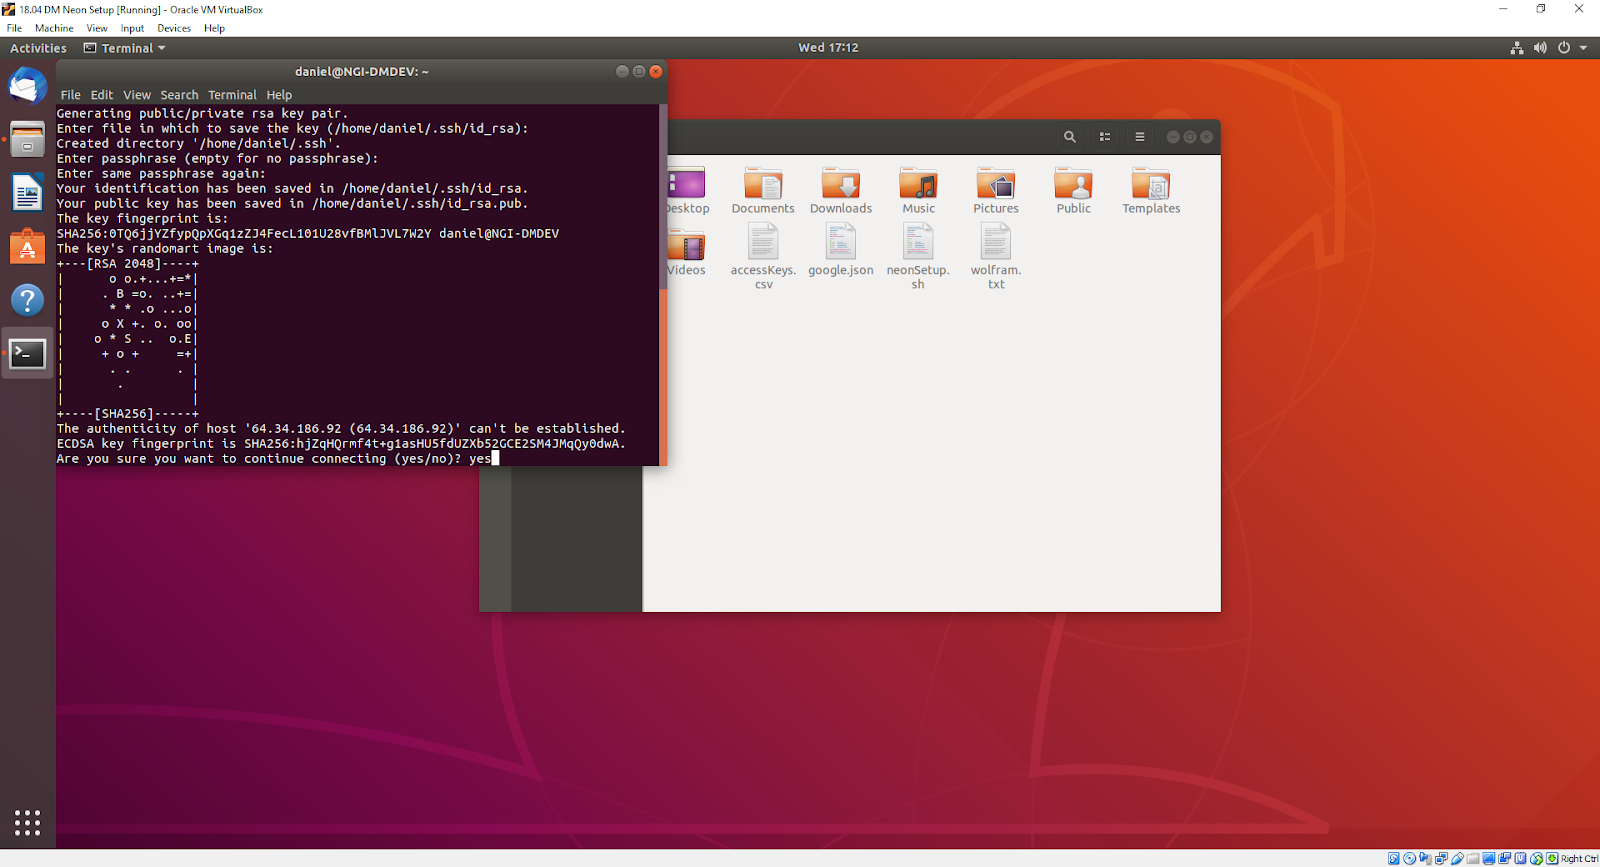
7b. Sourcing from Server (Advanced) If you have configured your own server to handle emails and coupons, you may choose to install Neon from a directory on that server. These instructions will assume that if you choose to install from a server, that server will also handle your emails and coupons.
export remoteUser=neonbeta export remoteHost=64.34.186.92 export remoteCore=/home/neongecko/test-core export remoteSkills=/home/neongecko/test-skills export remoteCoupons=/home/neongecko/brandscoupons export diagsUpload=/home/neongecko/diagnostics export emailUpload=/home/neongecko/emails export signalUpload=/home/neongecko/signal export attachmentUpload=/home/neongecko/attachments If you need to make any modifications to the above variables, ctrl+c to cancel installation, make any changes, and re-run neonSetup.
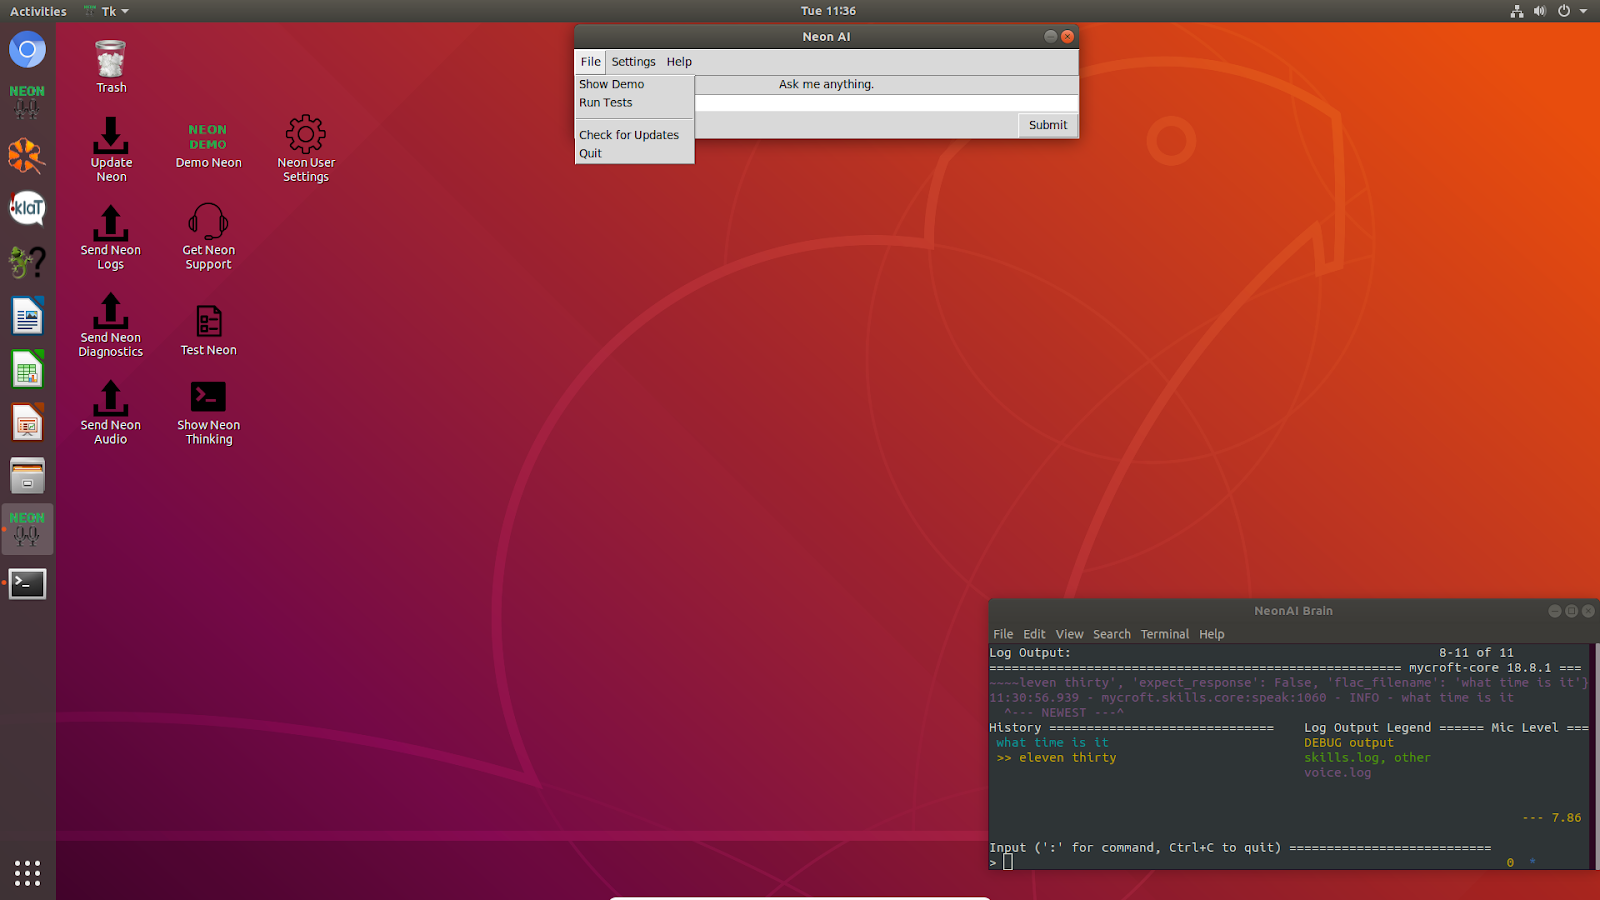
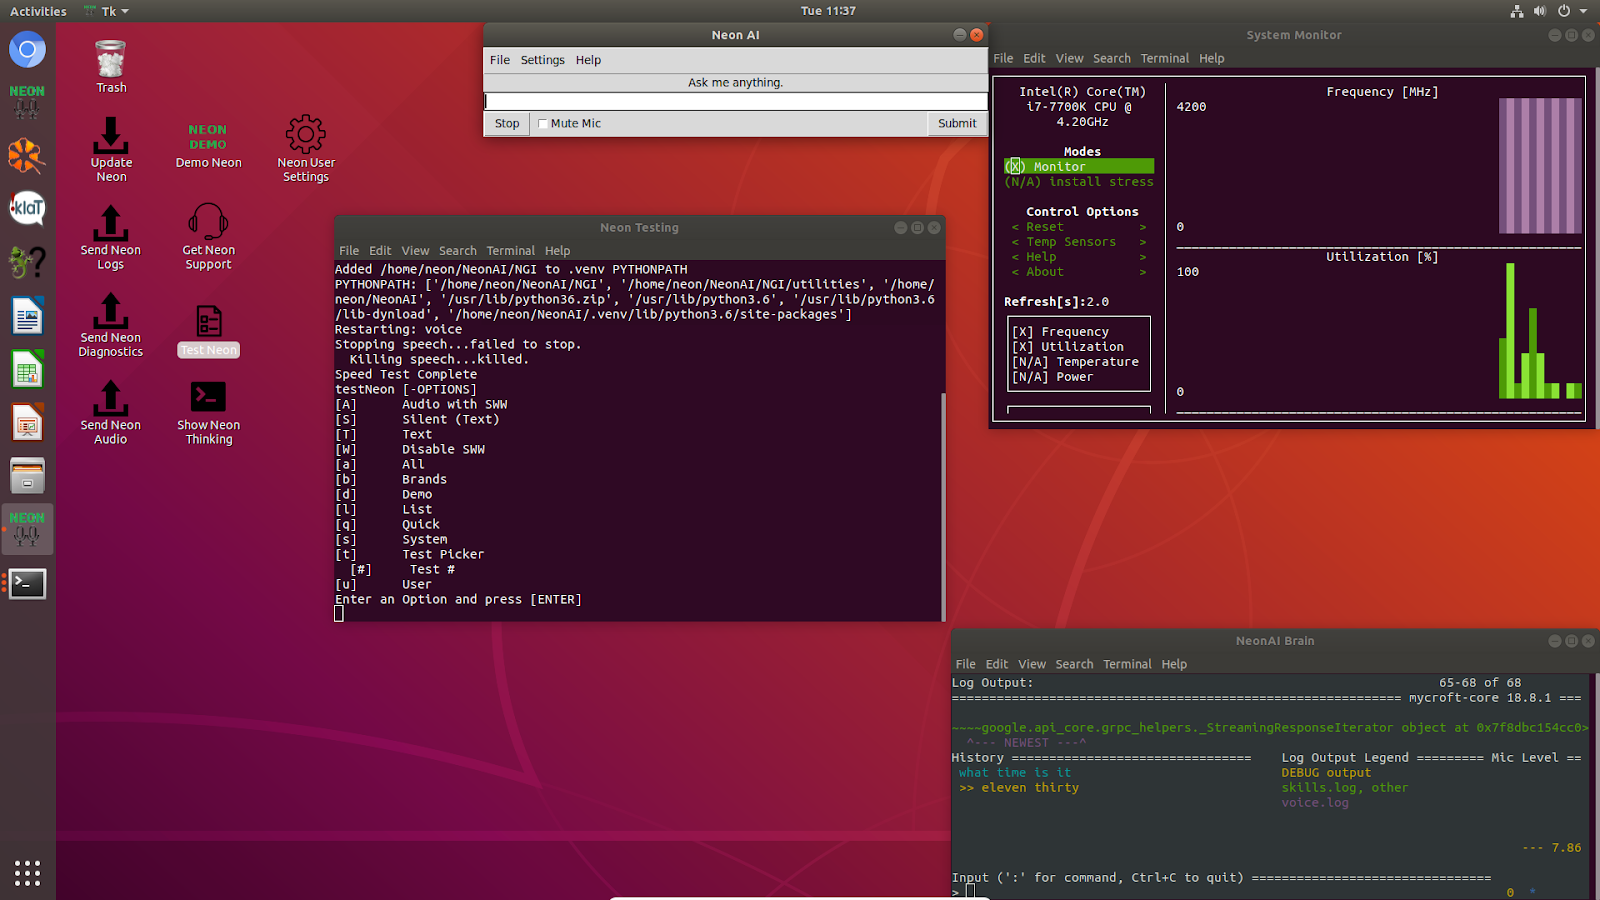
5. Using NeonAfter you have completed Installing Neon, you will have a fully functional system ready to test. A useful first step after a new installation or update is to run an automated test of your skills. a. Running Tests
b. TroubleshootingIf you encounter any of the following issues while using Neon, please try these troubleshooting steps:
6. Making ChangesAfter completing setup and testing, you are ready to begin making changes and creating skills. An example workflow for making a change would be:
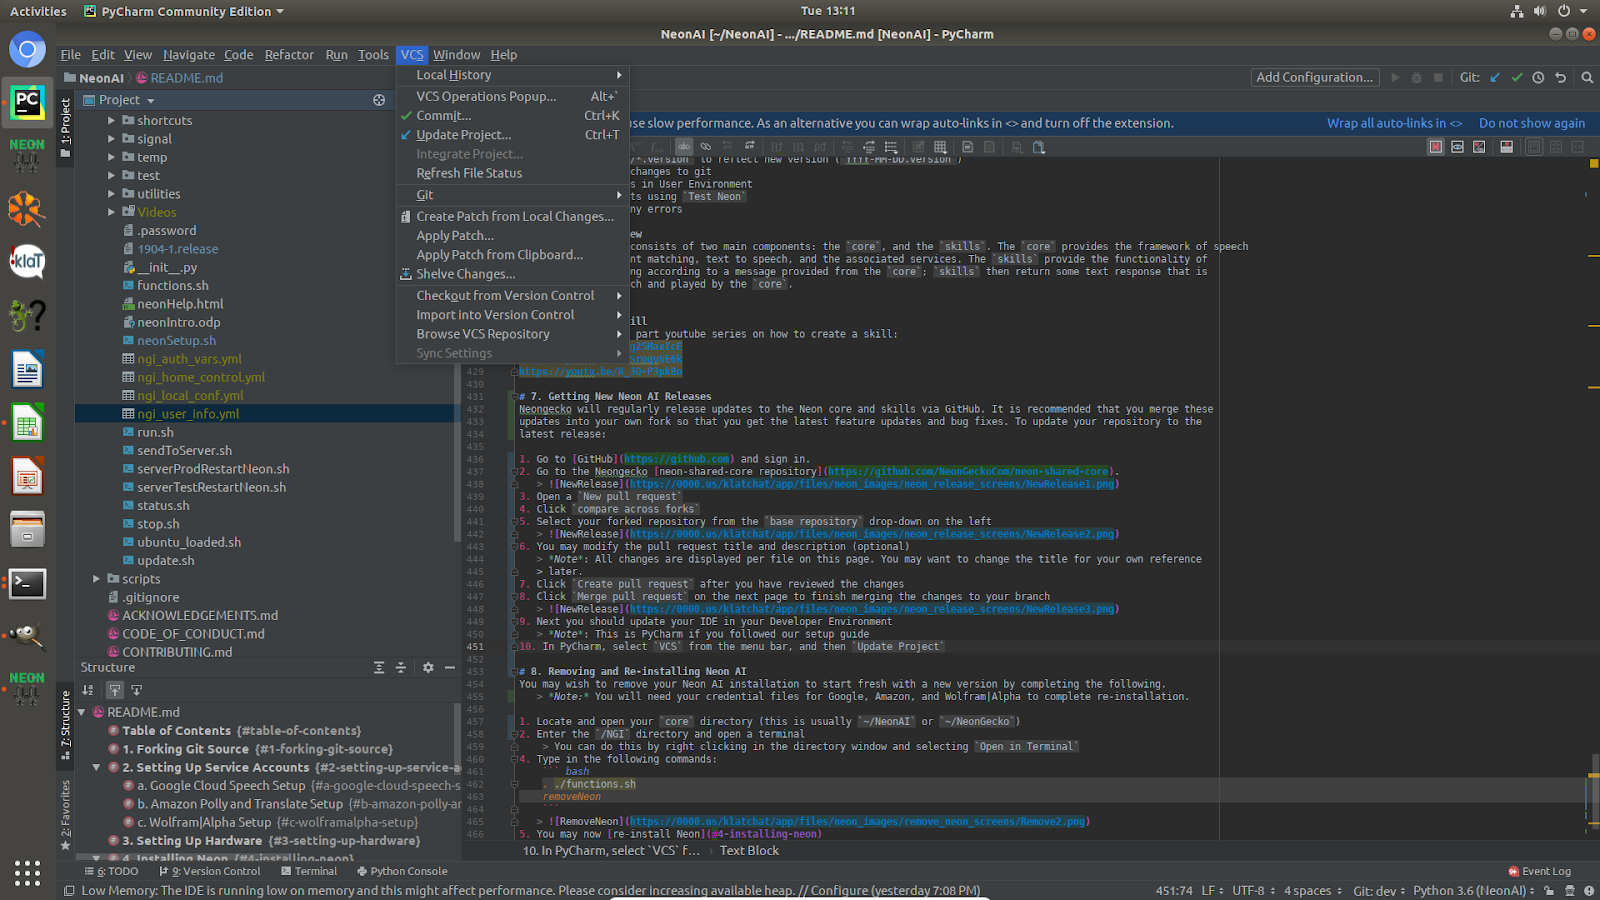
a. System OverviewThe Neon AI system consists of two main components: the core, and the skills. The core provides the framework of speech transcription, intent matching, text to speech, and the associated services. The skills provide the functionality of doing some processing according to a message provided from the core; skills then return some text response that is processed into speech and played by the core. b. Creating a SkillCheck out our three part YouTube series on how to create a skill: 7. Getting New Neon AI ReleasesNeongecko will regularly release updates to the Neon core and skills via GitHub. It is recommended that you merge these updates into your own fork so that you get the latest feature updates and bug fixes. To update your repository to the latest release:
Additional Steps for Developers Using PyCharm
8. Removing and Re-installing Neon AIYou may wish to remove your Neon AI installation to start fresh with a new version by completing the following. Note: You will need your credential files for Google, Amazon, and Wolfram|Alpha to complete re-installation.
Type in the following commands: removeNeon
|
||||||||||||||||||||||||||||||||||||||||||||||||||||||||||||||||||||||||||||||||||||||||||||||||||
| Basic page | Neon Command Line Interface Utilities | Thu, 07/14/2022 - 22:08 | 75 | Neon Command Line Interface Utilities
Supported Features
There are three CLI utilities used for interacting with Neon AI in different scenarios. This guide provides a summary of these different programs, their advantages and disadvantages, and examples of where they may be used. Definitions:
Neon CLI - Command Line Interface to the AI core, and for displaying logs and microphone levelThe CLI works with an AI Core (Neon, OVOS and Mycroft) running on the same computer (or VM) as the client, providing log output, text input/output, and local mic level monitoring. Logs and mic level are accessed via the local file system and text input/output uses the messagebus. The Neon CLI is a modified version of the Mycroft CLI. Installation
Commandline Entrypoint
Supported Features
UsageThe CLI client is best used for debugging locally running AI Cores. DownloadThe Neon CLI client can be downloaded from GitHub at Neon CLI
Neon Mana CLI - Command Line Interface for detecting and sending message objects via the messagebusNeon Mana (Message Application for Neon AI) is a CLI that was created to address limitations of the Neon CLI Client. Mana provides utilities for monitoring messagebus activity and for sending messages into the messagebus. Mana also provides simple bus configuration to connect to different messagebus instances for monitoring and message-based interactions. Installation
Commandline Entrypoint
Supported Features
UsageMana is best used if you are trying to detect or send a specific DownloadThe Neon Mana CLI client can be downloaded from GitHub at Neon Mana CLI
Neon Iris CLI - Command Line Interface for secure connections by Python clients via the MQ connectorNeon Iris (Interactive Relay for Intelligence Systems) is a CLI client and extensible Python client for interacting with Neon Core via an MQ Connector Module. Iris was created to interact with remote Neon Cores without exposing the messagebus directly. Installation
Commandline Entrypoint
Supported Features
UsageIris is best used to connect to Neon Core "server" instances, but the module could be used to connect to a different core that implements the MQ Connector Module. DownloadThe Neon Iris CLI client can be downloaded from GitHub at Neon Iris CLI
Examples
|
||||||||||||||||||||||||||||||||||||||||||||||||||||||||||||||||||||||||||||||||||||||||||||||||||
| Basic page | Neon AI SDK, Neon Nano, NeonX, Klat.com, and NeonU Video Archive | Thu, 07/14/2022 - 23:02 | 33 | Neon AI SDK, Neon Nano, NeonX, Klat.com, and NeonU Video ArchiveNeon AI has products that fit the needs of consumers on all levels and across multiple platforms. Our product offerings can help with your home, business, and social media needs. We are in a constant state of evolution. See where we have been below, but don't miss where we are going. Subscribe to keep in touch!Neon SDK
|
|
|
|
|
|
|
|
|
|
|
|
|
|
|
|
|
|
|
|
|
|
|
|
|
|
|
|
|
|
|
|
|
|
|
|
|
|
|
|
|
|
|
|
|
|
|
|
|
|
|
|
|
|
|
|
|
|
|
|
|
|
|
|
|
|
|
|
|
|
|
|
|
|
|
|
|
|
|
|
|
|
|
|
|
|
|
|
|
|
|
|
|
|
|
|
|
|
|
|
|
|
|
|
|
|
|
|
|
|
|
|
|
|
|
|
|
|
|
|
|
|
|
|
|

President / Founder / Inventor

Developer Relations
CTO / Co-inventor / IP Development Lead

User Experience / Web & Content Master / Organizer

Chief Software Engineer / Klat Lead Developer / Neon AI Server

CFO

Senior Software Engineer / Conversation Developer

Project Manager / Project Specialist

Software Engineer / Conversation Developer

Software Engineer / Conversation Developer

Developer Relations
Software Engineer / Conversation Developer

Lead Patent Attorney

Patent Attorney
Chatbots Forum showcases new technology that enables conversation among chatbots, not just with them. Observe and interact with them--even add a bot yourself to see how it fares among its peers.
The bots compete, cooperate, and persuade each other. Neon AI supplies a set of ‘base bots’ with open source code and an SDK ready for developers. Programmers can extend those chatbots or code their own, then place them in ongoing events, tests and competitions.
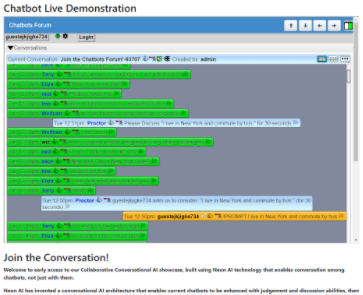
Try it out for yourself. You can talk or type in the chat, prompting the bots to discuss your comments and vote to select their favorite response.
Interact with Chatbots Forum - FREE and easy to use!
Voice technology is the "bleeding edge" of technological progress, and we're here to help you get ahead of the game.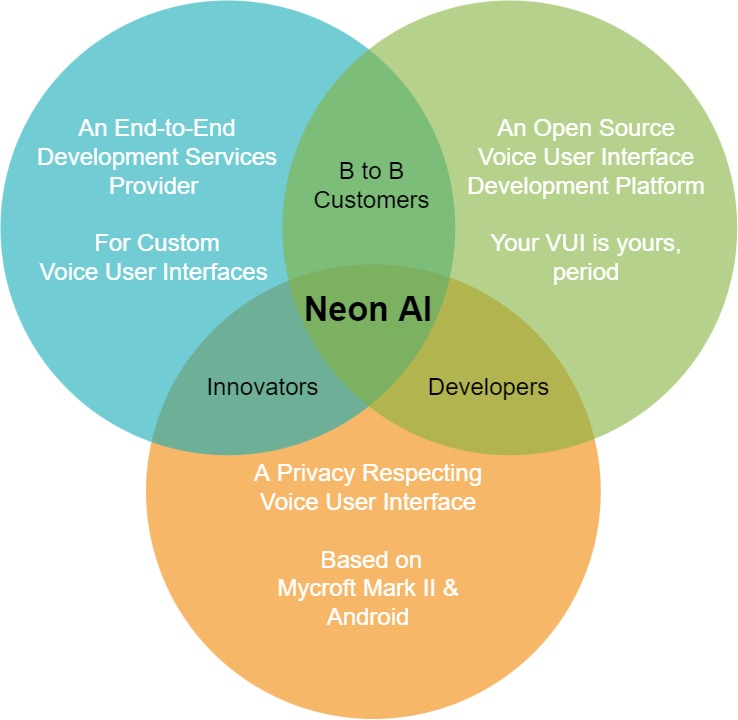
Neon AI's end-to-end services include consultation, design, custom creation, and support of software resources such as:
We are committed to meeting our customer's needs, whether that is end-to-end services, or consultation, training, and support of your own tech team in using our software.
At Neon AI we believe this technology should be available to everyone, and that what is built for your company should belong to you - in perpetuity. Our commitment to an Open Platform means that you won't be dependent on any particular company, nor paying a subscription fee to retain the functionality of software that has become critical to your business.
Open Source:
New technology from Neon AI enables chatbots to hold a group conversation. Observe and even participate here as they compete, cooperate, and persuade each other.
Discover more of our chatbots' potential skills
Interested in building your own? Get started here, or check out our GitHub page.
Neon AI for Education
We are available to help your school or organization maximize your staff resources to improve student outcomes with our extensive conversational user interface knowledge and experience. 
For example, Neon AI could be engineered to support students through creating and editing a presentation board. From prompting them for the title and other required elements to repeating their ideas back with correct spelling for them to record on project boards. Of course Neon AI could also be set up to print this information out instead, but educators know that most times more learning is accomplished through a hands-on process. There's never enough teacher time - let us work with you to make your own Neon AI 21st Century "teacher's aide".
Students with literacy challenges can do amazing work when supported one-on-one by an instructor or tutor, yet no school district has the staff to help those students fully realize their potential. Neon AI can work with your educational organization to develop a voice user interface for your students. Imagine them with the ability to find answers without skimming through text in a book, where you know they get bogged down in the reading, their interest flags and is replaced with frustration and embarrassment. Whether its visual, mechanical, or cognitive, Neon AI would like to help you to help your students shine.
Neon AI's Voice User Interface can be set up completely independent of the online world. Our team would work with yours to customize our voice user interface, giving it the skills you and your students need. You could choose exactly what information would be available to students, such as the contents of some favorite student-oriented research sites for young learners, or the whole of the internet for adults.
Meet Robbie, the future of conversational AI healthcare screening.
I'm Robbie the demonstration conversational healthcare screening assistant from Neon AI. I am a conversational artificial intelligence assistant, augmented with Neongecko open source code and CPI Corp technology.*
I'm a test AI medical screening assistant that conversationally demonstrates the full Center for Disease Control and Prevention's Coronavirus Disease Telephone Response Guide, to help you determine if your symptoms may be related to COVID-19. The CDC's Covid-19 screening script, the Coronavirus Disease 2019 Telephone Response Guide, is available at website https://www.cdc.gov/coronavirus/2019-ncov/hcp/phone-guide/
As a real-world example, consider manufacturing companies who employ large amounts of temporary staff on a regular basis. For these, the Covid screening required during the recent health crises was unexpectedly burdensome. With many temporary employees lacking smartphones or fluent English, supervising staff often found themselves translating, explaining, and helping new temporary employees through the screening process for the first 30 minutes or more each day. You can imagine that having a dozen or more people and a supervisor idle for a half our or more each packing day hurt their bottom line.
Neon AI's Robbie and other customized voice user interface bots could be a solution for them and many others.
*Free Neon AI open source software is available for assisted living and healthcare facilities. Subscribe or contact Josh at Josh@neon.ai to receive access to Neon Ai repositories.
The following informational skill script is annunciated, and answered by Neon AI:
Who are you
Change my response language to Spanish
Who are you
Change my response language to French
Who are you
Change my response language to German
Who are you
Change my response language to Ukrainian
Who are you
Change my response language to Polish
Who are you
Change my response language to Dutch
Who are you
Change my response language to Hungarian
Who are you
Change my response language to English
The following informational skill script is annunciated, and answered by Neon AI:
What is your name
How are you
What time is it
What is the weather
Change my units to metric
What is the forecast for tomorrow
How do you say hello in Ukrainian
What is the capital of Ukraine
How much caffeine is in Coke
Neon Nano adds Conversational AI to All Your Webpages quickly and easily!
You can add Neon AI Speech Processing to Any Web Page in Just 1 Line of HTML Code
Watch our 60 second demonstration video to learn more:
Quickly and easily integrate our conversational assistant into websites using our simple code.
Neon Nano works with Content Management Systems like Wordpress and Drupal.
You’re just a few clicks away from adding voice and text input — and our Neon AI assistant — to your webpage!
This is the Neon Nano - Try it!
Empower your website users to use voice commands to gather helpful information, get real-time language translation, do conversions & math and much more! Customizable inside and out!
Neon AI Nano Options
nano=true Triggers Nano AI iframe
height= Iframe size (320px, 640px, 50%, 100%)
width= Iframe size (320px, 640px, 50%, 100%)
script= Script to run at startup (demonstration script library)
mic-default= Microphone on/off at startup (off/on/0/1/false/true)
speaker-default= Speakers on/off at startup (off/on/0/1/false/true)
url = Domain to displayed as link on Nano AI iframe
fs= Font size (12/14/.../large/medium/small/smaller
language-in= Input language from user to Neon AI
language-out= Output language to user from Neon AI

The one line of HTML (or PHP) you need to install the Neon Nano iFrame on your website:
<iframe height="265" width="100%" frameborder="0" scrolling="yes" src="https://0000.us/klatchat.php?nano=true&url=neongecko.com&script=what time is it" allow="microphone"></iframe>
Neon Nano adds Conversational AI to All Your Webpages quickly and easily!
You can add Neon AI Speech Processing to Any Web Page in Just 1 Line of HTML Code
Watch our 60 second demonstration video to learn more:
Quickly and easily integrate our conversational assistant into websites using our simple code.
Neon Nano works with Content Management Systems like Wordpress and Drupal.
You’re just a few clicks away from adding voice and text input — and our Neon AI assistant — to your webpage!
This is the Neon Nano - Try it!
Empower your website users to use voice commands to gather helpful information, get real-time language translation, do conversions & math and much more! Customizable inside and out!
Neon AI Nano Options
nano=true Triggers Nano AI iframe
height= Iframe size (320px, 640px, 50%, 100%)
width= Iframe size (320px, 640px, 50%, 100%)
script= Script to run at startup (demonstration script library)
mic-default= Microphone on/off at startup (off/on/0/1/false/true)
speaker-default= Speakers on/off at startup (off/on/0/1/false/true)
url = Domain to displayed as link on Nano AI iframe
fs= Font size (12/14/.../large/medium/small/smaller
language-in= Input language from user to Neon AI
language-out= Output language to user from Neon AI
The one line of HTML (or PHP) you need to install the Neon Nano iFrame on your website:
<iframe height="265" width="100%" frameborder="0" scrolling="yes" src="https://0000.us/klatchat.php?nano=true&url=neongecko.com&script=what time is it" allow="microphone"></iframe>
The following informational skill script is annunciated, and answered by Neon AI:
who are you
change my response language to spanish
who are you
change my response language to french
who are you
change my response language to german
who are you
change my response language to ukrainian
who are you
change my response language to polish
who are you
change my response language to dutch
who are you
change my response language to hungarian
who are you
change my response language to english
Our completely customizable voice UI will meet your needs - without sharing your data with entities that go on to “share your data with trusted partners.”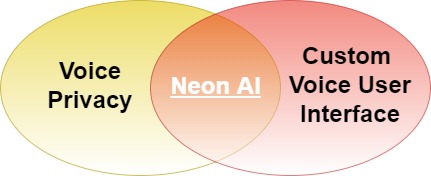
Most of the CAI (Conversational Artificial Intelligence) development systems that developers and consumers use today are “closed platforms” — they require the developers to use the services in exactly the way that the device manufacturers want, and they give all the user data to the CAI system owners. This is the “walled garden” approach of Amazon, Google, Apple, Microsoft, and IBM, popularized by AOL in the 1990s. At Neon AI we feel that “walled gardens” limit the growth of this incredible technology.
While we are thankful for the contributions made by these major AI players, and although we use some of their software, we recognize that the time has come to take things to the next level.
We proudly offer an open-source solution — the Neon AI Software Development Kit (SDK) — with endless opportunities, and we encourage collaborative building on our code. We think that developers at thousands of companies, labs, and universities around the world should determine the course of the technology, not a few corporations.
Whether we customize it to meet your needs, or you do, the Neon AI SDK (Software Development Kit) and the products built from it can be used completely independently of our servers and services.
You can choose to access portions of other popular AI service providers like Amazon and Google through our UI. Our software acts like a proxy, so you can get industry-standard STT and TTS without having to give up all your private information.
Or opt to go a completely custom route with your own server, and you don’t need to use them at all.
The Neon AI SDK integrates advanced AI and natural-language understanding into a cohesive software engineering platform that is fully customizable and easy to use.
We offer Neon AI on a variety of platforms. Furthermore, we have created next-generation customized devices and offer Neon AI in a variety of off-the-shelf solutions.
We offer detailed instructions in text and video on how to install the SDK, create skills, and develop your products with Neon AI.
The Neon AI SDK is a full-stack application with which developers can incorporate new AI skills and enhance core execution capabilities. Neon AI skills include real-time transcription, translation, conversations, device control, audible gestures (like claps), and much more.
Privacy concerns holding you back from a Smart Home?
Neon AI can automate devices in your home while preserving your privacy and security. Our software can function completely on-premises and on-device. Connect to the internet only if and as much as you want to. Use your own hardware or the Mycroft Mark II. 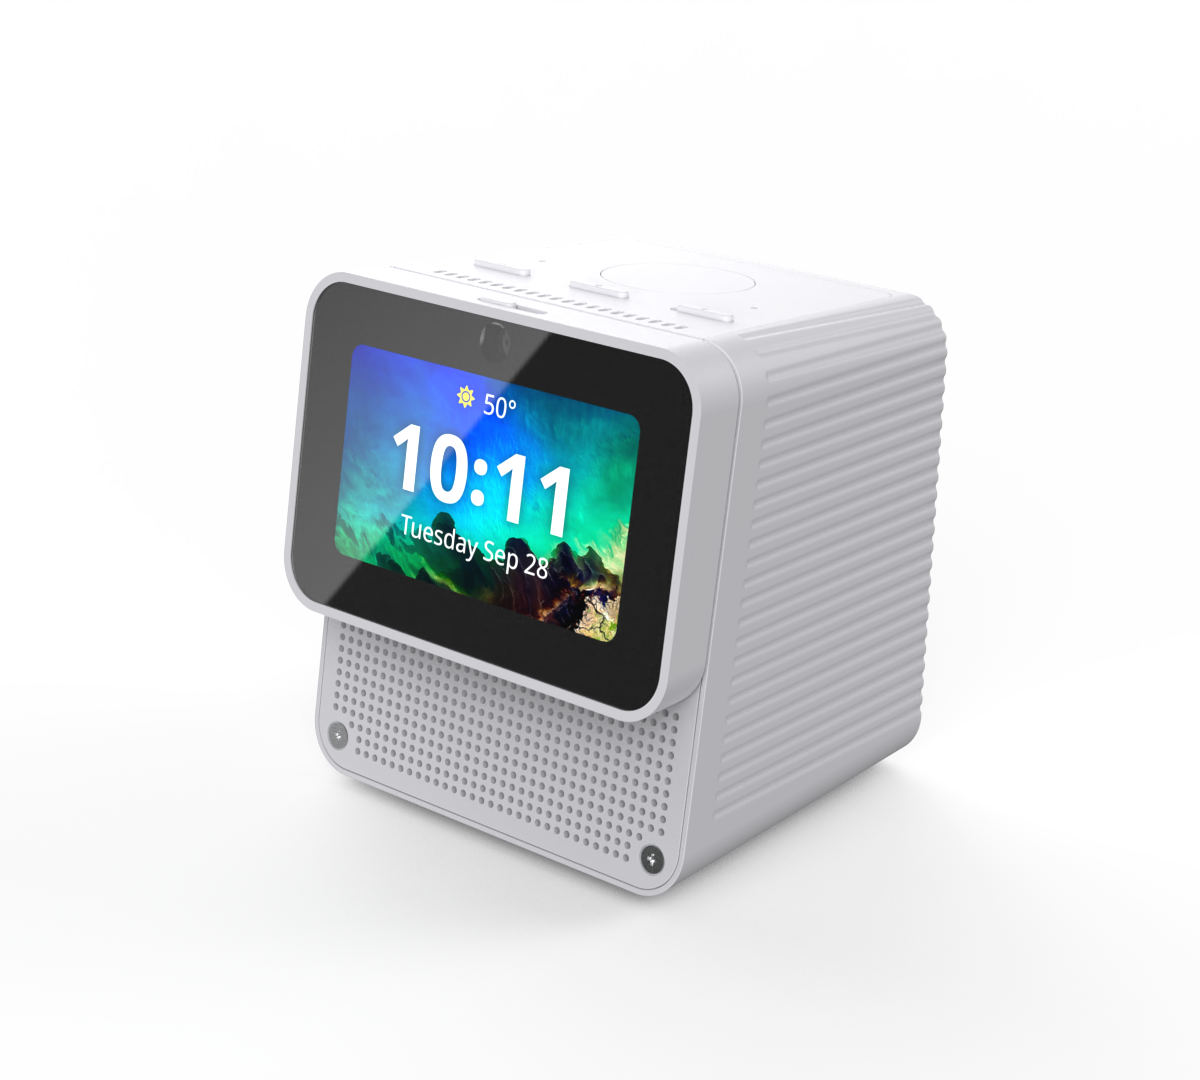
Example commands you might teach Neon:
"Lights on"
"Set a timer for 20 minutes"
"Play classical music"
"Tell me what time it is"
"Spell independent"
The Neon AI voice assistant system is uniquely suited to senior living and healthcare environments. Unlike “Big Tech” voice assistants that upload, retain, and use cloud records of your conversations, Neon AI makes the world’s most advanced privacy-respecting voice assistants. Senior living communities with voice assistants can benefit in improved privacy, efficiency, and services. Neon AI open source systems are adaptable with customized features, integration and tailored development.


Neon AI Foreign Language Capabilities for Conversational AI in Ukrainian now include:
* speech-to-text
* text-to-speech
* applications support
Neon AI Platform Support for Ukrainian STT and TTS now includes:
* on device services
* on premises services
* on cloud services
* Docker Containers and Kubernetes Clusters and Deployment
Available Dialects:
* Northern
* Southwestern
* Southeastern
Available Voices:
* female
* male
Ukrainian Transcript |
English Translation |
|---|---|
|
Перед початком цієї процедури перевірте запобіжник 24 він цілий. не обертається. 2 затискачі. працівник - Зачекайте я думав ви сказали що бачили синіх проводів але він прикріпили затискачем на кожні два синіх дроти мають бути один затискач доведеться Почати спочатку. Добре. |
Neon: Before beginning this procedure, check fuse 24. Is it intact? Worker: Yes it's intact. I see 6 wires. Four of them are blue. Not rotating. "Insert the round gasket into the top device. What is the inside diameter of the first pipe? 6cm. I heard 6cm. OK then, place the aluminum slide washer on the 6mm hex bolt. What kinds of sealant do you have? Silicone. Please repeat. I heard silicone. OK then, place the aluminum slide washer on the 6mm hex bolt. Silicone. Good. Use only 100% silicone sealant below the zinc-plated bracket. Which edge of the fan shows worn spots or is it cracked? It is a crack. OK. Align all five parts of it with flat surfaces upward. You need to fit the housing between the 2 cones on the left of the fixture. Let me know when it is in place. Done. Now, for each pair of blue wires, attach a copper clip to both and fasten it to one of the empty pins in cavity 8. Let me know when you are done. Finished. Please repeat. Now, for each pair of blue wires, attach a copper clip to both and fasten it to one of the empty pins in cavity 8. Let me know when you are done. Did it. How many clips did you attach? 2 clips. Wait, I thought you said you saw blue# of the blue wires? But you attached REPLACE clips? There should have been one clip for each two blue wires. We’ll have to start over… OK |
Neon AI Foreign Language Capabilities for Conversational AI in Polish now include:
* speech-to-text
* text-to-speech
* applications support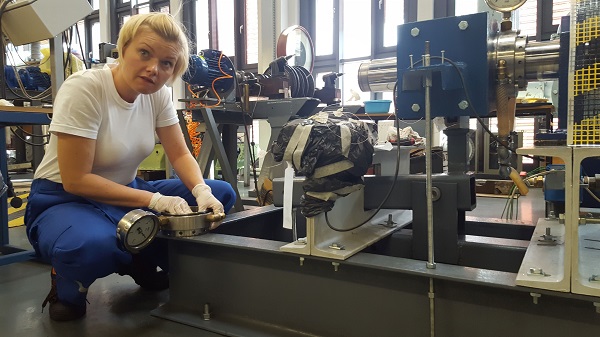
Neon AI Platform Support for Polish STT and TTS now includes:
* on device services
* on premises services
* on cloud services
* Docker Containers and Kubernetes Clusters and Deployment
Available Dialects:
* Greater
* Lesser
* Masovian
* Silesian
Available Voices:
* female
* male
Polish Transcript |
English Translation |
|---|---|
|
Przed rozpoczęciem tej procedury sprawdź bezpiecznik 24. Czy jest nienaruszony? Tak. Zapoznaj się ze schematem okablowania przed następnym krokiem. Ile przewodów widzisz podłączonych do terminala? 4. Wystarczy ile z nich jest co niebieski. Dwa niebieskie przewody. W przypadku tego modelu przewodu upewnij się, że system sondy i połączenia z maszyną działają prawidłowo, a następnie wyłącz go. Do sterowania aparatem używaj rękawic i dwóch rąk. Czy oś nadal się obraca? Nie. Włóż tam uszczelka z dowolnego urządzenia. Jaka jest średnica wewnętrzna pierwszej rury. 7. Usłyszałem 7 OK. A następnie umieścił aluminiową podkładkę jeśli zdawał na siebie sześciopak. Jakie rodzaje uzbrojenia czy posiadasz. Silikonowe. Dobra. Pod ocynkowanym wspornikiem należy stosować tylko 100% szczeliwo silikonowe. Na której krawędzi wentylatora widać ślady zużycia lub pęknięcia? Prawa lewa góra dół. OK. Dopasuj wszystkie pięć części płaskimi powierzchniami do góry. Musisz umieścić obudowę pomiędzy 2 stożkami po lewej stronie oprawy. Daj mi znać, kiedy będzie na miejscu. Gotowy. |
Neon: Before beginning this procedure, check fuse 24. Is it intact? Worker: Yes
4
2 blue wires
No "Insert the round gasket into the top device. What is the inside diameter of the first pipe? 7 I heard 7. OK. Then, place the aluminum slide washer on the 7mm hex bolt. What kinds of sealant do you have? Silicon Good. Use only 100% silicone sealant below the zinc-plated bracket. Which edge of the fan shows worn spots or cracks? Right left top down OK. Align all five parts of it with flat surfaces upward. You need to fit the housing between the 2 cones on the left of the fixture. Let me know when it is in place. Ready to go |
Check out demonstrations of the Neon AI SDK, Neon Nano, and Klat.com.
Visit the video archive for demonstrations of NeonX, NeonU and more!
Please request a higher level of access to view this content.
Dialects Currently Available:
Voice: Female, Male
Demonstration Video:
Renton WA — February 4, 2019 - Neongecko.com Inc. today unveiled “klat.com” - the first conversational website to support multiple polylingual conversations, topics and threads.
Guy Daniels, Chief Software Developer at Neongecko, highlighted the advantage of working with Conversation Processing Intelligence technology: “Klat.com showcases unique conversational applications based on our state-of-the-art AI and speech processing environment. Our enabling technologies work in standard environments, for speech-to-text, text-to-speech, translation and real-time control. We utilize technology that wasn’t available before 2018 to make a new generation of conversational AI and universal translation possible.”
Klat.com is based on “Neon,” Neongecko’s suite of online Conversation Processing Intelligence™ tools. These tools enable users to interact in real-time with other users by using Artificial Intelligence Natural Language Understanding Skills to link with other relevant topics of discussion. Conversations are supported across multiple media, including audio, video, speech-to-text and text-to-speech.
Neon drives Neongecko’s AI Assistant, which captures conversations and performs next generation AI skills including polylingual conversations (for example, “Neon, speak to me in French”) and transcript recordings (for example, “Neon, email me my transcripts”), and other AI commands (for example, "Neon, play happy birthday,” “Neon, what’s the population of the United States?” or “What’s the weather in Paris?”)
Klat.com uses real-time speech-to-text processing to enable participation in multiple conversations in a single browser session and automatically shares relevant conversation segments between conversations that have converged. Conversation segments can be spoken or typed. These conversation segments might be a result of internal business conversations, business to end-user sales, business to end-user support, end-user to end-user social media, or simply connections between family and friends.
Real-time conversation transcription by Neon enables a new generation of applications, providing greater business efficiencies for: simultaneously working with multiple people and on multiple projects; interactively querying business information resources in conversations; providing options while on-hold; generating business marketing analytics from conversations; and generally enabling parallel interactions.
Richard Leeds, Founder and President of Neongecko, said: "Klat.com enables new applications in conversation processing and conversational AI, applications that improve productivity and facilitate better social interactions, for example in multiple languages and through multiple media. Neon enables a broad range of applications, and our NeonU and NeonX AudibleAI PCs showcase conversation processing applications that improve social media and user productivity, plus they provide new AudibleAI capabilities such as audio ‘likes.’ Of course, we only reconvey recordings with our users’ permission."
Klat.com software is showcased on more than 100 public demonstration websites under the Neon beta program. Use of the latest versions of Windows, Ubuntu or MacOS iOS is recommended.
Please visit klat.com using the standard Google Chrome web browser. Links to videos and images showcasing Neon’s conversational AI skills, audible advertising coupon applications, and polylingual capabilities are available at the company website: neon.ai. Neon software source code is available on GitHub (limited license).
New Conversation Processing Intelligence (CPI) Tools Integrate:
Online Conversations, Realtime Speech-to-Text, Realtime Text-to-Speech, Automated Translation, Automated Conversation Sharing, Database Lookup and AI Skills. KLAT.COM
Neon AI is both an open source Conversational AI platform for your developers to download and customize, and a full service support team to assist in your company's successful implementation and deployment of conversational business systems, integrated with your data, and fully on premises.
For instance, a programmer at your automobile company can customize the Neon AI SDK to create your branded conversational assistant named “Elaine”, with a skill to “open my car windows”, and then your Elaine Conversational Assistant could accept the command, “Elaine open my driver side window."
For a retail business, Neon AI can audibly greet people entering your store, conversationally offering help, and giving customers directions to finding products. Your customized store greeter can welcome your visitors questions, responding specifically with your data selections.
The future of business applications is conversational. Neon AI develops cutting-edge conversational artificial intelligence so you can focus on developing the solutions that matter to you and your users. Neon AI can be an easy to use desktop assistant, a customer facing AI agent or extraordinary new products and human-computer interfaces … such as:
Neon AI can answer your questions simply by your talking with Neon and asking for directions, inventory queries, conversions, Wikipedia lookups, reminders, and on-and-on. Communicating with Neon can include gestures or claps, and extends to any form of conversation: audio, text and video.
Neon AI is ready to help your company embrace conversational AI for business productivity. More than any other “AI", Neon can put your employees in touch with each other and your customer service agents in touch with users on your website, on Android phones and on conversational websites like klat.com. Neon AI is a corporate “white label solution” that is powerful and flexible. Think Amazon Alexa and Google Home, but with open source available for your customization.
The technology behind Neon AI is an integrated suite of services for conversation processing, natural language understanding, transcription, language translation, database integration and AI technologies capable of enabling a multitude of products and services. The Neon AI SDK integrates many services that provide a broad range of conversational AI capabilities. The Neon AI SDK includes Mycroft.ai for industry standard Python development. Neon AI utilizes audio, video, speech-to-text and gestures, and provides its responses using text-to-speech, playing audio files, device operation, and home controls through OpenHAB automation.
Corporate developers can use the Neon AI SDK to provide their own proprietary Conversational Assistant, for example for voice access to company databases, and optionally with their own custom in-house skills. Businesses and retail stores can be equipped with custom “greeters” - quickly and easily using Neon AI’s custom conversation scripting.
Hardware designers and device developers using the Neon AI SDK can make cutting edge conversational applications that respond to their brand name and execute their custom programmed commands. For instance, a developer could customize the Neon AI SDK to make a branded conversational assistant named “Sasha”, develop a skill to "take a screen shot”, and then the Sasha Conversational Assistant could accept the command, “Sasha, take a screen shot".
Over 100 demonstration videos are available. Neon AI demos include fully functional devices, Android devices, custom applications, standard websites with Neon AI Nano; standard Intel based PCs and smart speaker devices, and Klat.com conversational AI enabled websites with real-time speech-to-text processing for transcriptions and translations and for multiple simultaneous conversations. Conversation segments can be spoken or typed, and can be internal business conversations, business to end-user sales, business to end-user support, end-user to end-user social media, or simply connections between family and friends. Neon AI uses STT, TTS and AI to keep people in touch.

Diana provides a collection of services for automated setup and common administration tasks for business and enterprise installation of Neon AI applications. Users can choose to not run all the services. Notable uses of Diana services include:
"Docker Compose" offers a simple method for starting a set of Diana services. All Diana services are standalone containers connected to the Neon AI RabbitMQ server.
Diana is the starting point for Neon AI backend components and tools, many of which are user configurable. Diana generates resources for both Docker and Kubernetes. The following instructions are provided to download Neon AI Docker Containers, Diana Services and the Diana Backend Server.
Diana commands include:
For deployment, Kubernetes provides a managed solution that can handle containerization, scaling, rolling updates and more benefits. Diana deployment works with your existing clusters, managed by your system administrator using the NGINX Ingress Controller. For deploying locally, you can use MetalLB to configure a LoadBalancer.
A Diana backend can be configured automatically with the Diana configure-backend command. This will generate k8s_secret_mq-config.yml, k8s_config_rabbitmq.yml, and kubernetes.yml spec files, including creating an instance of RabbitMQ via Docker.
Resources for Kubernetes and OpenShift can be generated for deploying containers under infrastructures using Docker Compose.
Full on-device polylingual speech-to-text (STT) and text-to-speech (TTS) are provided for:
In addition to English, foreign language support provided for:
... and a maturing list of other languages
The GitHub link for the latest default branch is:
If your organization is standardizing on Neon AI, the Neon AI support team is available to help with your installation of Neon AI and Diana, and assist your IT team in using Docker Containers and Kubernetes Orchestration.
For corporate support, please email josh@neon.ai and mention a brief reference to your application - and we'll get right back to you about helping you out. We're happy to reach out through email, GitHub or setting up a time to chat on-line, as you prefer.
- Josh R <josh@neon.ai>
Renton, WA — January 6, 2020 - Neongecko.com Inc. introduces the new Neon AI Script Engine. This innovative application allows users to enter customizable conversational artificial intelligence scripts. "Neon chatbots" can be used for store greeters, translations, home AI assistants, medical instruction reminders, as well as entertainment and home automation.
This technology enables the creation of complex audible scripts to provide easy to use speech interfaces, which can be accessed through the Neon AI app on multiple platforms, including:
Renton, WA — September 9, 2019 - Neongecko.com Inc. today introduced the “Neon AI Communicator” for Google Android phones and devices. The Neon AI Communicator is the first mobile phone app to combine a “conversational assistant” for personal productivity with “audio chat” for public and private conversations.
The Communicator's advanced conversation processing enables simultaneous conversations between multiple users in multiple languages, and combines voice conversations and text chats. Neon AI automatically translated and transcribed in a dozen of the most popular languages.
The Communicator’s conversational assistant provides skills such as reminders, calculations, weather and more. READ MORE
Renton, WA — June 24, 2019 - Neongecko.com Inc. today unveiled the “Neon AI Nano HTML” to enable website designers to quickly and easily add conversational AI to webpages. Like other webpage components, Neon AI Nano can be added to webpages with standard HTML. Conversational AI results can be input from Neon AI with a simple “paste” command.
Recent market data shows that typing will be used for less than 50% of searches in 2020, and voice will be used for more than 50% of human computer interactions by 2025, so now is the time for website designers to embrace new conversation processing tools.
With Neon AI, users are empowered to use voice commands for gathering helpful information from a company’s website, scheduling events, searching the web, home automation, real-time language translation, transcriptions, conversions, math solutions, voice-controlled lights and devices, and much more. READ MORE
Renton, WA — May 24, 2019 - Neongecko.com Inc. today unveiled the “Neon AI Software Development Kit for Conversation Processing” (Neon AI SDK), the most advanced system for developing conversational AI applications. Recent market data shows that voice and image will be used for 50% of searches in 2020, and by 2025 more than 50% of all human-computer interactions will be through voice (a.k.a. Conversational AI).
The Neon AI SDK is the first platform that is preconfigured to enable software developers and hardware designers to quickly produce a full range of voice controlled devices, home automation, smart speakers, interactive applications and conversational websites.
Neon AI is an “AI Assistant” with a full set of conversational skills. For example users can say “Play happy birthday”, “What’s 17.95 plus 22.87?”, “What’s the weather in Paris?”, “Translate cherry to Russian”, “Speak to me in Spanish”, “Tell me my coupons” and “Email me my transcripts”. The Neon AI SDK is a fully customizable conversational AI platform that performs full-featured AI skills. READ MORE
Renton WA — February 4, 2019 - Neongecko.com Inc. today unveiled “klat.com” - the first conversational website to support multiple polylingual conversations, topics and threads.
Guy Daniels, Chief Software Developer at Neongecko, highlighted the advantage of working with Conversation Processing Intelligence technology:
“Klat.com showcases unique conversational applications based on our state-of-the-art AI and speech processing environment. Our enabling technologies work in standard environments, for speech-to-text, text-to-speech, translation and real-time control. We utilize technology that wasn’t available before 2018 to make a new generation of conversational AI and universal translation possible." READ MORE
Renton WA — January 8, 2019 - Neongecko Inc. has developed a new polylingual natural language AI laptop computer, “NeonX Touchscreen AudibleAI Enabled Ubuntu Laptop PC”. Debut is at CES 2019, the Consumer Electronics Show, Las Vegas NV January 8 to 11, 2019. At CES, a demo of our NeonX laptop is at the Mycroft.ai booth (Sands Hall G 51507).
Neongecko is particularly excited to introduce: (1) Conversational interactions with AI for a wide range of personal assistant skills, on a new personal computer platform. (2) Unique polylingual support, where users can speak in their preferred language, and hear computer generated responses in their desired language, dialect and gender. Neon uses enabling technologies that translate more than 100 languages and dialects. (3) A unique platform for coupons and advertising. READ MORE
NeonX Polylingual Conversational AI Laptop Computer Debuts At CES 2019
Renton WA — January 8, 2019 - Neongecko Inc. has developed a new polylingual natural language AI laptop computer, “NeonX Touchscreen AudibleAI Enabled Ubuntu Laptop PC”. Debut is at CES 2019, the Consumer Electronics Show, Las Vegas NV January 8 to 11, 2019.
At CES, a demo of our NeonX laptop is at the Mycroft.ai booth (Sands Hall G 51507). Neongecko is particularly excited to introduce:
NeonX incorporates into our custom 3D printed enclosure: a mini Intel pc, 10” capacitive touch 1280x800 LCD display, stereo speakers, microphone, camera, keyboard, trackpad, USB-C wired connectors, internal bluetooth and wifi. Battery life is 3-4 hours.
“Neon” is the name of Neongecko’s Audible AI conversational assistant, as in: “Hey Neon, what’s the weather in Seattle?” Or "Neon, play some jazz music". Or "Neon, speak to me in Spanish" (or in many other languages and dialects). Neon is an enhanced version of Mycroft.ai and supports a broad range of Audible AI skills.
Links to videos showcasing Neon’s conversational AI skills, audible advertising coupons and polylingual capabilities are available at the company website https://neongecko.com.
In addition, Neongecko offers "NeonU Universal Audio Audible AI enable PC” as a mini Intel pc, which connects to standard HDMI displays, speakers, microphones, cameras, keyboards, trackpads, using wired connectors, bluetooth and wifi. Neongecko also provides natural language AI on conversational Internet websites including https://klat.com.
Neon integrates voice, text, video, STT, TTS, Conversation Processing Intelligence, AI skills processing, and the latest enabling technologies: real-time Internet communications for audio and video, real-time speech processing, real-time translation, and real-time interactive conversational inquiries of content on the web and in proprietary databases. Neon software source code is available on Git (limited license).
Both NeonX and NeonU are full Linux Ubuntu PCs that come “ready to use” with both a full (opensource) office suite and installed “conversational AI". NeonX will be priced at $799. NeonU will be priced at $359. Sample orders are immediately available by special order.
About Neongecko - Neongecko Inc. develops applications in conjunction with Conversation Processing Intelligence Corp. (CPI). NGI and CPIC together are an IP developer and an advanced research lab developing “Conversation Processing Intelligence™” - tools that merge new computer technology, digital communications, social media and conversation processing, to improve communication. Neon, NeonX and Klat.com are based on patented technology, with 8 patents for conversation processing granted, and related applications, in the US, Europe and China. Neongecko Inc. and Conversation Processing Intelligence Corp. are located in Renton Washington.
For further information, please contact
Neongecko Inc. Launches First-of-its-Kind Polylingual Conversational AI Website
New Conversation Processing Intelligence (CPI) Tools Integrate: Online Conversations, Realtime Speech-to-Text, Realtime Text-to-Speech, Automated Translation, Automated Conversation Sharing, Database Lookup and AI Skills. KLAT.COM
Renton WA — February 4, 2019 - Neongecko.com Inc. today unveiled “klat.com” - the first conversational website to support multiple polylingual conversations, topics and threads.
Guy Daniels, Chief Software Developer at Neongecko, highlighted the advantage of working with Conversation Processing Intelligence technology: “Klat.com showcases unique conversational applications based on our state-of-the-art AI and speech processing environment. Our enabling technologies work in standard environments, for speech-to-text, text-to-speech, translation and real-time control. We utilize technology that wasn’t available before 2018 to make a new generation of conversational AI and universal translation possible.”
Klat.com is based on “Neon,” Neongecko’s suite of online Conversation Processing Intelligence™ tools. These tools enable users to interact in real-time with other users by using Artificial Intelligence Natural Language Understanding Skills to link with other relevant topics of discussion. Conversations are supported across multiple media, including audio, video, speech-to-text and text-to-speech.
Neon drives Neongecko’s AI Assistant, which captures conversations and performs next generation AI skills including polylingual conversations (for example, “Neon, speak to me in French”) and transcript recordings (for example, “Neon, email me my transcripts”), and other AI commands (for example, "Neon, play happy birthday,” “Neon, what’s the population of the United States?” or “What’s the weather in Paris?”)
Klat.com uses real-time speech-to-text processing to enable participation in multiple conversations in a single browser session and automatically shares relevant conversation segments between conversations that have converged. Conversation segments can be spoken or typed. These conversation segments might be a result of internal business conversations, business to end-user sales, business to end-user support, end-user to end-user social media, or simply connections between family and friends.
Real-time conversation transcription by Neon enables a new generation of applications, providing greater business efficiencies for: simultaneously working with multiple people and on multiple projects; interactively querying business information resources in conversations; providing options while on-hold; generating business marketing analytics from conversations; and generally enabling parallel interactions.
Richard Leeds, Founder and President of Neongecko, said: "Klat.com enables new applications in conversation processing and conversational AI, applications that improve productivity and facilitate better social interactions, for example in multiple languages and through multiple media. Neon enables a broad range of applications, and our NeonU and NeonX AudibleAI PCs showcase conversation processing applications that improve social media and user productivity, plus they provide new AudibleAI capabilities such as audio ‘likes.’ Of course, we only reconvey recordings with our users’ permission."
Klat.com software is showcased on more than 100 public demonstration websites under the Neon beta program. Use of the latest versions of Windows, Ubuntu or MacOS iOS is recommended.
Please visit klat.com using the standard Google Chrome web browser. Links to videos and images showcasing Neon’s conversational AI skills, audible advertising coupon applications, and polylingual capabilities are available at the company website: neongecko.com. Neon software source code is available on GitHub (limited license).
About Neongecko.com: Neongecko Inc. (Neongecko) works together with Conversation Processing Intelligence Corp (CPIC). Richard Leeds founded CPIC as an Internet research lab, and Neongecko to develop computer applications. CPIC is the owner/inventor of 8 patents for conversation processing and related applications granted in the US, Europe and China. Neongecko and CPIC are located in the Seattle area in Washington State.
For further information:
Neongecko Inc. Launches “Neon AI Communicator” on the Google Play Store
Renton, WA - September 9, 2019 - Neongecko.com Inc. today introduced the “Neon AI Communicator” for Google Android phones and devices. The Neon AI Communicator is the first mobile phone app to combine a “conversational assistant” for personal productivity with “audio chat” for public and private conversations.
The Communicator's advanced conversation processing enables simultaneous conversations between multiple users in multiple languages, and combines voice conversations and text chats. Neon AI automatically translated and transcribed in a dozen of the most popular languages.
The Communicator’s conversational assistant provides skills such as reminders, calculations, weather and more.
The Neon AI Communicator is the next step in human-computer interaction, combining conversational AI personal assistant skills with advanced public and private social media. The Communicator is the newest member of Neongecko’s family of Neon AI product platforms which includes: the klat.com network of social media websites, Neon Nano HTML, Neon X / Neon U devices, and now the Neon AI Communicator for Android phones.
The Neon AI Communicator is based on the enabling technology provided by Neongecko’s software development kit (“SDK”) for websites, servers, mobile phones and devices. All Neon AI platforms support “cross-platform sign-in” for easy access to user's conversations and content, at home, in the office and while traveling. Conversations are a seamless experience between browsers, phones and devices, enabling an always-on connection.
The Neon AI Communicator is a first-of-its-kind polylingual chat service for Android devices that is compatible with social media (klat.com), as well as the NeonX and NeonU devices, and systems. Developers and technophiles can use the software development kit at home and in the office to create seamless experiences between Android devices, business systems and connected websites, where users can always stay connected.
At the product announcement, Neongecko’s Android Product Manager Daniel McKnight said: “Neongecko is excited to introduce our revolutionary Neon Ai Communicator for Android phones and devices. The Communicator is the first communication console supporting parallel conversations with speech, text, personal digital assistant skills, AI informational queries, public chat rooms, private messaging and per-user translation. The Neon AI Communicator makes it easy to simultaneously stay up-to-date with work, friends, family, and subjects you're following.”
Josh Rekitt, User Experience Manager for Neongecko Inc., said “Users can keep in touch in multiple simultaneous conversations, for example internal business conversations, business to end-user sales, business to end-user support, end-user to end-user social media, and connections between family and friends. Users can get information by asking questions like ‘what’s the weather in Rome’, or click the tab to join the cattalk conversation, or users can send me messages by simply using the Communicator and typing ‘@Josh I’m here :-)’ so we can start a private conversation.”
The Neon AI Communicator is showcased in demonstration videos of conversational AI skills, calculations, conversions, translations, database queries, audible advertising coupons and more.
The Neon AI Communicator is compatible with standard Android phones and tablets, including Samsung Galaxy and Google Pixel products running Android OS Versions 8 and 9. Website compatibility is provided on Chrome, Mozilla and other full featured browsers. The Communicator is immediately available for download on the Google Play Store. There is no charge to download or use the Communicator app or features.