
Table of Contents
- Forking Git Source
- Setting Up Service Accounts
- Setting Up Hardware
- Installing Neon
- Using Neon
- Making Changes
- Getting New Neon AI Releases
- Removing and re-installing Neon
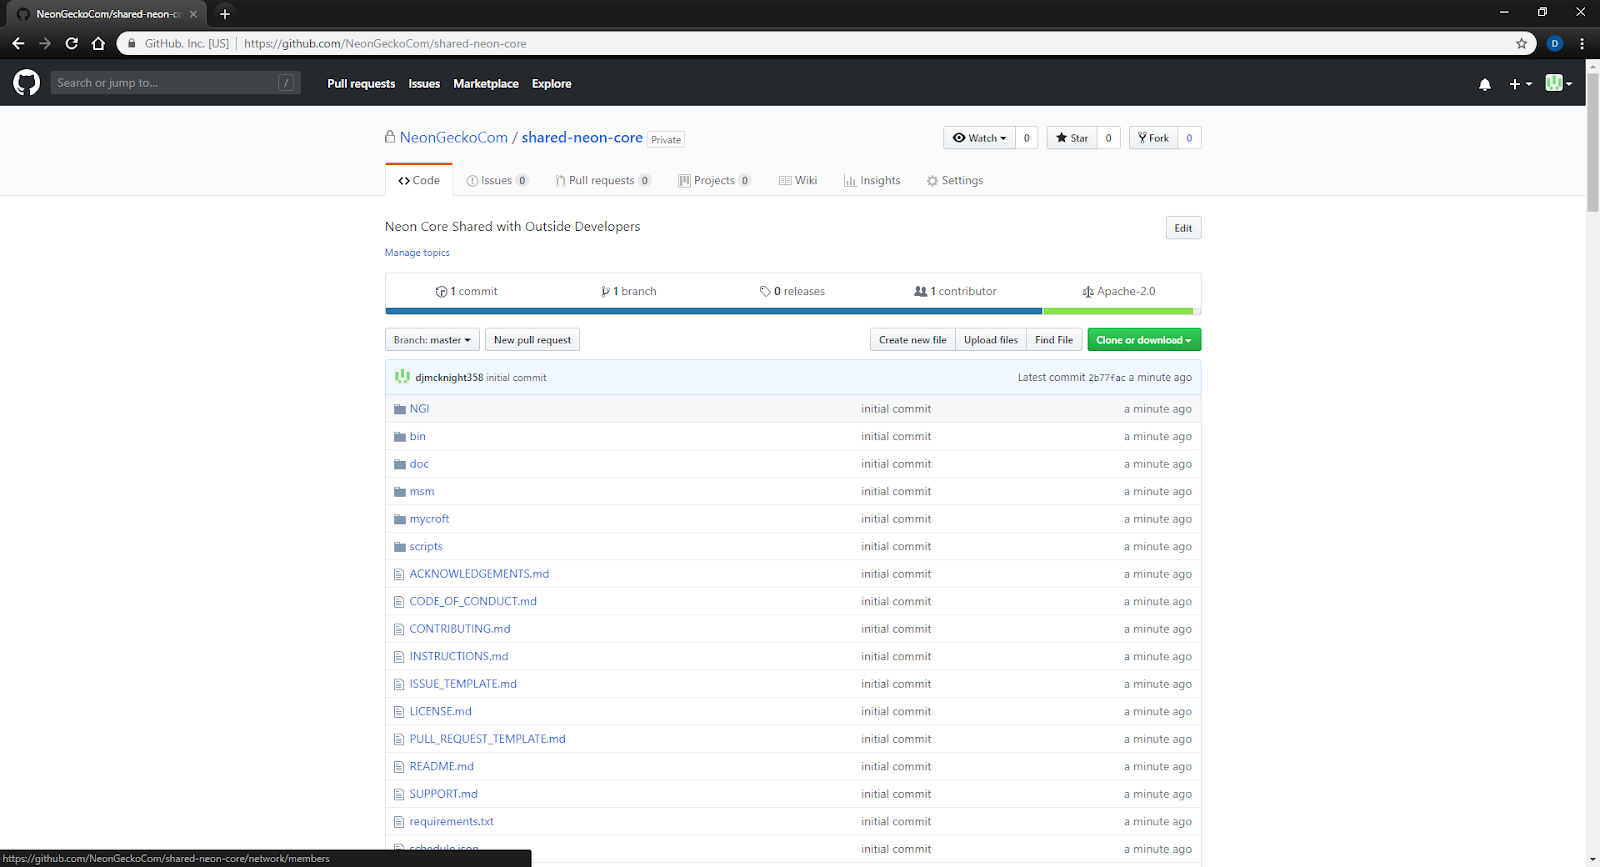
1. Forking Git Source
Before installing Neon, you will need to fork your own branch of the Neon core and skills repositories on Github. You will also need to get neonSetup.sh from your forked core Git.
- Go to the core repository and click “Fork” in the upper right hand corner.
- Select the account you wish to fork to (generally you only have one listed)
- Do the same for the skills repository
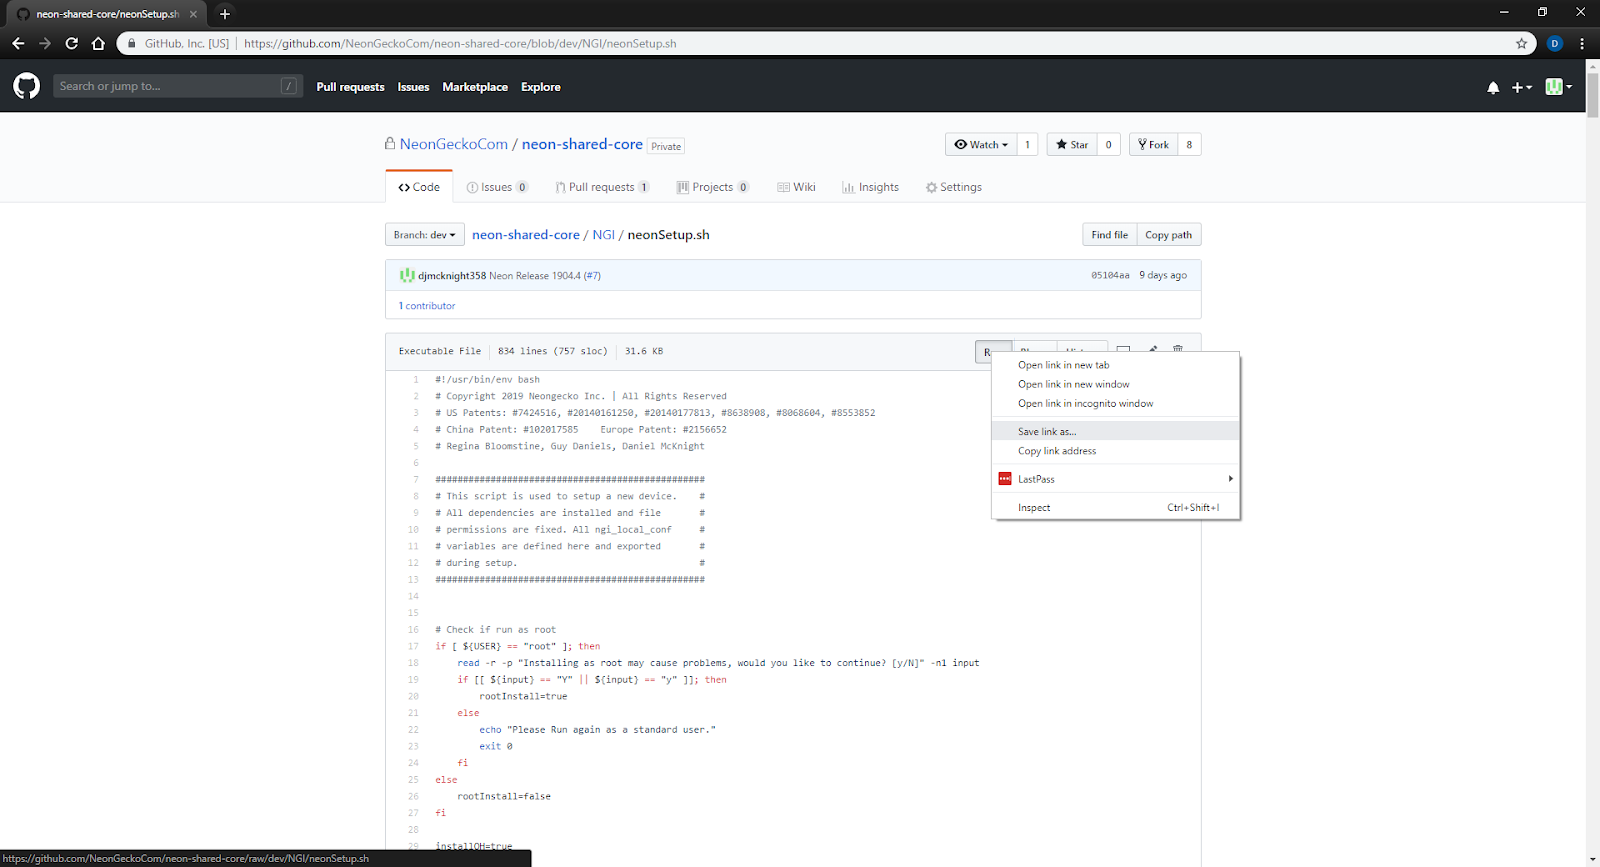
- Locate NGIneonSetup.sh in your core repository

- Right Click on Raw and select Save link as…
- Rename the file to neonSetup.sh and save to your Home directory
Note: If you completed this step on a Windows PC, save the file to a flash drive to transfer to the computer you will install Neon on. - Save your changes
- Move neonSetup.sh to a directory on the machine you will be installing on (recommended ~/).

2. Setting Up Service Accounts
Please follow these steps to create the three credential files required to install Neon. During setup, all credentials will be imported and validated with any errors logged in status.log.
Note: If you complete this setup on a Windows PC, make sure to edit any files using a text editor such as Notepad++ to ensure compatibility in Linux. Also check for correct file extensions after copying your files to your Linux PC, as Windows will hide known file extensions by default.
a. Google Cloud Speech Setup
- Go to:
https://cloud.google.com/
- Sign in or create a Google account

- Go to your Console
- Search for and select “Cloud Speech-to-Text” (Not to be confused with Text-to-Speech)
- Select the option you would like to use
- You will be prompted to enable billing on your account at this point because this service is paid after a free monthly quota.
Google will not automatically charge your card unless you give permission to do so.
- In the left Navigation Menu, select APIs & Services, Credentials
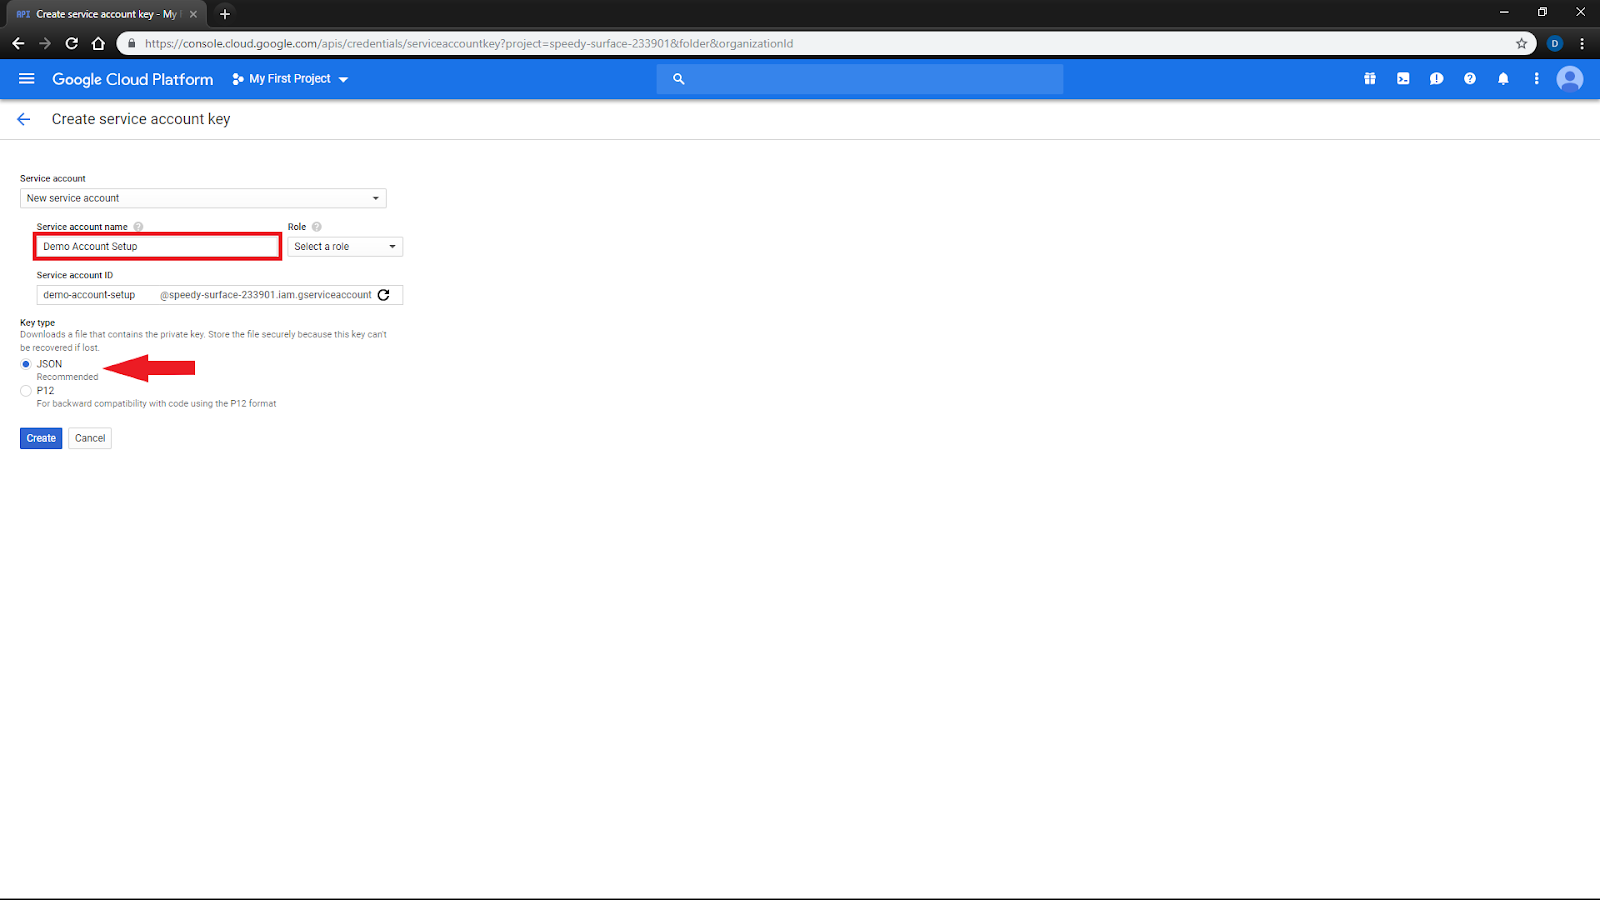
- Click Create credendials, Service Account Key
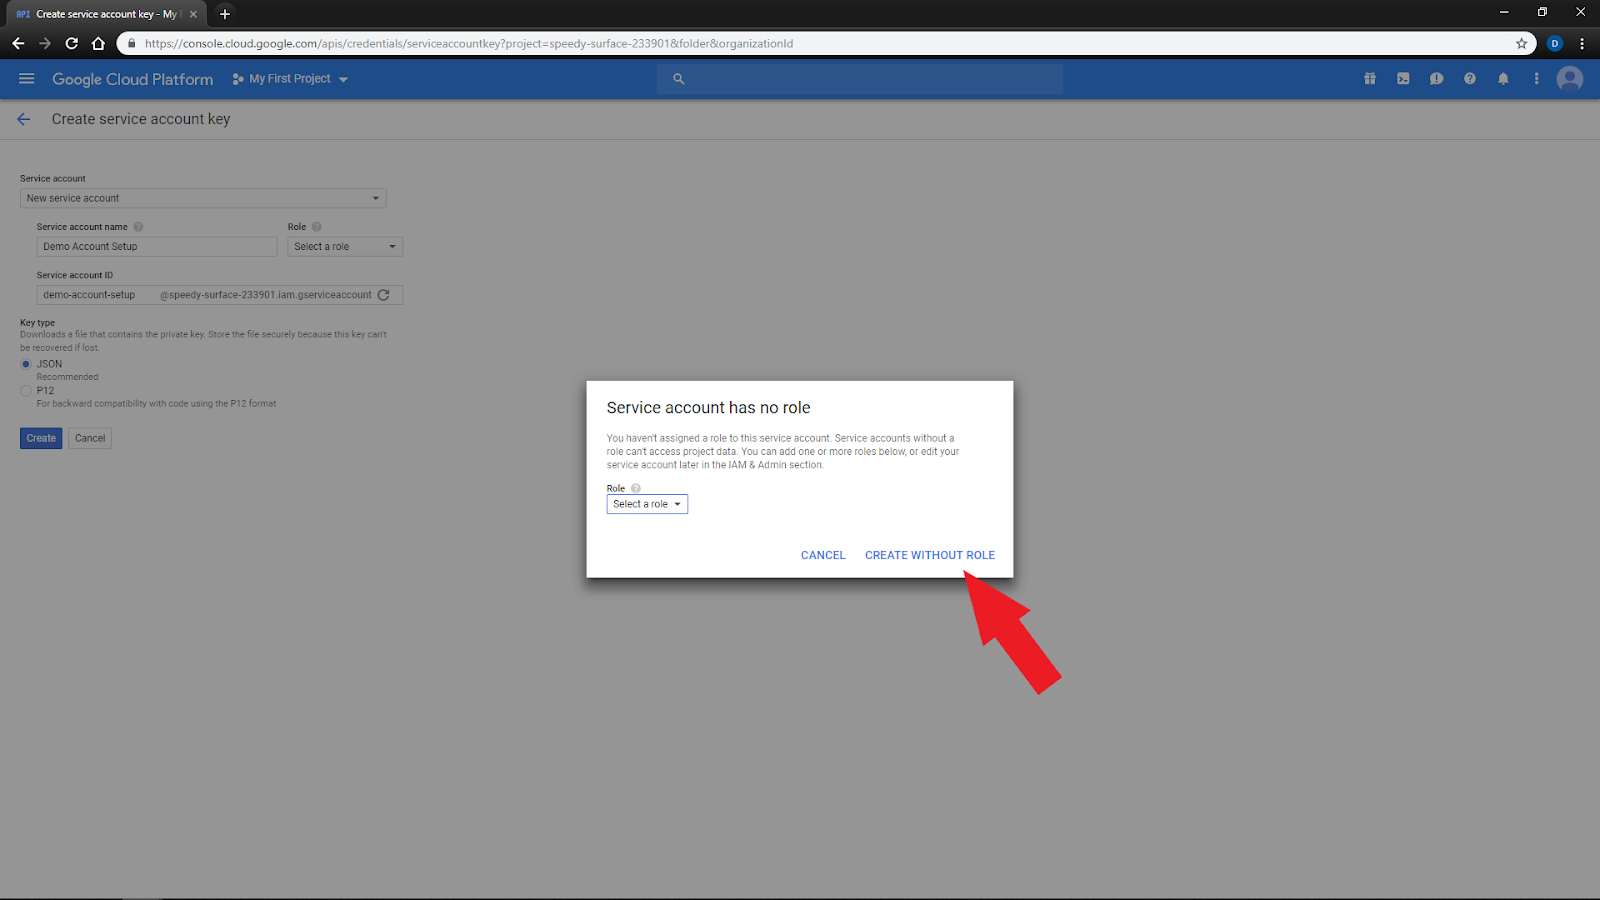
- Choose any service account name for your reference. You may leave the Role field empty.
- Make sure key type is JSON and click on Continue
- If you did not assign a role, you would be prompted. You may continue by clicking ‘CREATE WITHOUT ROLE’.
- You will see a prompt and your service key will automatically download
- Rename the downloaded file to google.json and move it into the same directory as neonSetup.sh
Note: The premium models are only available in US English and provide some enhancements to phone and video audio which do not apply to this project. The options with Data Logging allows Google to use your audio and transcriptions to train their model. You may select the option without logging to opt out (note that the option with logging is discounted).


At this point, Neon can be partially tested without Amazon translations and Wolfram information skills. You may run setup without continuing, but Amazon and Wolfram|Alpha services are highly recommended.
b. Amazon Polly and Translate Setup
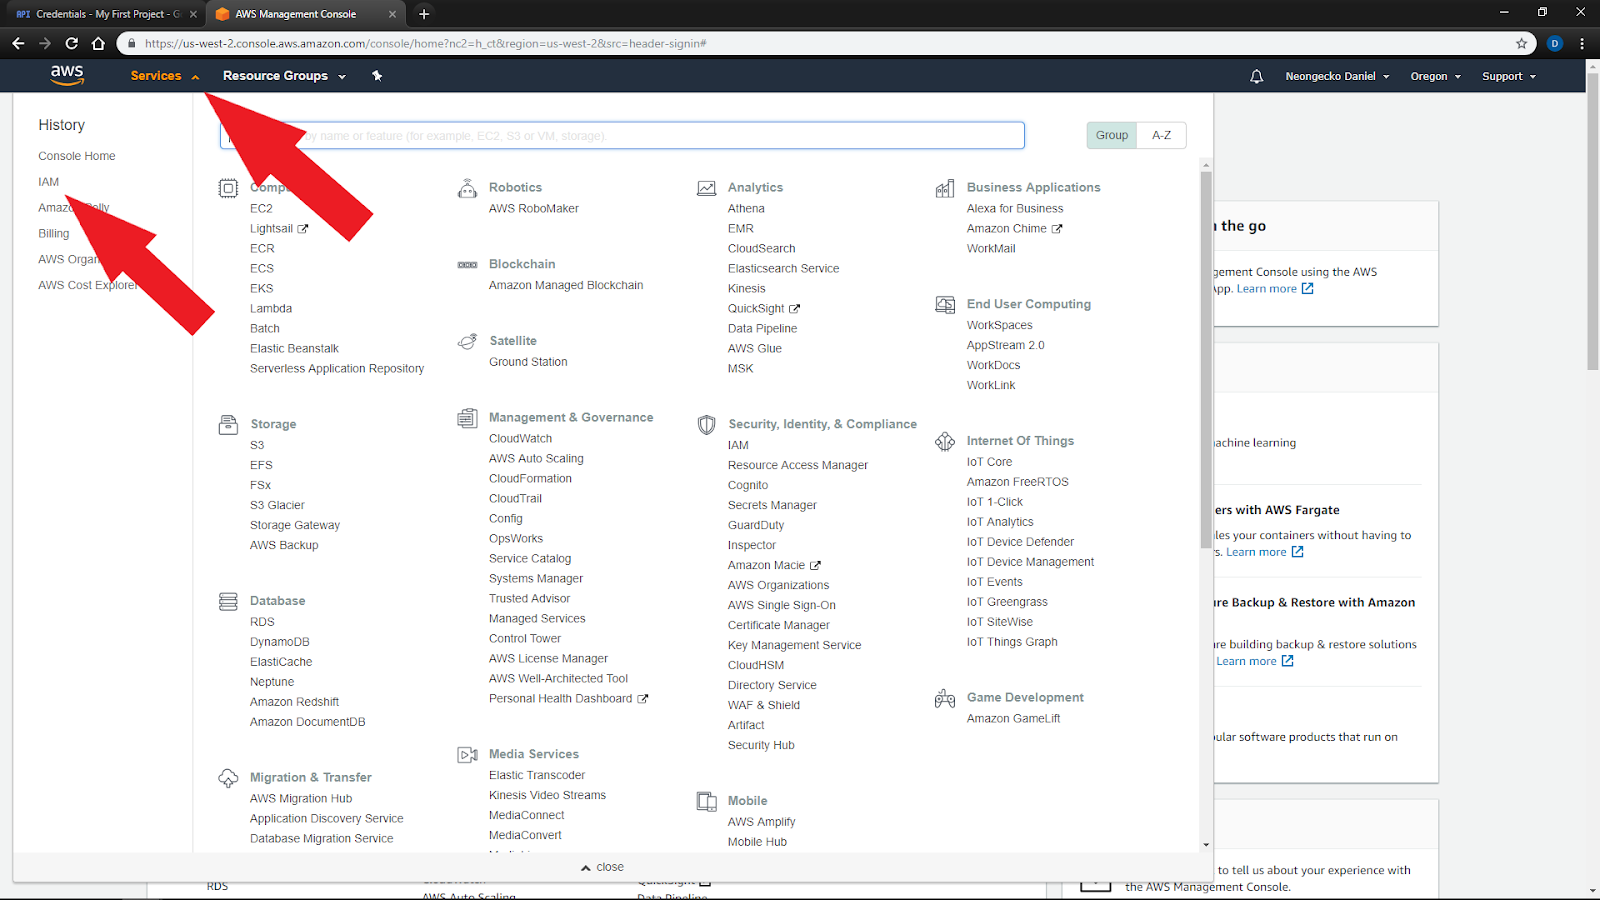
- Go to:
https://aws.amazon.com/
- Click “Sign into the Console” at the top right of the screen
- Sign in or register for an account
- Go to the Services Menu at the top left of the screen and click IAM
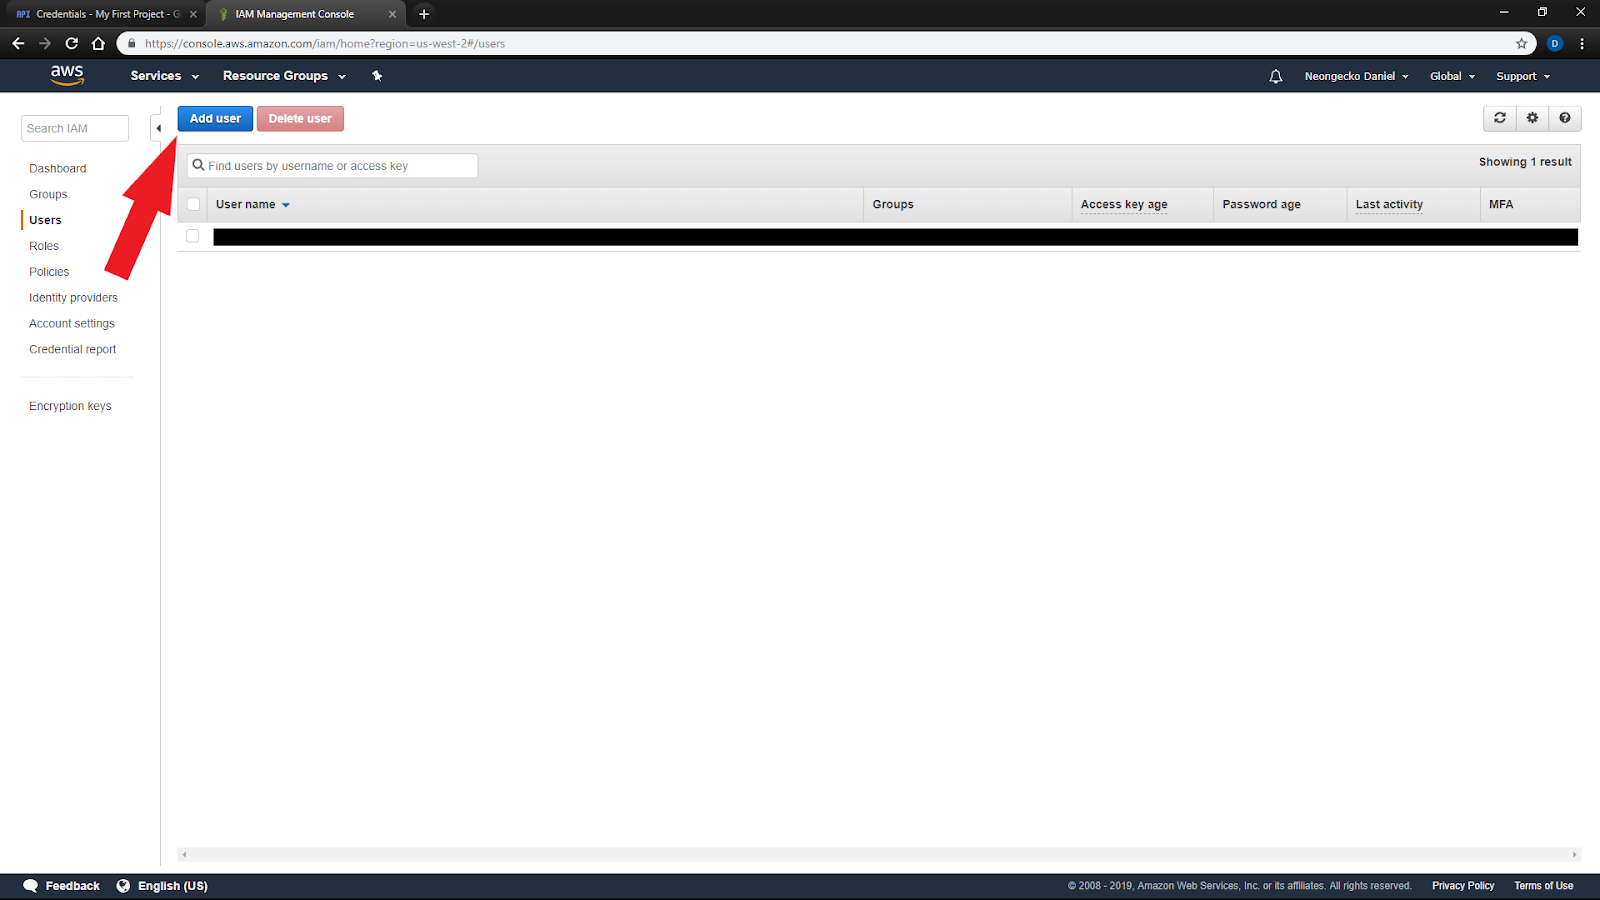
- Select Users from the left side menu and click Add user
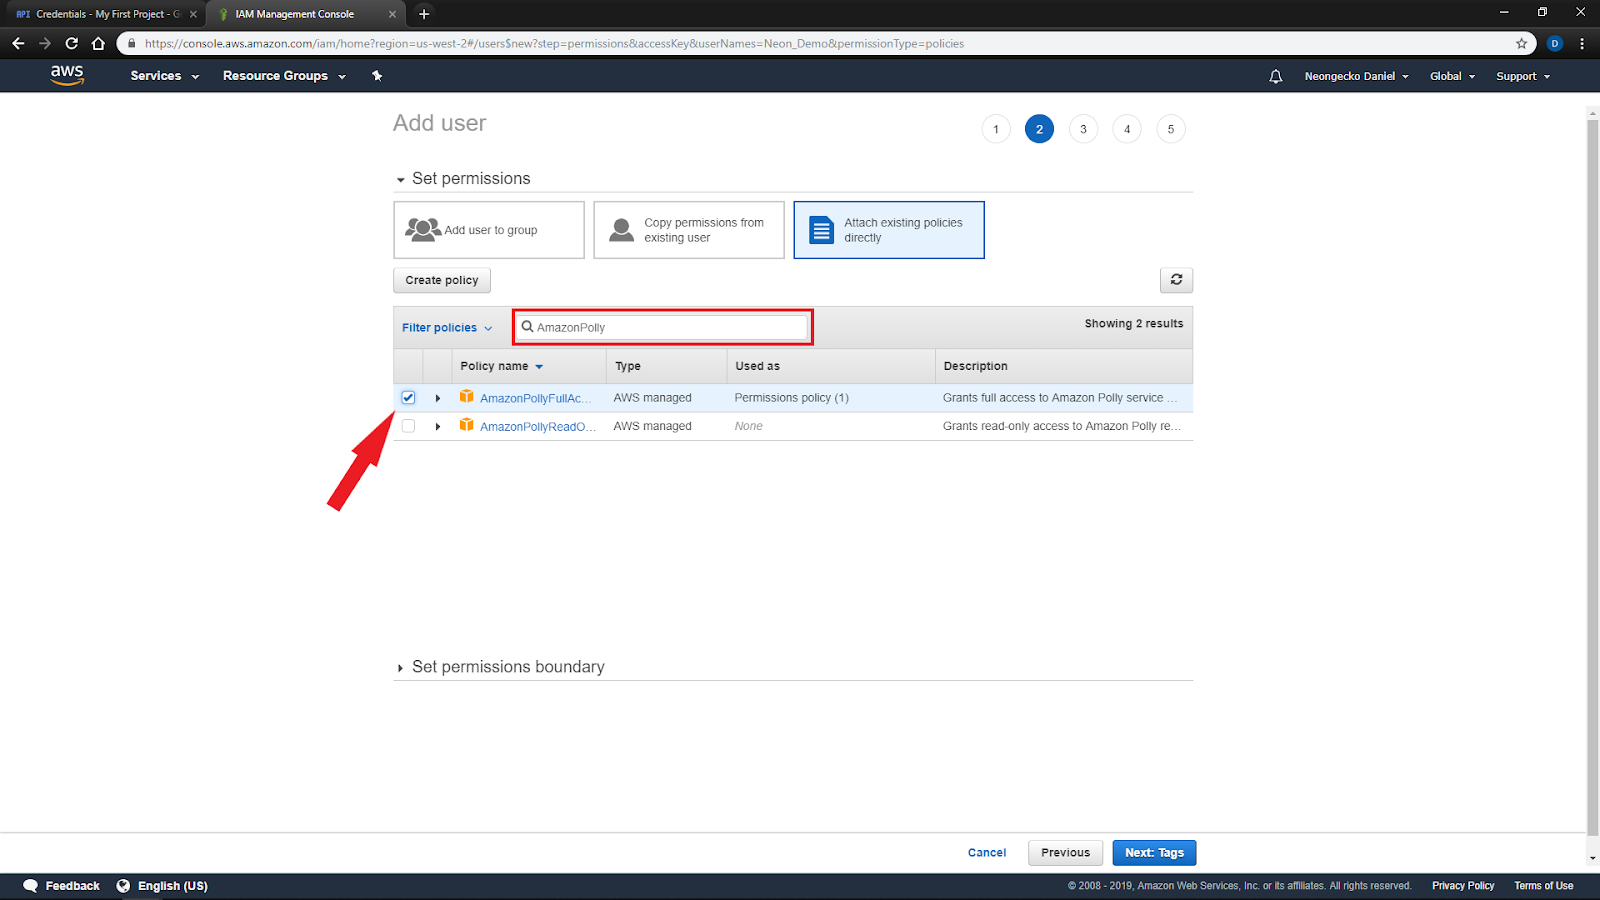
- Enter a User name and check the box for Programmatic access
- On the next page, Select ‘Attach existing policies directly’ and search for ‘AmazonPollyFullAccess’ and ‘TranslateFullAccess’
- You may add tags on the next page if desired
- Review your selections on the next page and Create user
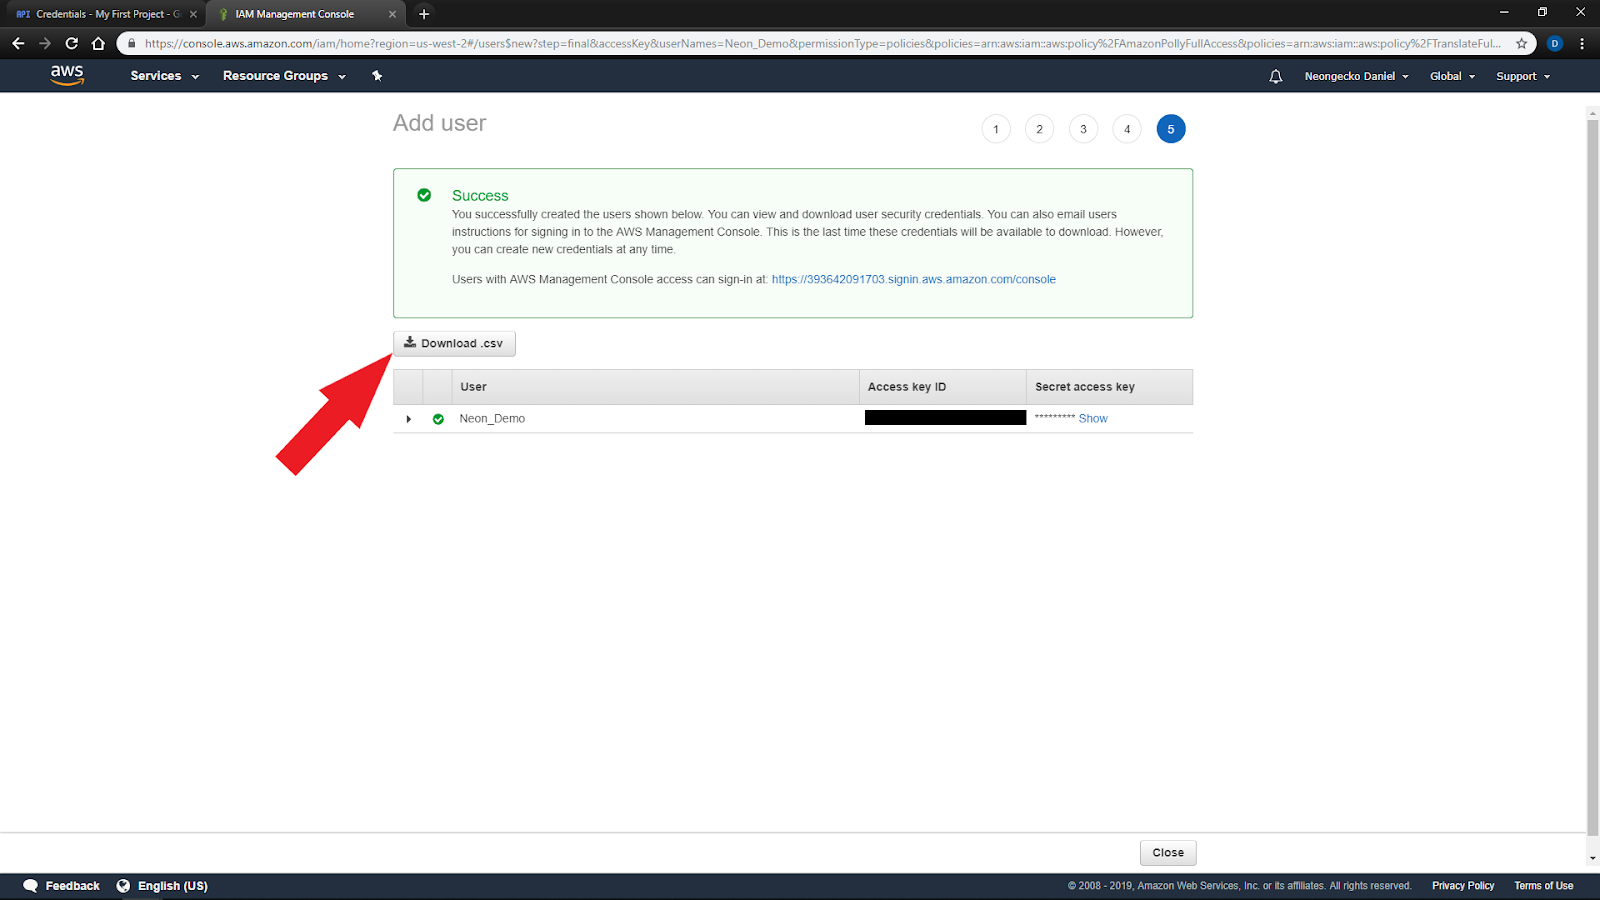
- On the next page you can see your Access key ID and Secret access key
- Click the Download .csv file button to save your credentials to your computer
- Copy or move the downloaded accessKeys.csv to the same directory as neonSetup.sh
Note: You will not be able to view your secret access key after it is generated, so if you need a secret access key, you will have to generate a new Access key.
The Users menu lets you create new users and new access keys per user as you wish, as well as modify permissions.


c. Wolfram|Alpha Setup
- Go to:
http://developer.wolframalpha.com/portal/myapps/
- Sign in or register for a free account
- Click ‘Get an AppID’ at the top right of the screen
- Assign an Application name and Description and click Get AppID
- You will presented with a window listing your AppID
- Copy your AppID into a file named wolfram.txt in the same directory as neonSetup.sh
Note: You can access the AppID later at the same link; you may use this one AppID accross multiple installations of Neon or create multiple appIDs if you’d like to track queries by device or manage access for different applications separately.


3. Setting Up Hardware
Before continuing, make sure you have your hardware setup ready for installation.
You will need the following:
- A computer running up-to-date Ubuntu 18.04
You can find our video tutorial for installing Ubuntu in a virtual machine here, or you can find written instructions here
Note: If you prefer to use Windows for your development environment, you can install the Windows Subsystem for Linux. You can find our video tutorial here. Audio and gui functionality will be limited in this case; you will only be able to interact with Neon via command line.
System Requirements
- Speakers and a microphone recognized by Ubuntu
- You can verify Ubuntu sees your devices by accessing Settings and then Sound
- If you are unsure of which device to select, you can click Test Speakers to play a test tone through the selected Output device.
- You can test your microphone under the Input tab, the Input level should move when you speak into the microphone.
If you do not see any microphone activity, make sure the correct device is selected and the Input volume is set above 50%.
- Webcam (optional)
Some functionality requires a webcam (ex. USB Cam Skill). Most webcams also include a microphone that can be used for Neon. - An active internet connection
Note: A connection of at least 10Mbps is recommended. On slower connections, installation may take several hours. - At least 5GB of available disk space (9 GB if installing Mimic)
Neon AI occupies less than 1GB itself. With dependencies, the installation takes about 3GB on an up-to-date Ubuntu 18.04 system. Mimic local speech-to-text requires about 3.5 GB.

4. Installing Neon
This guide includes instructions for installing in both a Development environment and a User environment. The User environment is more lightweight and does not assume any existing IDE. The Developer environment will have more consoles, debug outputs, and logs available. See details below.
Some users may opt to have only one installation, but having both environments set up is recommended.
A development environment is designed to be a testable installation of Neon AI that can be connected to an IDE (ex. Pycharm) for modifications and skill development.
This guide assumes installation in a development environment from an unmodified fork of NeonAI. After installation, any changes and additions can be pushed to Git or hosted on a private server.
A user environment is designed to be an installation on a device that will be used normally as a voice assistant. You may want to test how your changes affect performance on less powerful hardware or test how changes may be deployed as updates.
If you are developing in a virtual machine, installation on physical hardware in a user environment is useful for testing audio and video I/O which can be difficult in many virtualized environments.
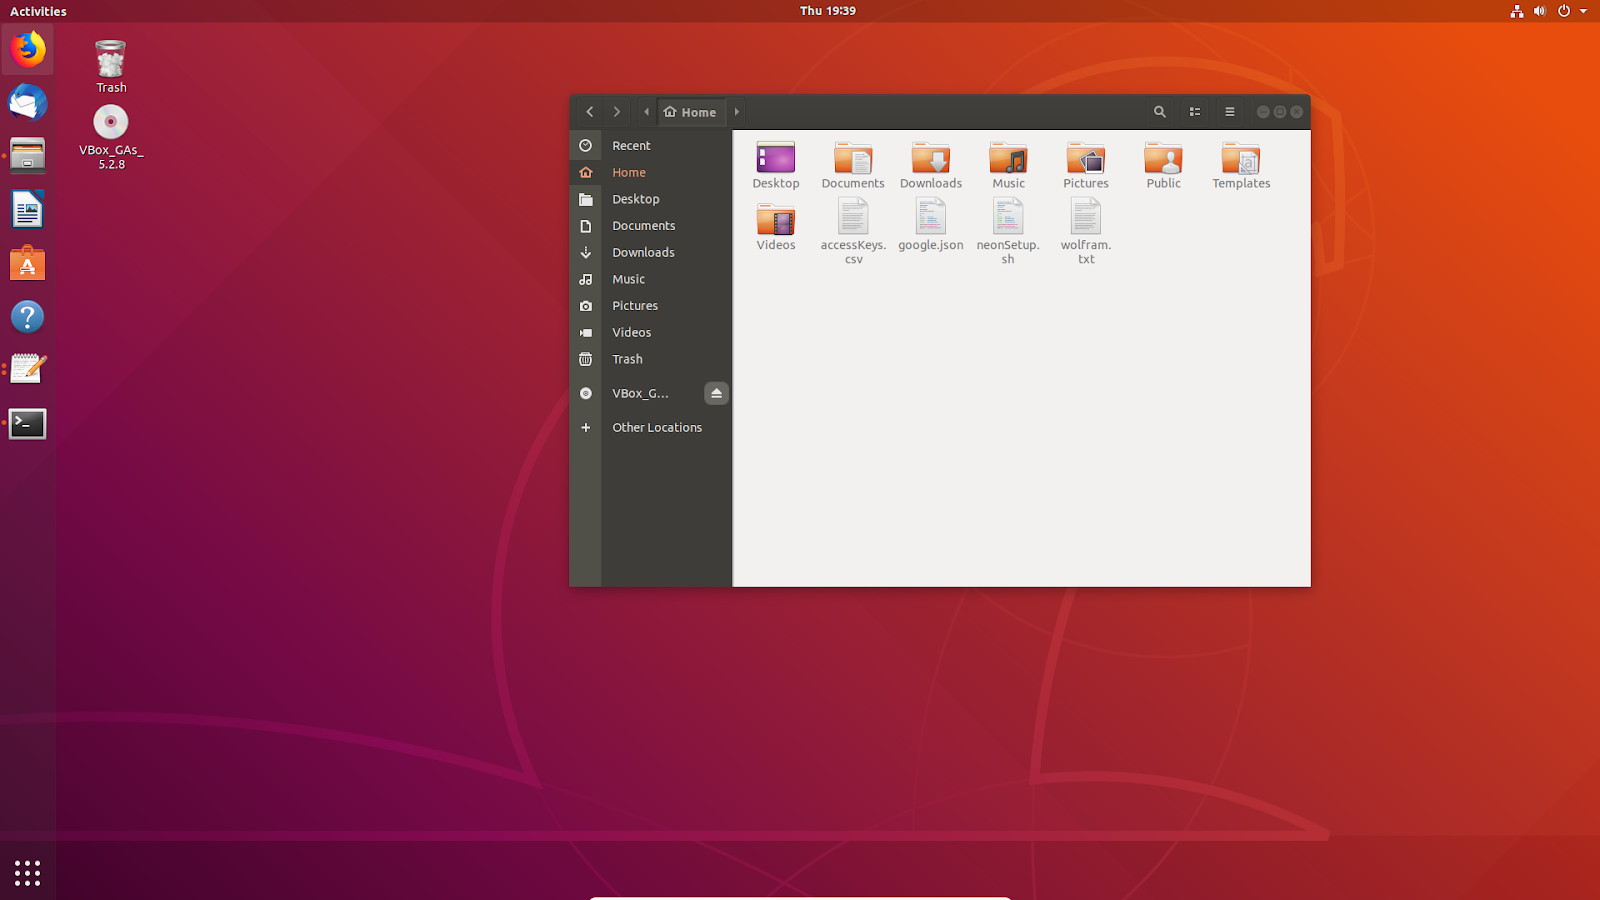
Before starting here, make sure you have already completed setting up your service accounts. You should have neonSetup.sh, google.json, wolfram.txt, and accessKeys.csv already saved to the machine you are installing to.
Note: Always make sure you have a current neonSetup.sh file before starting your installation, see 1. Forking Git Source for instructions on how to get this from your GitHub repository.
All of the following options, such as autorun and automatic updates can be easily modified later using your voice, settings table, or configuration files.
Installing Neon in a Development Environment
- Take your neonSetup.sh file and place it in your home directory
- Make sure you have your accessKeys.csv, google.json, and wolfram.txt files here as well, otherwise you will be prompted for credentials during setup.
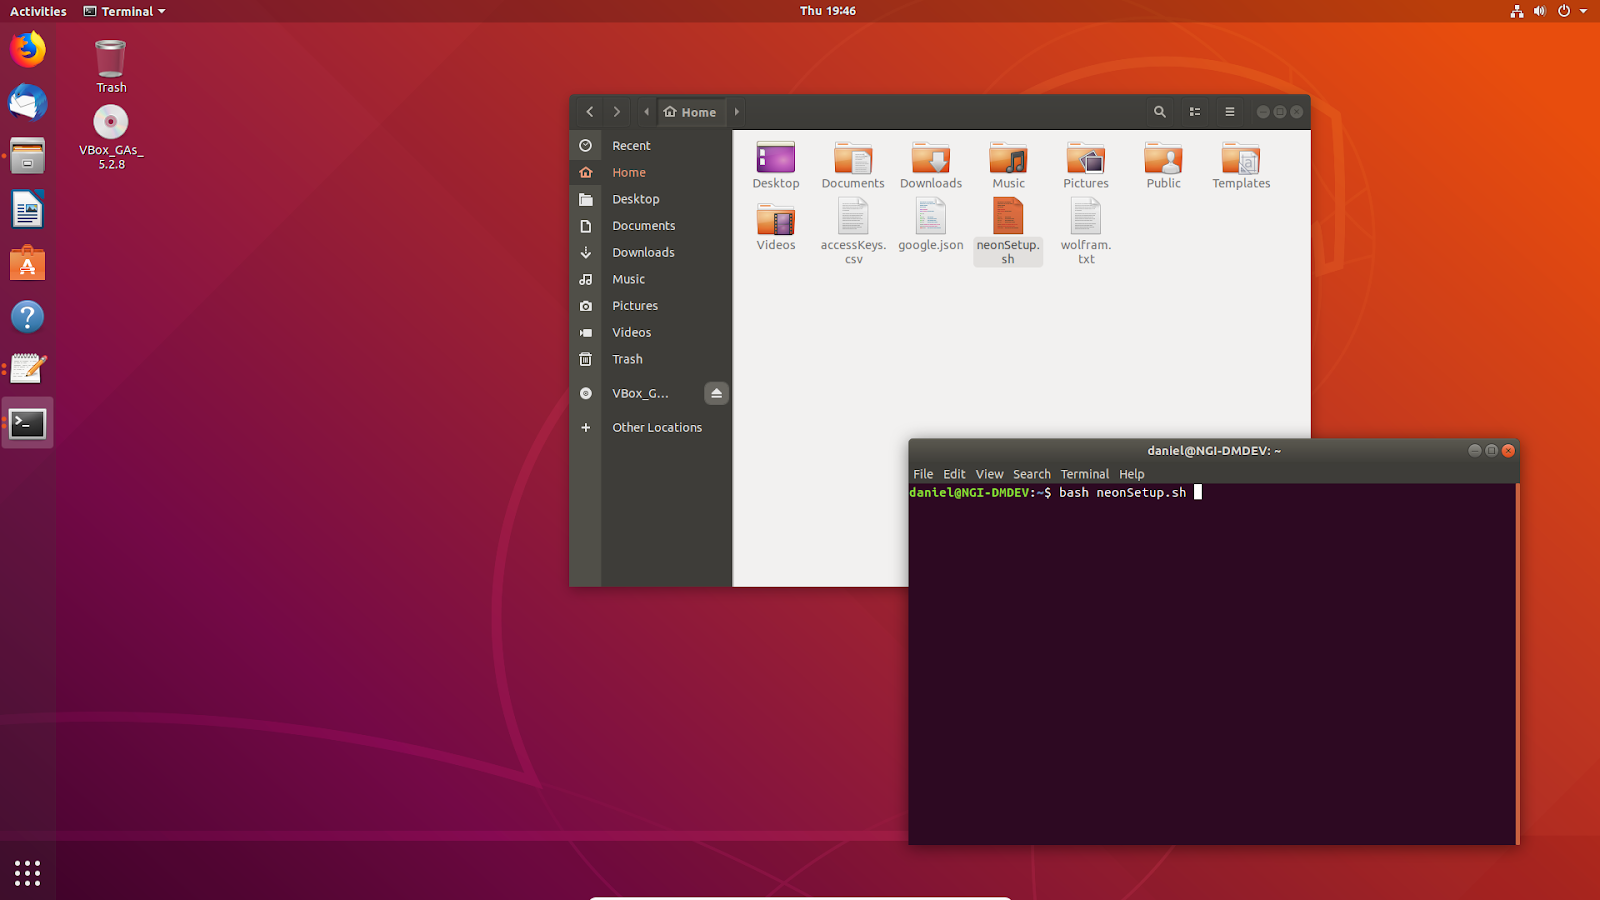
- Open a terminal in your home directory (ctrl+alt+t)
- Type in bash neonSetup.sh and press Enter
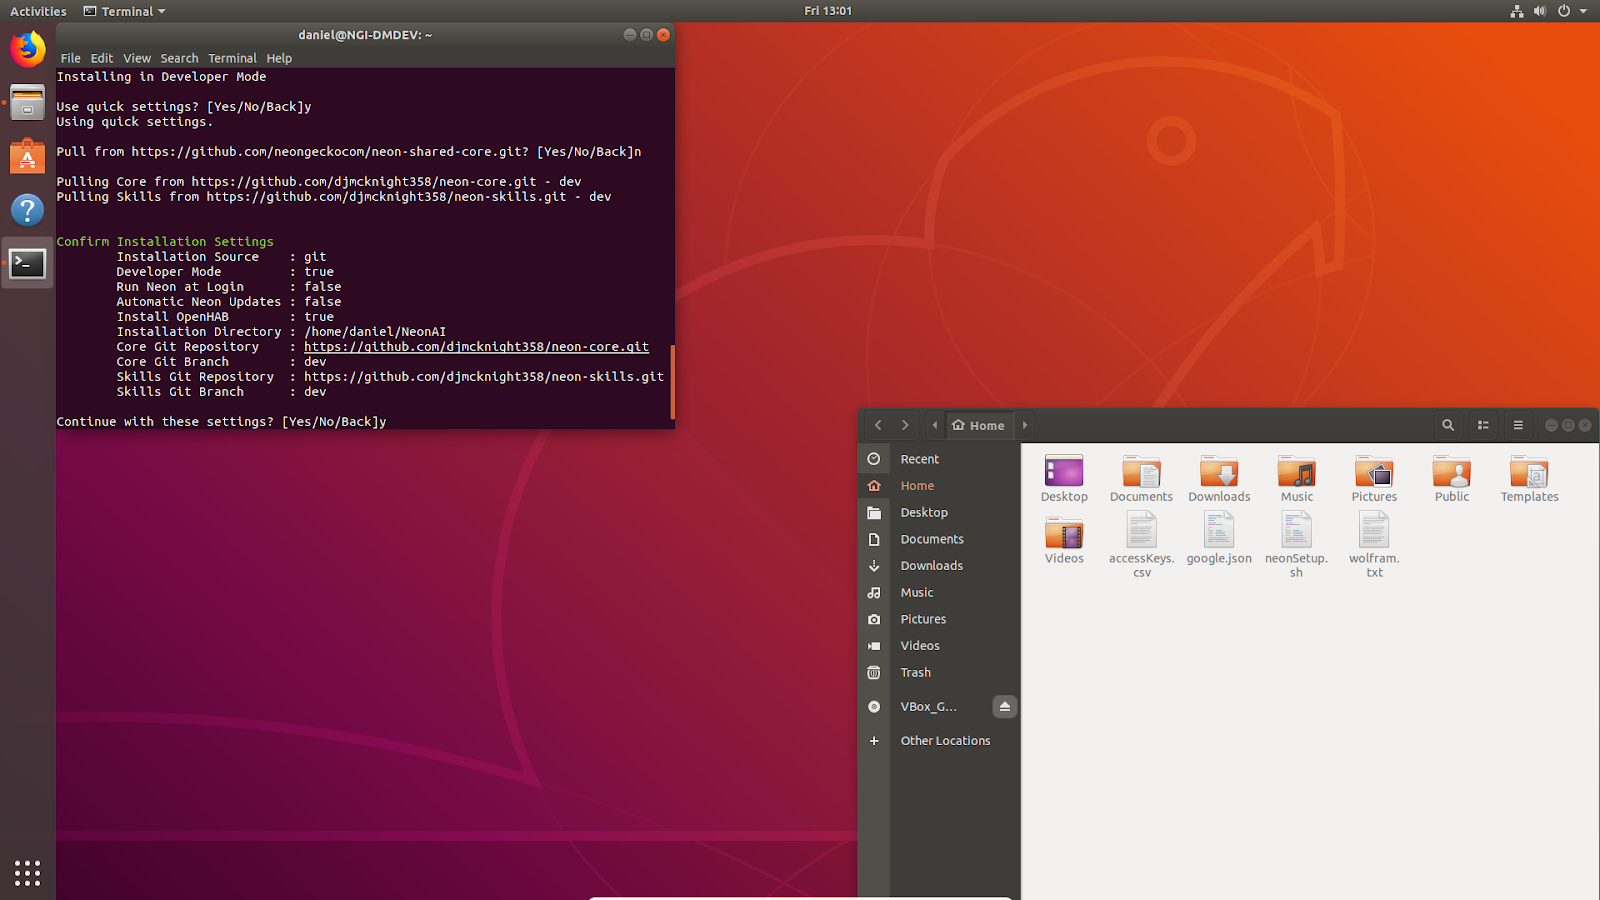
- Type y to Install in full Developer Mode
Alternatively, n for quick User mode
- Type n to Input Custom settings
Note: You may use quick settings if you have manually updated your default repository settings in neonSetup.sh
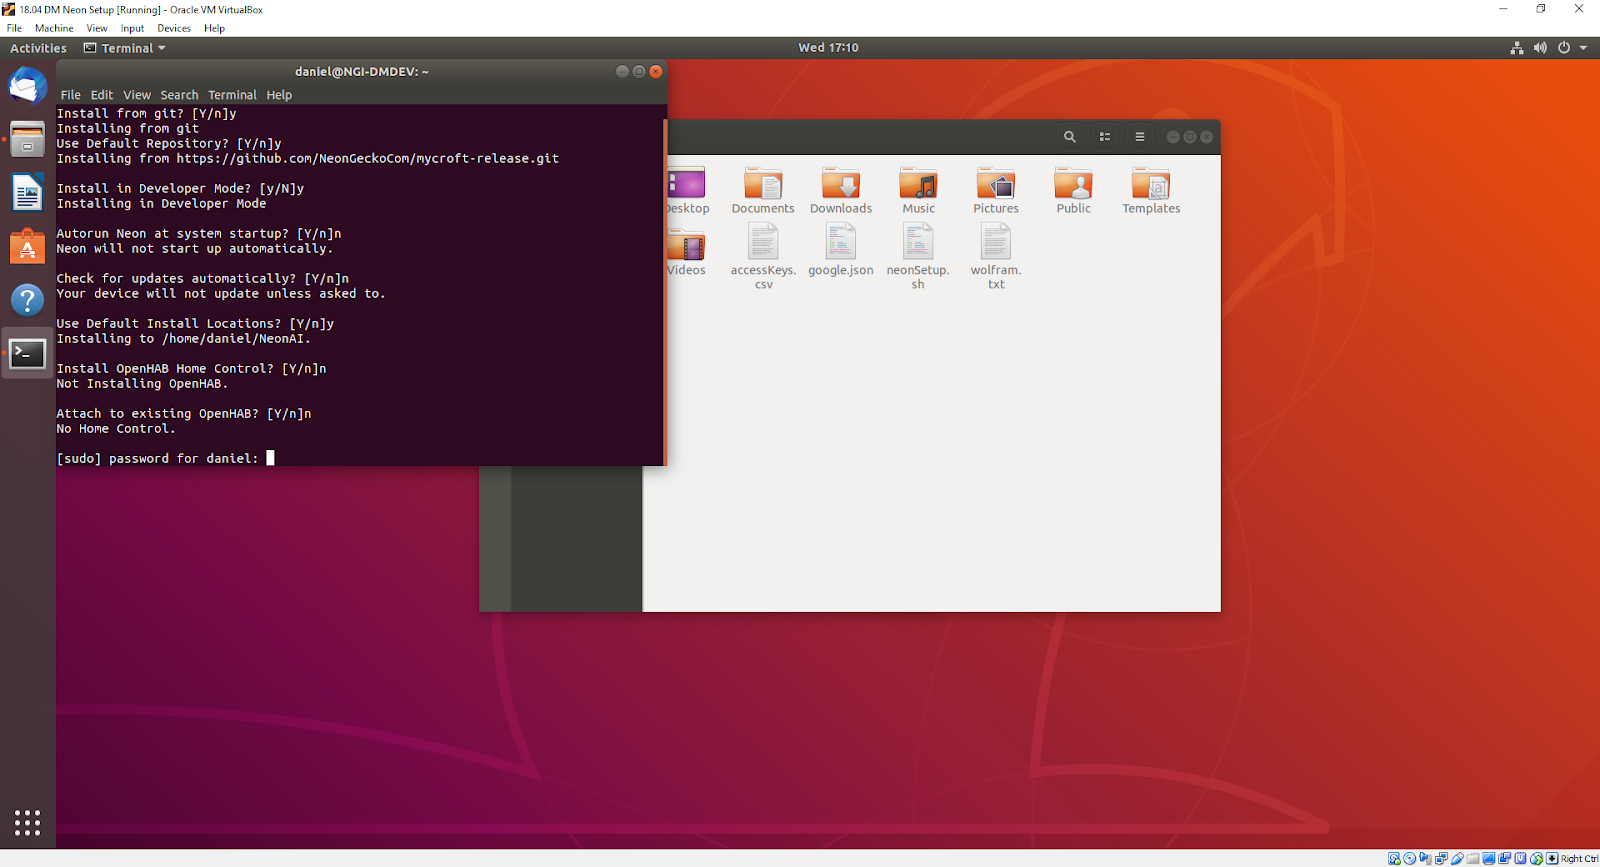
- Type y to Install from git
- Type n to Specify your own git repository
Default repository settings are contained in neonSetup.sh, you may specify your repository settings there instead.
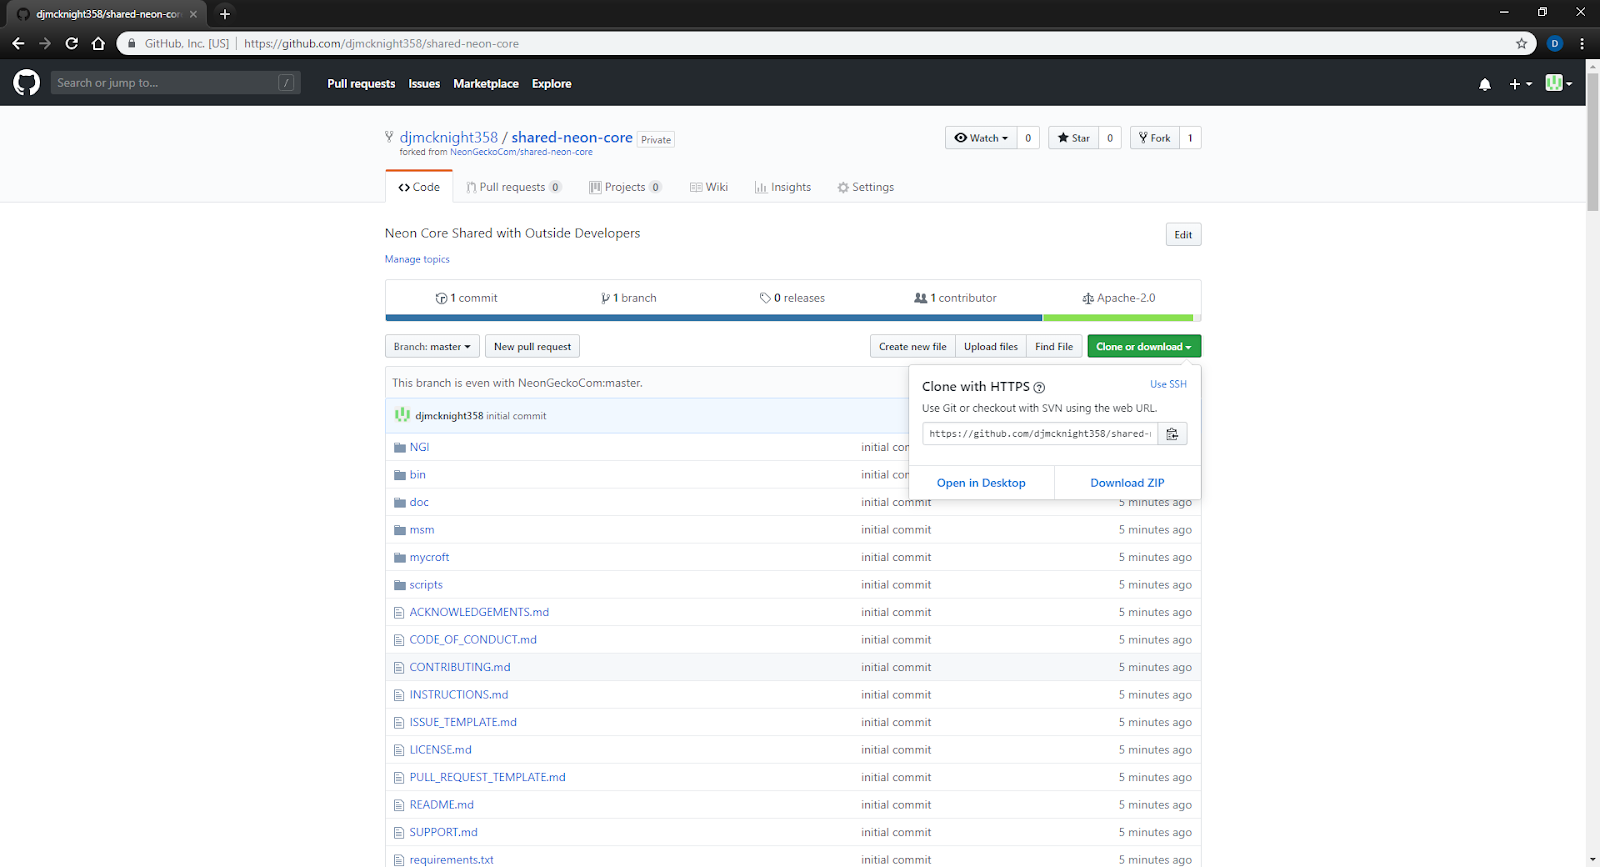
export coreGit=https://github.com/NeonGeckoCom/neon-shared-core.git
export coreBranch=dev
export skillsGit=https://github.com/NeonGeckoCom/neon-shared-skills.git
export skillsBranch=dev
- You can copy the core and skills URLs from the “Clone or download” button on your GitHub repository pages
- In the next windows specify your git core repository, core branch, skills repository, skills branch
Note: The default value here will be populated, make sure to clear the default before pasting in your URL copied from GitHub.
- Autorun is recommended off (n) for Development Environments
- Automatic updates are recommended off (n) for Development Environments
- Default Install Locations will install to a subdirectory /NeonAI relative to neonSetup.sh
If you specify a different install location, make sure you have read/write permissions there. Please refer to this tutorial if you have questions about directory rights.
- If you plan on developing home control solutions (ex. controlling Belkin Wemo or TP-Link Kasa lights and outlets) and want to host a server on your development machine, Install OpenHAB.
If you have questions, you can find more about OpenHAB here.

- If you selected n, you will get the option to connect to an existing OpenHAB server.
- Mimic is optional (n by default)
Note: Mimic enables offline TTS but does take some time to install, especially on weaker hardware.
- You will be prompted to confirm your settings, press y to continue, n to start over, or b to go back and correct a previous setting
- When prompted by your current terminal session, enter your sudo password (the password you use to login if you have an Administrator account) in order to install the required packages and complete setup.
Note: In Linux terminals, you will not see anything printed when you type in passwords; type in your password and press Enter.
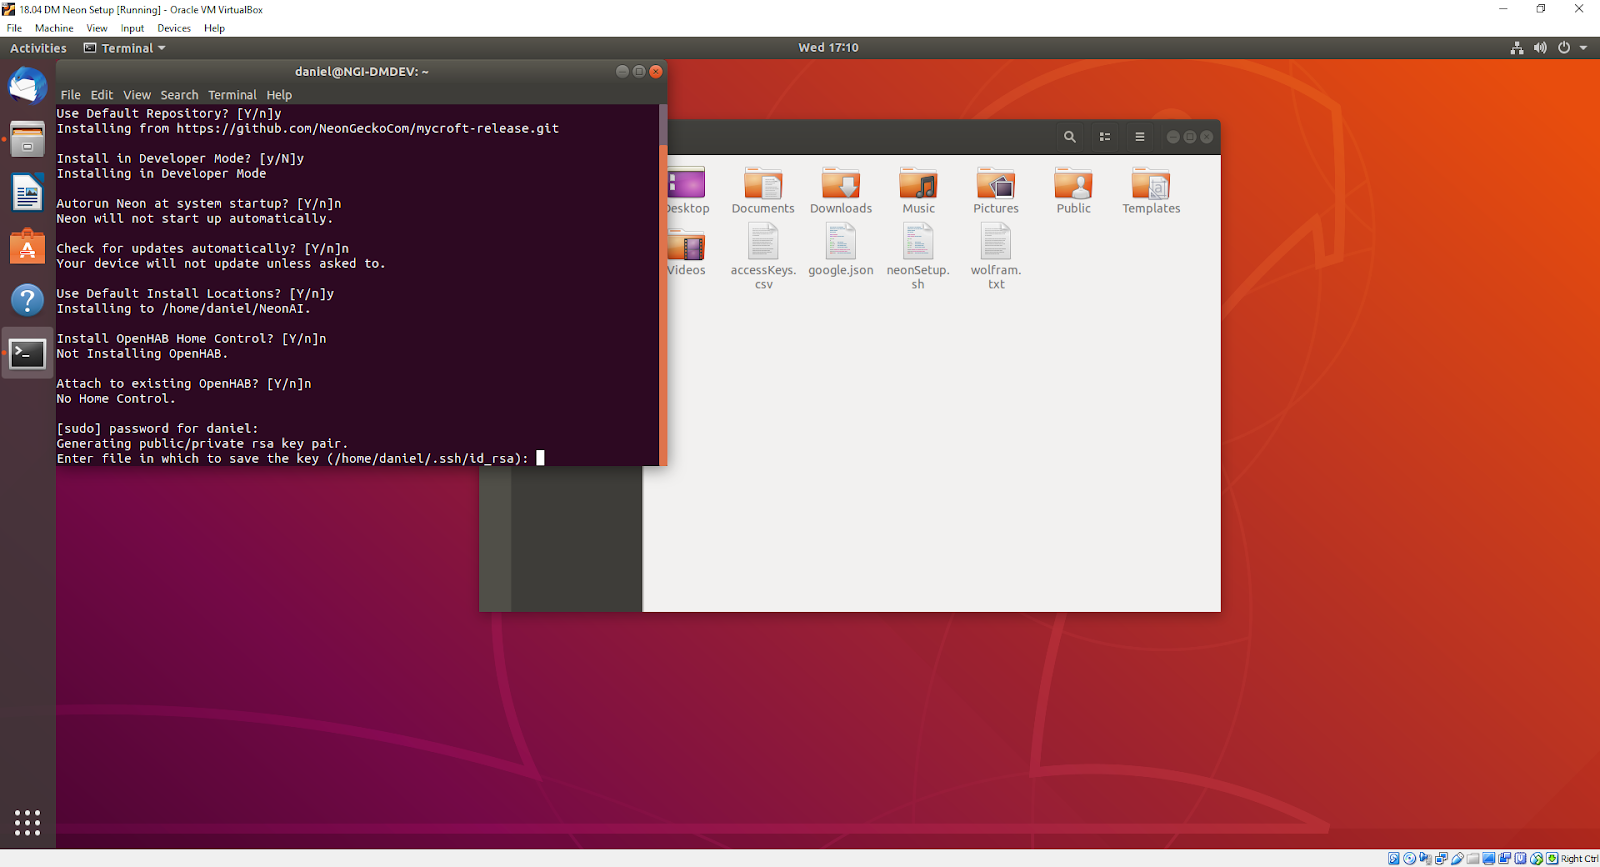
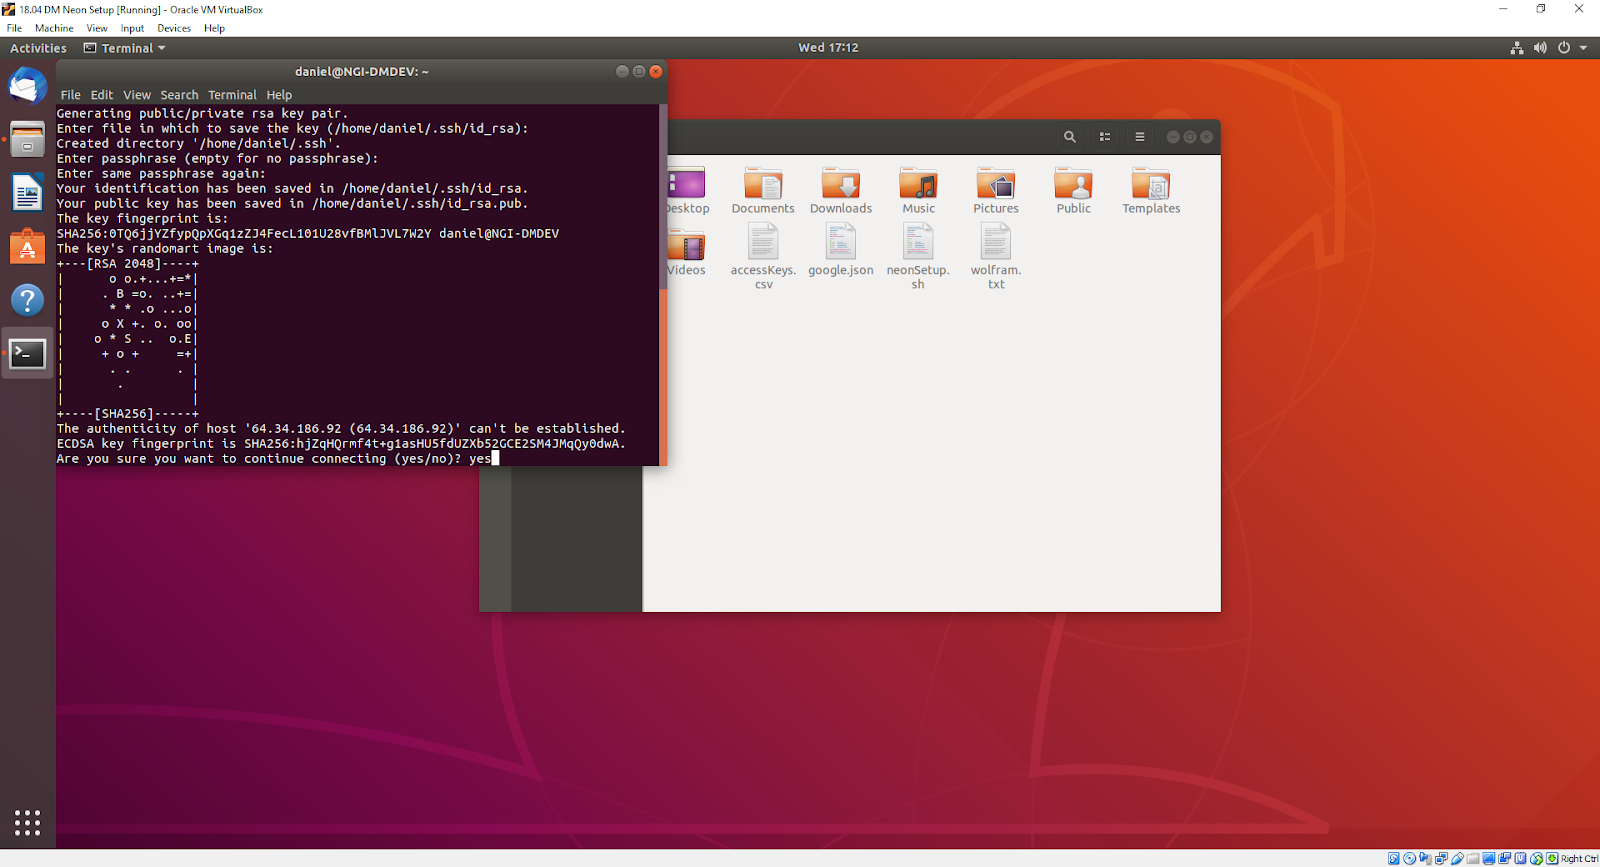
- The next step is to setup server RSA keys. By default, the Neon server is used for getting coupons and sending emails and authentication is over SSH. Simply press Enter to use the default key location and default null passphrase.
Note: If you have already configured SSH keys, this step will be skipped
- Type yes and press Enter to confirm connection to the Neon server.
- To connect to the server and access the database files provided by NeonGecko, you will need to use the password provided to you in the greeting email sent to you by NeonGecko when you registered at NeonGecko.com.
- If cloning from a private repository, you will be prompted for your git credentials at this stage
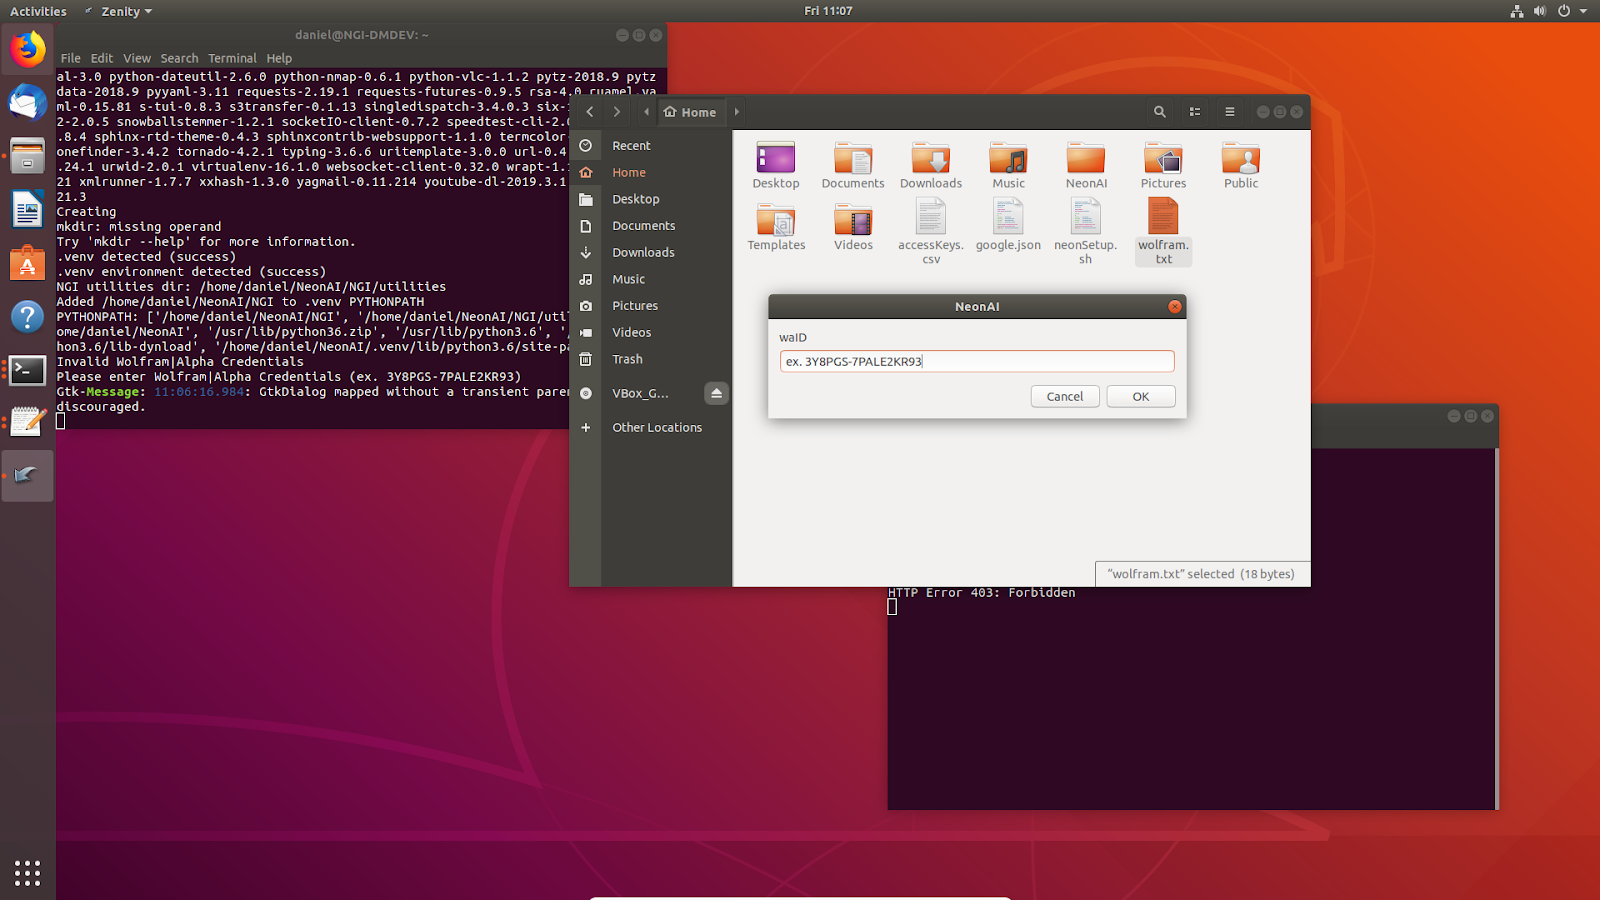
- If any of your credentials cannot be validated, you will get a prompt to correct them. Please refer to an example of Wolfram|Alpha correction:
At this time:- Google credentials are required for continuous transcriptions and non-English speech recognition.
- Amazon credentials are required for translations, non-English speech recognition, and non-English output.
- Wolfram|Alpha credentials are required to get responses to general inquiries (ex. weather, stock, math).
- If any of your credentials cannot be validated, you will get a prompt to correct them. Please refer to an example of Wolfram|Alpha correction:
- When setup is complete, Neon will automatically start up.


Installing Neon in a User/Deployment Environment
Installing in a User Environment is very similar to installing in a development environment, but different options will be recommended here.
- Take your neonSetup.sh file and place it in your home directory
- Make sure you have your accessKeys.csv, google.json, and wolfram.txt files here as well, otherwise you will be prompted for credentials during setup.
- Open a terminal in your home directory (ctrl+alt+t)
- Type in bash neonSetup.sh and press Enter
- Type n to Install in User Mode (Not Developer Mode)
- Type n to Input Custom settings
Note
: You may use quick settings if you have manually updated your default repository settings in neonSetup.sh
- 7a. Sourcing from Git (Recommended)


- Type y to Install from git
- Type n to Specify your own git repository
If you have modified your newSetup.sh to point at your own repository, you can use default locations here, otherwise - type n to specify your git
- You can copy the core and skills URLs from the “Clone or download” button on your GitHub repository pages
- In the next windows specify your git core repository, core branch, skills repository, skills branch
Note: The default value here will be populated, make sure to clear the default before pasting in your URL copied from GitHub.


7b. Sourcing from Server (Advanced)
If you have configured your own server to handle emails and coupons, you may choose to install Neon from a directory on that server.
These instructions will assume that if you choose to install from a server, that server will also handle your emails and coupons.
- Make sure the Remote Variables section of newSetup.sh is updated (ex:)
export remoteUser=neonbeta
export remoteHost=64.34.186.92
export remoteCore=/home/neongecko/test-core
export remoteSkills=/home/neongecko/test-skills
export remoteCoupons=/home/neongecko/brandscoupons
export diagsUpload=/home/neongecko/diagnostics
export emailUpload=/home/neongecko/emails
export signalUpload=/home/neongecko/signal
export attachmentUpload=/home/neongecko/attachments
If you need to make any modifications to the above variables, ctrl+c to cancel installation, make any changes, and re-run neonSetup.
- Type n to Install from server
- Type n to install in User mode (y for full Developer mode)
- Autorun is recommended on (y) for User Environments
- Automatic updates are recommended on (y) for User Environments
- Default Install Locations will install to a subdirectory /NeonGecko in the user’s Home directory.
Note: If you specify different install locations, make sure you have read/write permissions there.
- Install OpenHAB if you plan on developing home control solutions and want to host a server on your deployed machine.
- If you select n, you will get the option to connect to an existing OpenHAB server
Note that skill-based device detection and renaming assumes OpenHAB is running locally
- If you select n, you will get the option to connect to an existing OpenHAB server
- Find out more about OpenHAB here
- Mimic is optional (n by default)
Note: Mimic enables offline TTS but does take some time to install, especially on weaker hardware.
- You will be prompted to confirm your settings, press y to continue, n to start over, or b to go back and correct a previous setting.
- Enter your sudo password to continue
Note: Your sudo password is the password you use to login if you have an Administrator account.
- You will be prompted to setup SSH keys to connect to the server specified in the Remote Variables, press Enter to use the default key location and default null passphrase.
By default, the Neon server is used for getting coupons and sending emails.
- Type yes and press Enter to confirm connection
- Use the password provided to you to connect to the server
- You will be prompted for your git credentials if cloning from a private repository
- You will be prompted for your git credentials if cloning from a private repository
- If any of your credentials cannot be validated, you will get a prompt to correct them, this is an example from Wolfram|Alpha:
- Google credentials are required for continuous transcriptions and non-English speech recognition
- Amazon credentials are required for translations, non-English speech recognition, and non-English output
- Wolfram|Alpha credentials are required to get responses to general inquiries (ex. weather, stock, math)
- When setup is complete, Neon will automatically start up.


5. Using Neon
After you have completed Installing Neon, you will have a fully functional system ready to test. A useful first step after a new installation or update is to run an automated test of your skills.
a. Running Tests
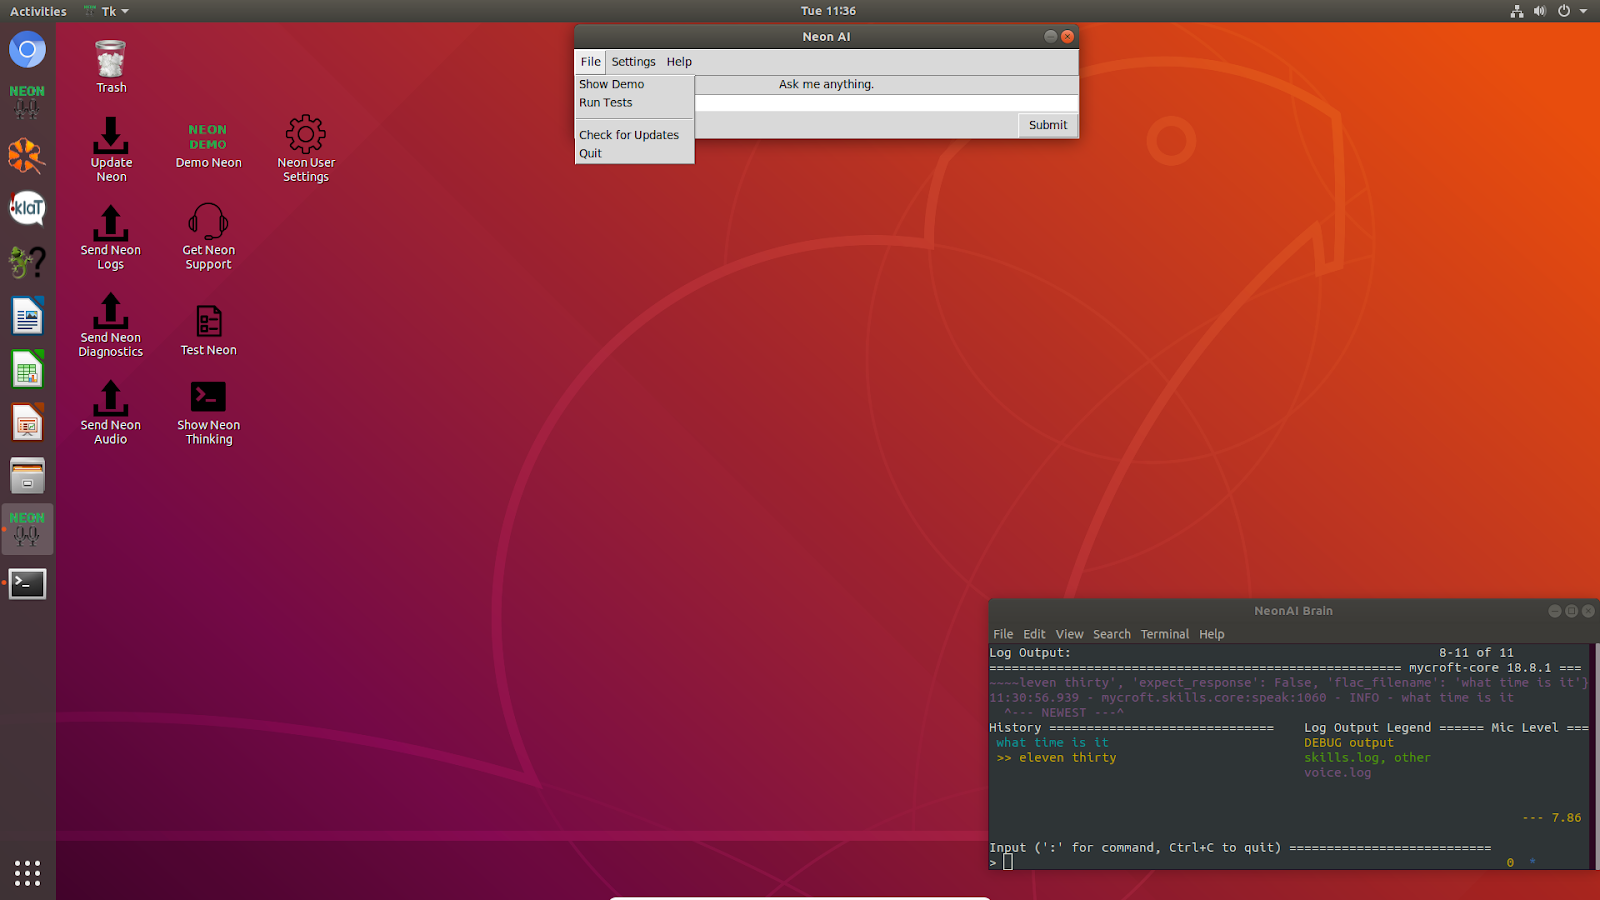
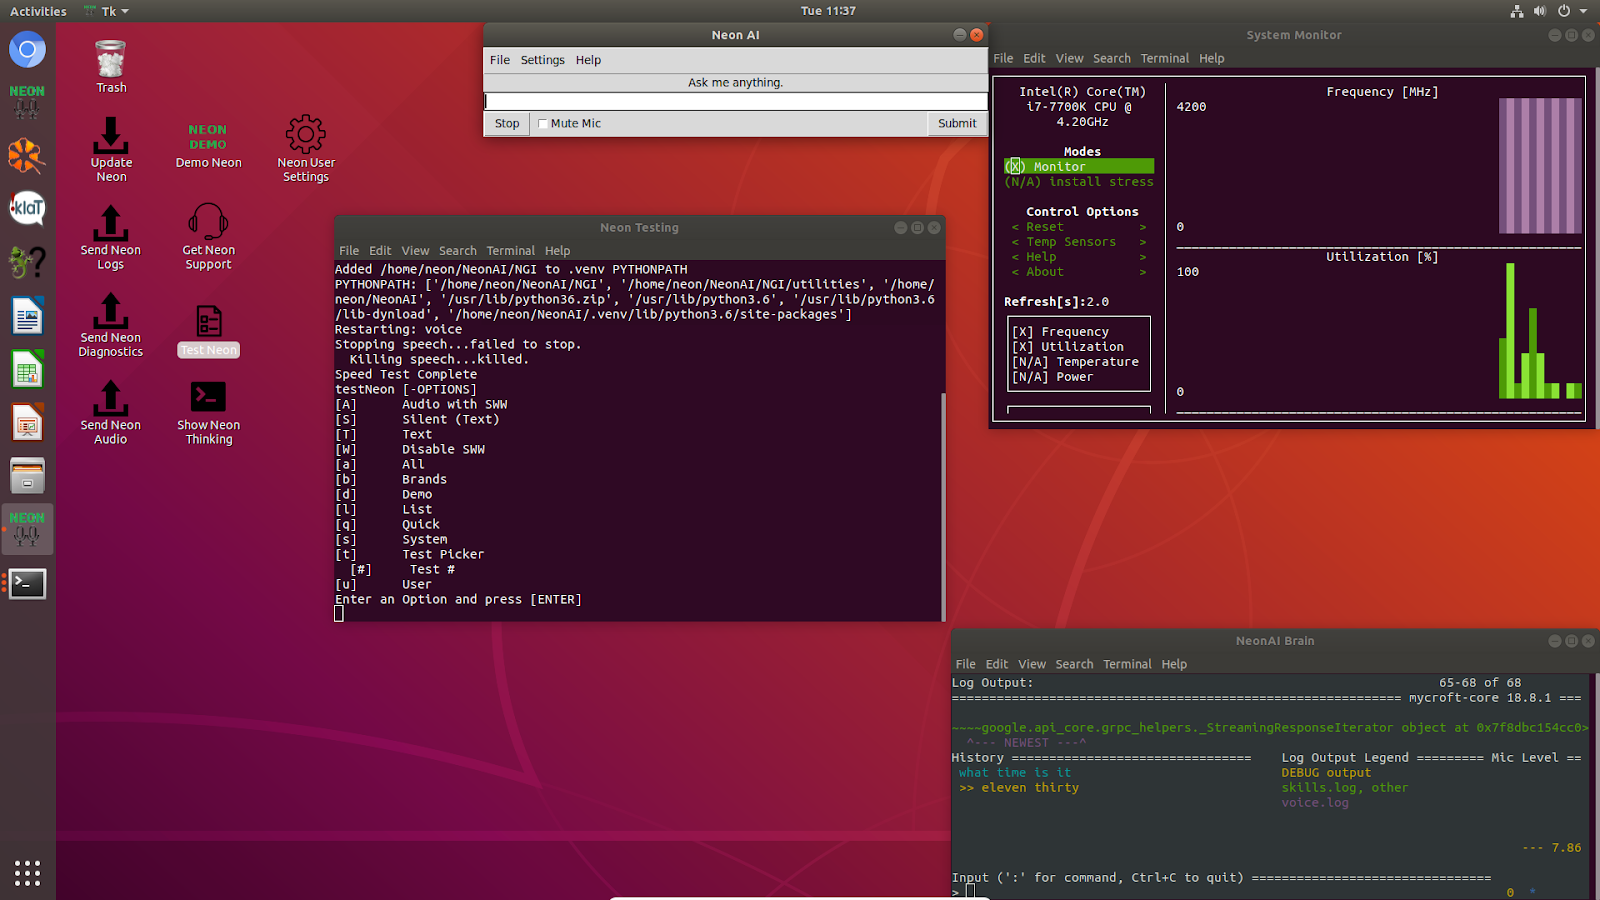
- With Neon running, use the desktop shortcut Test Neon or File menu option Run Tests to run tests
- The test program will automatically backup your user settings and run a network speed test and then present you with the test options
The upper case options determine the way testing is run (Text or Audio).
The lower case options determine which skills are tested.
- Type in the options you wish to test with, you may string multiple together (ex. TaAa would run all tests as Text and then all tests as Audio).
Note: If running audio tests, you must loop back audio output to audio input (the easiest way to do this is to run a 3.5mm cable from your speaker port to your microphone port).
- After selecting your options and pressing Enter, you will see the test pass either text or audio to Neon.
- The System Monitor will show available statistics such as CPU Utilization, Temperature, and Power
Note: This data is saved with test results.
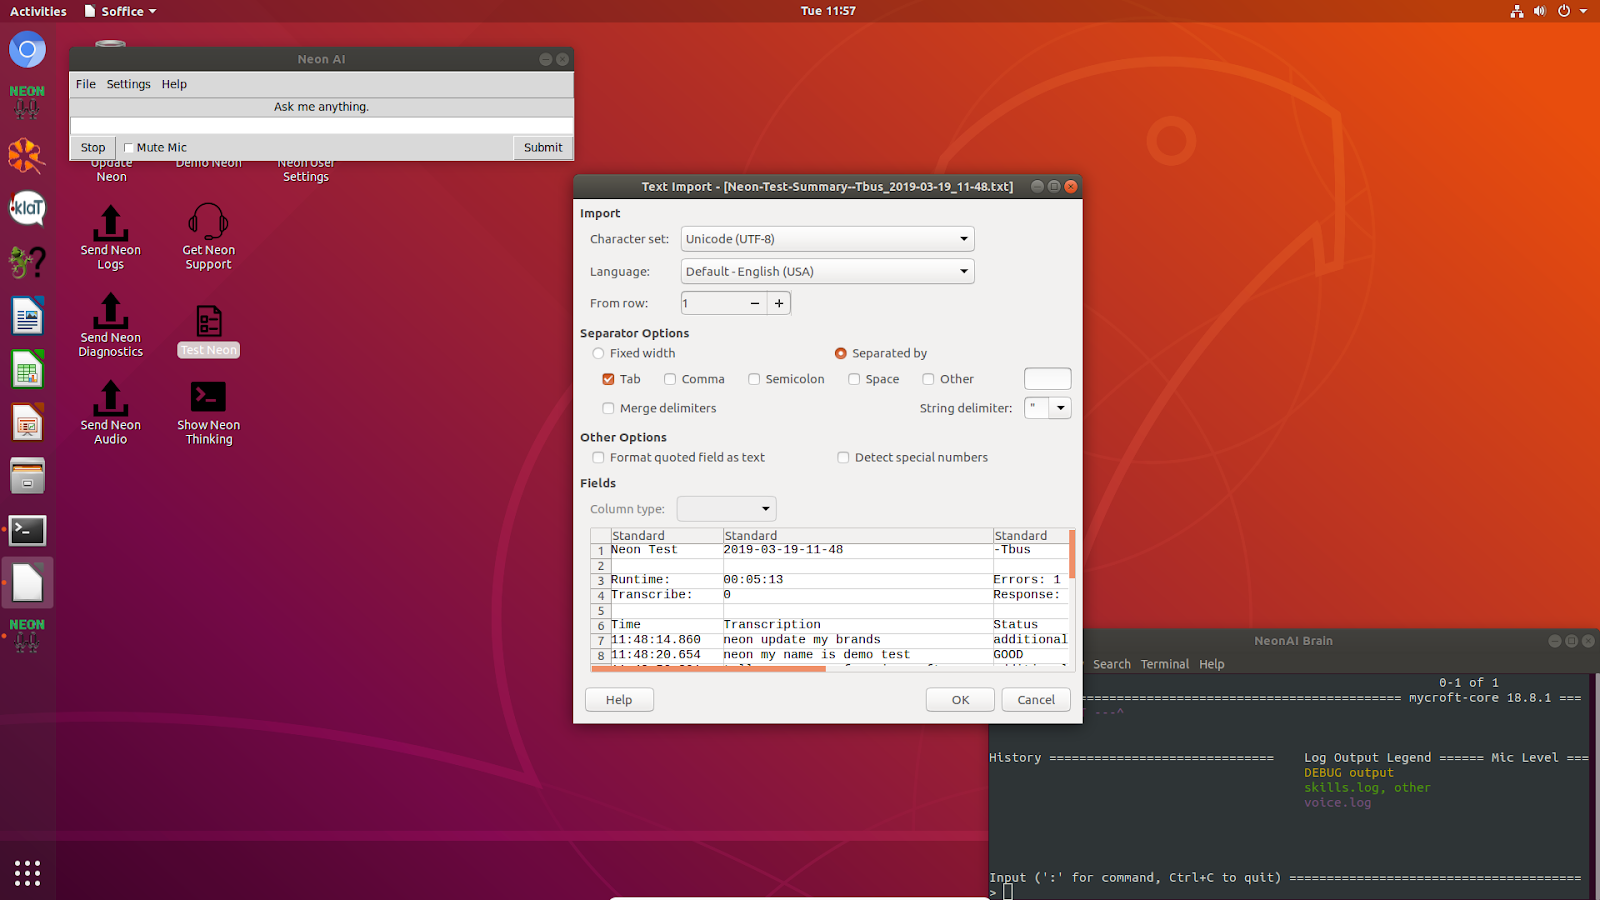
- After the tests have completed, Neon will restart and you will see an option to review test results. The results are saved as Tab separated values, so make sure only the Tab option is selected.
- More complete logs and information can be found in the Diagnostics directory.
By default, this is at ~NeonAIDiagnosticstesting for Development Machines and ~DocumentsNeonGeckoDiagnosticstesting for User Machines.

b. Troubleshooting
If you encounter any of the following issues while using Neon, please try these troubleshooting steps:
- My computer is slow to respond
- Check for high memory usage in System Monitor. If your Memory and Swap both show 100% utilization under Resources, try exiting PyCharm and Neon AI.
If there is still abnormal memory usage, open a Terminal and type in:
sudo systemctl stop openhab2.service - If you can determine the offending program, see if restarting the program or your computer resolves your issues. If not, you may find common solutions online.
- Check for high memory usage in System Monitor. If your Memory and Swap both show 100% utilization under Resources, try exiting PyCharm and Neon AI.
- Neon AI is not transcribing anything I say
- Check that your microphone is working and active by going to Sound the Settings Menu. Go to the Input tab and make sure the correct microphone is selected. Make sure the Input Level is up and turned on and look for activity on the Input Level bar when you tap the mic. If you change devices here, restart Neon AI.
- Some audio is very quiet, while other audio is louder
- Check that the audio level for the affected application is turned up by going to Sound the Settings Menu. Go to the Applications tab.
- For quiet responses from Neon, ask Neon something with a longer response (ex. “Tell me a joke”). When an application named neon-voice appears, make sure it is not muted and that the volume is set to the maximum. Do the same for any other applications that are too quiet; start playing something and check the Application’s volume.
- AVMusic will not pause or resume
- If AVMusic playback is changed by something other than Neon, the skill can lose track of whether something is playing or paused. If something is paused and Neon will not resume, you may say “pause” to resume playback. “Stop” should work in any case.
- Any other issues
- If you encounter any other issues while using Neon, they can often be solved by restarting Neon or your computer. If this does not resolve you issue, please contact support at info@neongecko.com.
6. Making Changes
After completing setup and testing, you are ready to begin making changes and creating skills. An example workflow for making a change would be:
- Make any changes to the core or skills
- Test changes in the Developer Environment (Look for errors in logs, unexpected behaviour, etc)
- Run Test Neon to check that all skills and TTS/STT behave as expected
- Update NGI/temp/*.version to reflect new version (YYYY-MM-DD.version)
- Commit and Push changes to git
- Check for updates in User Environment
- Run complete tests using Test Neon
- Check logs for any errors
a. System Overview
The Neon AI system consists of two main components: the core, and the skills. The core provides the framework of speech transcription, intent matching, text to speech, and the associated services. The skills provide the functionality of doing some processing according to a message provided from the core; skills then return some text response that is processed into speech and played by the core.
b. Creating a Skill
Check out our three part YouTube series on how to create a skill:
1. https://youtu.be/fxg25MaxIcE
2. https://youtu.be/DVSroqv6E6k
3. https://youtu.be/R_3Q-P3pk8o
7. Getting New Neon AI Releases
Neongecko will regularly release updates to the Neon core and skills via GitHub. It is recommended that you merge these updates into your own fork so that you get the latest feature updates and bug fixes. To update your repository to the latest release:
- Go to GitHub and sign in.
- Go to the Neongecko neon-shared-core repository.
- Open a New pull request
- Click compare across forks
- Select your forked repository from the base repository drop-down on the left
- You may modify the pull request title and description (optional)
Note: All changes are displayed per file on this page. You may want to change the title for your own reference later. - Click Create pull request after you have reviewed the changes
- Click Merge pull request on the next page to finish merging the changes to your branch
- Go to the Neongecko neon-shared-skills repository and repeat the above steps to update your skills
- You are now using the latest release of Neon AI, make sure to update any installations if they are not set to update automatically
- Use the desktop shortcut Update Neon or File menu option Check for Updates to update Neon


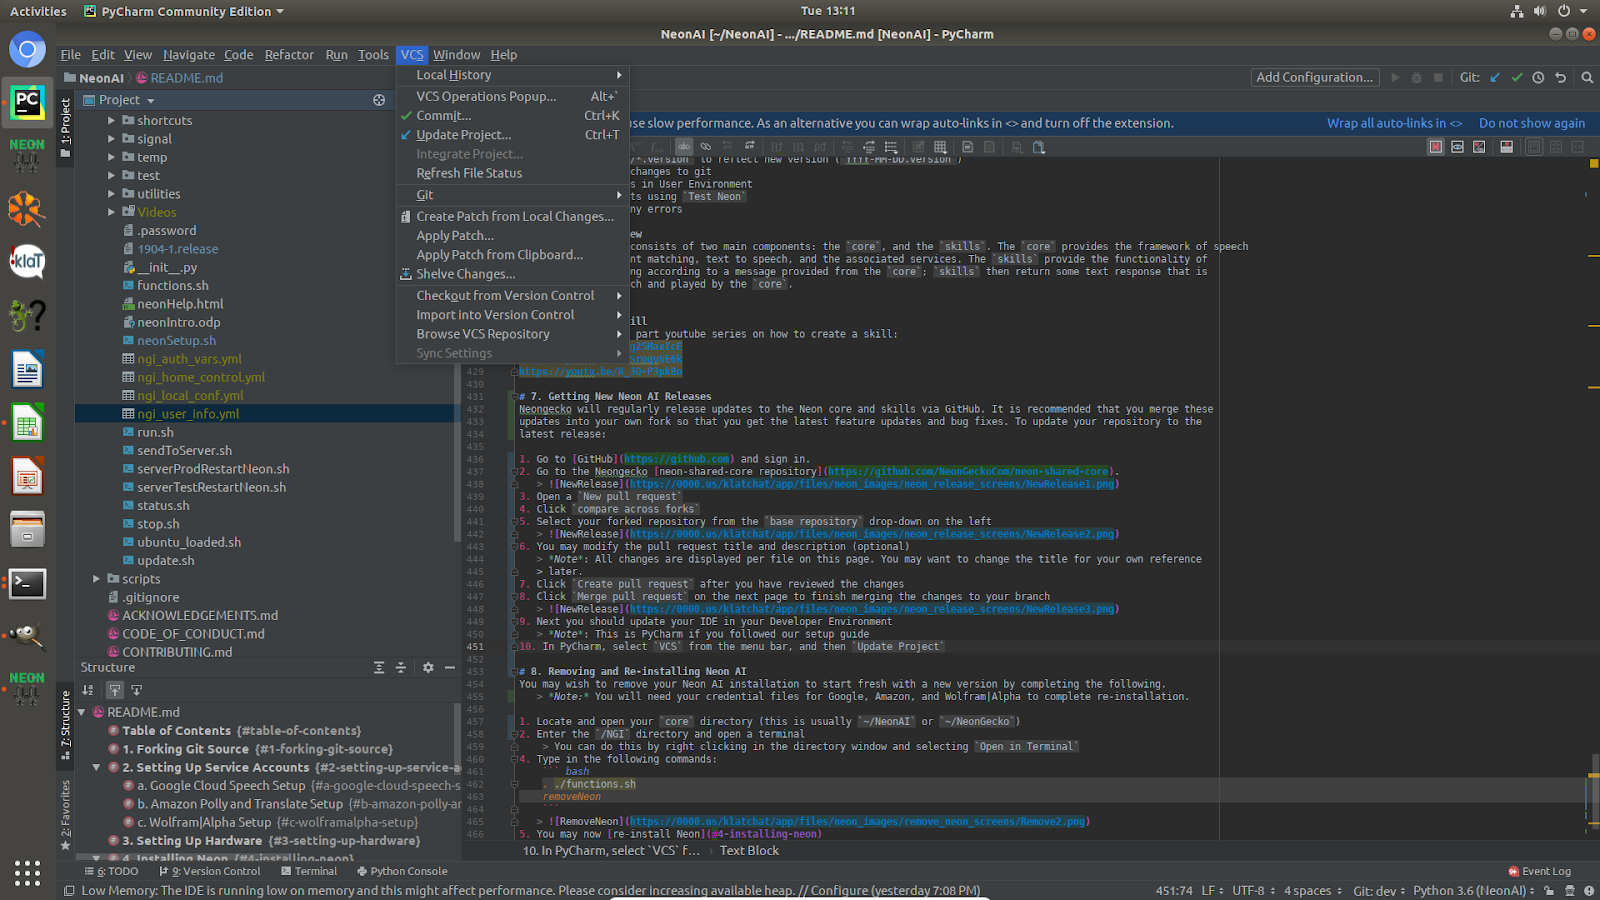
Additional Steps for Developers Using PyCharm
- Next you should update your IDE in your Developer Environmene
Note: This is PyCharm if you followed our setup guide.
- In PyCharm, select VCS from the menu bar, and then Update Project.
- You will be prompted to Update Project, you may leave the default settings and click OK.

8. Removing and Re-installing Neon AI
You may wish to remove your Neon AI installation to start fresh with a new version by completing the following.
Note: You will need your credential files for Google, Amazon, and Wolfram|Alpha to complete re-installation.
- Locate and open your core directory (this is usually ~/NeonAI or ~/NeonGecko)
- Enter the /NGI directory and open a terminal
You can do this by right clicking in the directory window and selecting Open in Terminal
Type in the following commands:
. ./functions.sh
removeNeon
-
You may be prompted to remove diagnostics files during this process. You may wish to back these up or leave them; if not, press y to remove each directory until setup is complete.
- You may now re-install Neon
